XiNiHa

@xiniha@hackers.pub · 79 following · 89 followers

GitHub
@XiNiHa
Bluesky
@xiniha.dev
Twitter
@xiniha_1e88df

Hackers' Pub에서는 현재 PostgreSQL 드라이버로 Postgres.js를 쓰고 있는데, 문제는 이 드라이버가 OpenTelemetry 지원하지 않는다… 수동으로라도 계측 코드를 짜려면 훅이 필요한데, 훅 API도 들어올 예정이 없다.

그래서 PostgreSQL 드라이버를 아예 node-postgres로 바꿀까 싶기도 한데, 이미 @fedify/postgres 패키지가 Postgres.js에 의존을 하고 있기 때문에 한 애플리케이션에서 두 종류의 드라이버를 쓰는 꼴이 된다. 음, 아무래도 상관 없으려나?

1

그 동안에는 Mastodon 등 다른 연합우주 인스턴스에서 앙케트를 만들면 Hackers' Pub에서는 앙케트의 선택지가 보이지도 않고 참여할 수도 없었는데요, 이제 Hackers' Pub에서도 앙케트(poll)에 참여할 수 있게 되었습니다. 다만, 아직 Hackers' Pub에서 새 앙케트를 만드는 기능은 구현되지 않았습니다. 새 앙케트를 만드는 기능은 필요하다는 의견이 많으면 구현하도록 하겠습니다. 언제나 같은 패턴이지만, UI 만드는 게 힘들어서요. 😅

3

저도 두 가지 쟁점 모두 동의하는 편입니다. 그리고, 별개의 이야기입니다만, $가르칠 때에는 그냥 문법이라고 가르치는 게 학습자의 이해와 응용이 압도적으로 빠르고 좋았습니다.

"이건 여기서부터 뒤로는 다 괄호로 감싸겠다는 뜻이라고 생각하세요."

이러면 한 방에 설명이 끝나고, 필요성이나 편리성에 대해서도 알아서들 납득하는 것이죠. 연산자 우선순위나 좌결합 우결합 등은 그게 되고 나서 얘기하고요. 그러면 "아, 이게 그래서 이렇게 되는 거였군요?" 하면서, 훨씬 쉽게 이해합니다. 이걸 거꾸로 좌결합 우결합 어쩌고부터 가르치려고 하면 다들 꾸벅꾸벅 졸아요... ㅋㅋ ㅠㅠ

(결국 "모나드란 무엇인가"부터 배우면/가르치면 안 된다는 주장과 같은 맥락입니다.)


RE: https://hackers.pub/@bgl/01963c3b-98fa-7432-a62f-0d2dfc0691bf

5

지금까지 Hackers' Pub은 반드시 이메일을 통해 로그인 링크를 수신하는 식으로만 로그인이 가능했는데, 사실은 많이 번거로웠죠?

이를 해결하기 위해 Hackers' Pub에 패스키 기능을 추가했습니다. 패스키 추가는 설정패스키 페이지에서 할 수 있으며, 패스키가 등록된 기기 및 브라우저에서는 로그인 페이지에서 자동적으로 패스키를 사용할 것인지 묻는 창이 뜨게 됩니다.

Hackers' Pub의 패스키 설정 페이지. 위쪽에는 패스키 등록을 위한 폼이, 아래쪽에는 등록된 패스키를 나열한 표가 보인다.Hackers' Pub의 로그인 페이지. 우측 상단에 패스키를 사용하여 로그인할 것인지 묻는 창이 보인다.
9
0
3

XiNiHa shared the below article:

Ditch the DIY Drama: Why Use Fedify Instead of Building ActivityPub from Scratch?

洪 民憙 (Hong Minhee) @hongminhee@hackers.pub

So, you're captivated by the fediverse—the decentralized social web powered by protocols like ActivityPub. Maybe you're dreaming of building the next great federated app, a unique space connected to Mastodon, Lemmy, Pixelfed, and more. The temptation to dive deep and implement ActivityPub yourself, from the ground up, is strong. Total control, right? Understanding every byte? Sounds cool!

But hold on a sec. Before you embark on that epic quest, let's talk reality. Implementing ActivityPub correctly isn't just one task; it's like juggling several complex standards while riding a unicycle… blindfolded. It’s hard.

That's where Fedify comes in. It's a TypeScript framework designed to handle the gnarliest parts of ActivityPub development, letting you focus on what makes your app special, not reinventing the federation wheel.

This post will break down the common headaches of DIY ActivityPub implementation and show how Fedify acts as the super-powered pain reliever, starting with the very foundation of how data is represented.

Challenge #1: Data Modeling—Speaking ActivityStreams & JSON-LD Fluently

At its core, ActivityPub relies on the ActivityStreams 2.0 vocabulary to describe actions and objects, and it uses JSON-LD as the syntax to encode this vocabulary. While powerful, this combination introduces significant complexity right from the start.

First, understanding and correctly using the vast ActivityStreams vocabulary itself is a hurdle. You need to model everything—posts (Note, Article), profiles (Person, Organization), actions (Create, Follow, Like, Announce)—using the precise terms and properties defined in the specification. Manual JSON construction is tedious and prone to errors.

Second, JSON-LD, the encoding layer, has specific rules that make direct JSON manipulation surprisingly tricky:

  • Missing vs. Empty Array: In JSON-LD, a property being absent is often semantically identical to it being present with an empty array. Your application logic needs to treat these cases equally when checking for values. For example, these two Note objects mean the same thing regarding the name property:
    // No name property
    {
      "@context": "https://www.w3.org/ns/activitystreams",
      "type": "Note",
      "content": ""
    }
    // Equivalent to:
    {
      "@context": "https://www.w3.org/ns/activitystreams",
      "type": "Note",
      "name": [],
      "content": ""
    }
  • Single Value vs. Array: Similarly, a property holding a single value directly is often equivalent to it holding a single-element array containing that value. Your code must anticipate both representations for the same meaning, like for the content property here:
    // Single value
    {
      "@context": "https://www.w3.org/ns/activitystreams",
      "type": "Note",
      "content": "Hello"
    }
    // Equivalent to:
    {
      "@context": "https://www.w3.org/ns/activitystreams",
      "type": "Note",
      "content": ["Hello"]
    }
  • Object Reference vs. Embedded Object: Properties can contain either the full JSON-LD object embedded directly or just a URI string referencing that object. Your application needs to be prepared to fetch the object's data if only a URI is given (a process called dereferencing). These two Announce activities are semantically equivalent (assuming the URIs resolve correctly):
    {
      "@context": "https://www.w3.org/ns/activitystreams",
      "type": "Announce",
      // Embedded objects:
      "actor": {
        "type": "Person",
        "id": "http://sally.example.org/",
        "name": "Sally"
      },
      "object": {
        "type": "Arrive",
        "id": "https://sally.example.com/arrive",
        /* ... */
      }
    }
    // Equivalent to:
    {
      "@context":
      "https://www.w3.org/ns/activitystreams",
      "type": "Announce",
      // URI references:
      "actor": "http://sally.example.org/",
      "object": "https://sally.example.com/arrive"
    }

Attempting to manually handle all these vocabulary rules and JSON-LD variations consistently across your application inevitably leads to verbose, complex, and fragile code, ripe for subtle bugs that break federation.

Fedify tackles this entire data modeling challenge with its comprehensive, type-safe Activity Vocabulary API. It provides TypeScript classes for ActivityStreams types and common extensions, giving you autocompletion and compile-time safety. Crucially, these classes internally manage all the tricky JSON-LD nuances. Fedify's property accessors present a consistent interface—non-functional properties (like tags) always return arrays, functional properties (like content) always return single values or null. It handles object references versus embedded objects seamlessly through dereferencing accessors (like activity.getActor()) which automatically fetch remote objects via URI when needed—a feature known as property hydration. With Fedify, you work with a clean, predictable TypeScript API, letting the framework handle the messy details of AS vocabulary and JSON-LD encoding.

Challenge #2: Discovery & Identity—Finding Your Actors

Once you can model data, you need to make your actors discoverable. This primarily involves the WebFinger protocol (RFC 7033). You'd need to build a server endpoint at /.well-known/webfinger capable of parsing resource queries (like acct: URIs), validating the requested domain against your server, and responding with a precisely formatted JSON Resource Descriptor (JRD). This JRD must include specific links, like a self link pointing to the actor's ActivityPub ID using the correct media type. Getting any part of this wrong can make your actors invisible.

Fedify simplifies this significantly. It automatically handles WebFinger requests based on the actor information you provide through its setActorDispatcher() method. Fedify generates the correct JRD response. If you need more advanced control, like mapping user-facing handles to internal identifiers, you can easily register mapHandle() or mapAlias() callbacks. You focus on defining your actors; Fedify handles making them discoverable.

// Example: Define how to find actors
federation.setActorDispatcher(
  "/users/{username}",
  async (ctx, username) => { /* ... */ }
);
// Now GET /.well-known/webfinger?resource=acct:username@your.domain just works!

Challenge #3: Core ActivityPub Mechanics—Handling Requests and Collections

Serving actor profiles requires careful content negotiation. A request for an actor's ID needs JSON-LD for machine clients (Accept: application/activity+json) but HTML for browsers (Accept: text/html). Handling incoming activities at the inbox endpoint involves validating POST requests, verifying cryptographic signatures, parsing the payload, preventing duplicates (idempotency), and routing based on activity type. Implementing collections (outbox, followers, etc.) with correct pagination adds another layer.

Fedify streamlines all of this. Its core request handler (via Federation.fetch() or framework adapters like @fedify/express) manages content negotiation. You define actors with setActorDispatcher() and web pages with your framework (Hono, Express, SvelteKit, etc.)—Fedify routes appropriately. For the inbox, setInboxListeners() lets you define handlers per activity type (e.g., .on(Follow, ...)), while Fedify automatically handles validation, signature verification, parsing, and idempotency checks using its KV Store. Collection implementation is simplified via dispatchers (e.g., setFollowersDispatcher()); you provide logic to fetch a page of data, and Fedify constructs the correct Collection or CollectionPage with pagination.

// Define inbox handlers
federation.setInboxListeners("/inbox", "/users/{handle}/inbox")
  .on(Follow, async (ctx, follow) => { /* Handle follow */ })
  .on(Undo, async (ctx, undo) => { /* Handle undo */ });

// Define followers collection logic
federation.setFollowersDispatcher(
  "/users/{handle}/followers",
  async (ctx, handle, cursor) => { /* ... */ }
);

Challenge #4: Reliable Delivery & Asynchronous Processing—Sending Activities Robustly

Sending an activity requires more than a simple POST. Networks fail, servers go down. You need robust failure handling and retry logic (ideally with backoff). Processing incoming activities synchronously can block your server. Efficiently broadcasting to many followers (fan-out) requires background processing and using shared inboxes where possible.

Fedify addresses reliability and scalability using its MessageQueue abstraction. When configured (highly recommended), Context.sendActivity() enqueues delivery tasks. Background workers handle sending with automatic retries based on configurable policies (like outboxRetryPolicy). Fedify supports various queue backends (Deno KV, Redis, PostgreSQL, AMQP). For high-traffic fan-out, Fedify uses an optimized two-stage mechanism to distribute the load efficiently.

// Configure Fedify with a persistent queue (e.g., Deno KV)
const federation = createFederation({
  queue: new DenoKvMessageQueue(/* ... */),
  // ...
});
// Sending is now reliable and non-blocking
await ctx.sendActivity({ handle: "myUser" }, recipient, someActivity);

Challenge #5: Security—Avoiding Common Pitfalls

Securing an ActivityPub server is critical. You need to implement HTTP Signatures (draft-cavage-http-signatures-12) for server-to-server authentication—a complex process. You might also need Linked Data Signatures (LDS) or Object Integrity Proofs (OIP) based on FEP-8b32 for data integrity and compatibility. Managing cryptographic keys securely is essential. Lastly, fetching remote resources risks Server-Side Request Forgery (SSRF) if not validated properly.

Fedify is designed with security in mind. It automatically handles the creation and verification of HTTP Signatures, LDS, and OIP, provided you supply keys via setKeyPairsDispatcher(). It includes key management utilities. Crucially, Fedify's default document loader includes built-in SSRF protection, blocking requests to private IPs unless explicitly allowed.

Challenge #6: Interoperability & Maintenance—Playing Nicely with Others

The fediverse is diverse. Different servers have quirks. Ensuring compatibility requires testing and adaptation. Standards evolve with new Federation Enhancement Proposals (FEPs). You also need protocols like NodeInfo to advertise server capabilities.

Fedify aims for broad interoperability and is actively maintained. It includes features like ActivityTransformers to smooth over implementation differences. NodeInfo support is built-in via setNodeInfoDispatcher().

Challenge #7: Developer Experience—Actually Building Your App

Beyond the protocol, building any server involves setup, testing, and debugging. With federation, debugging becomes harder—was the message malformed? Was the signature wrong? Is the remote server down? Is it a compatibility quirk? Good tooling is essential.

Fedify enhances the developer experience significantly. Being built with TypeScript, it offers excellent type safety and editor auto-completion. The fedify CLI is a powerful companion designed to streamline common development tasks.

You can quickly scaffold a new project tailored to your chosen runtime and web framework using fedify init.

For debugging interactions and verifying data, fedify lookup is invaluable. It lets you inspect how any remote actor or object appears from the outside by performing WebFinger discovery and fetching the object's data. Fedify then displays the parsed object structure and properties directly in your terminal. For example, running:

$ fedify lookup @fedify-example@fedify-blog.deno.dev

Will first show progress messages and then output the structured representation of the actor, similar to this:

// Output of fedify lookup command (shows parsed object structure)
Person {
  id: URL "https://fedify-blog.deno.dev/users/fedify-example",
  name: "Fedify Example Blog",
  published: 2024-03-03T13:18:11.857Z, // Simplified timestamp
  summary: "This blog is powered by Fedify, a fediverse server framework.",
  url: URL "https://fedify-blog.deno.dev/",
  preferredUsername: "fedify-example",
  publicKey: CryptographicKey {
    id: URL "https://fedify-blog.deno.dev/users/fedify-example#main-key",
    owner: URL "https://fedify-blog.deno.dev/users/fedify-example",
    publicKey: CryptoKey { /* ... CryptoKey details ... */ }
  },
  // ... other properties like inbox, outbox, followers, endpoints ...
}

This allows you to easily check how data is structured or troubleshoot why an interaction might be failing by seeing the actual properties Fedify parsed.

Testing outgoing activities from your application during development is made much easier with fedify inbox. Running the command starts a temporary local server that acts as a publicly accessible inbox, displaying key information about the temporary actor it creates for receiving messages:

$ fedify inbox
✔ The ephemeral ActivityPub server is up and running: https://<unique_id>.lhr.life/
✔ Sent follow request to @<some_test_account>@activitypub.academy.
╭───────────────┬─────────────────────────────────────────╮
│ Actor handle: │ i@<unique_id>.lhr.life                  │
├───────────────┼─────────────────────────────────────────┤
│   Actor URI:  │ https://<unique_id>.lhr.life/i          │
├───────────────┼─────────────────────────────────────────┤
│  Actor inbox: │ https://<unique_id>.lhr.life/i/inbox    │
├───────────────┼─────────────────────────────────────────┤
│ Shared inbox: │ https://<unique_id>.lhr.life/inbox      │
╰───────────────┴─────────────────────────────────────────╯

Web interface available at: http://localhost:8000/

You then configure your developing application to send an activity to the Actor inbox or Shared inbox URI provided. When an activity arrives, fedify inbox only prints a summary table to your console indicating that a request was received:

╭────────────────┬─────────────────────────────────────╮
│     Request #: │ 2                                   │
├────────────────┼─────────────────────────────────────┤
│ Activity type: │ Follow                              │
├────────────────┼─────────────────────────────────────┤
│  HTTP request: │ POST /i/inbox                       │
├────────────────┼─────────────────────────────────────┤
│ HTTP response: │ 202                                 │
├────────────────┼─────────────────────────────────────┤
│       Details  │ https://<unique_id>.lhr.life/r/2    │
╰────────────────┴─────────────────────────────────────╯

Crucially, the detailed information about the received request—including the full headers (like Signature), the request body (the Activity JSON), and the signature verification status—is only available in the web interface provided by fedify inbox. This web UI allows you to thoroughly inspect incoming activities during development.

Screenshot of the Fedify Inbox web interface showing received activities and their details.
The Fedify Inbox web UI is where you view detailed activity information.

When you need to test interactions with the live fediverse from your local machine beyond just sending, fedify tunnel can securely expose your entire local development server temporarily. This suite of tools significantly eases the process of building and debugging federated applications.

Conclusion: Build Features, Not Plumbing

Implementing the ActivityPub suite of protocols from scratch is an incredibly complex and time-consuming undertaking. It involves deep dives into multiple technical specifications, cryptographic signing, security hardening, and navigating the nuances of a diverse ecosystem. While educational, it dramatically slows down the process of building the actual, unique features of your federated application.

Fedify offers a well-architected, secure, and type-safe foundation, handling the intricacies of federation for you—data modeling, discovery, core mechanics, delivery, security, and interoperability. It lets you focus on your application's unique value and user experience. Stop wrestling with low-level protocol details and start building your vision for the fediverse faster and more reliably. Give Fedify a try!

Getting started is straightforward. First, install the Fedify CLI using your preferred method. Once installed, create a new project template by running fedify init your-project-name.

Check out the Fedify tutorials and Fedify manual to learn more. Happy federating!

Read more →
13
0
3

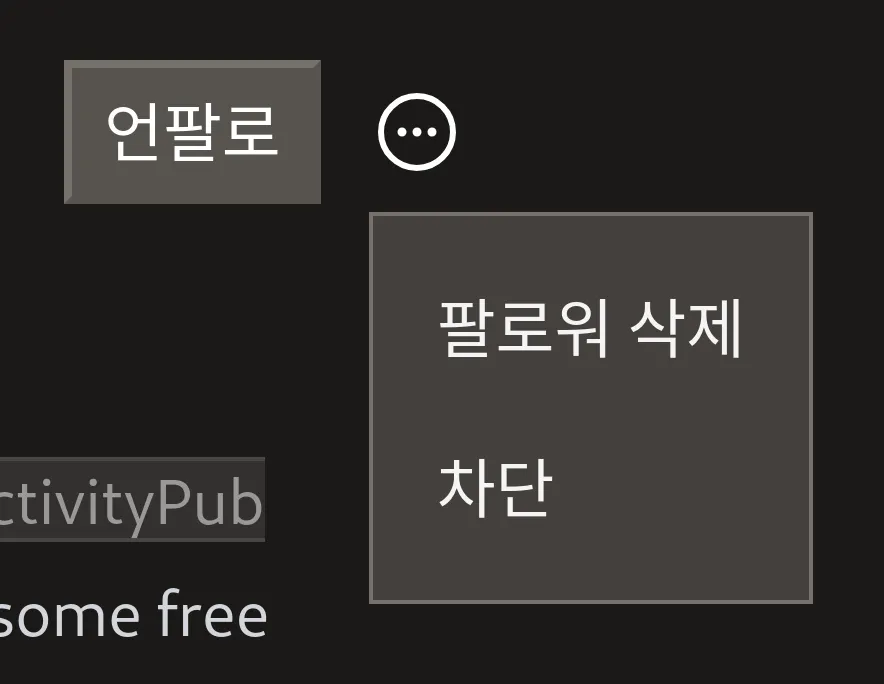
드디어 @xtjuxtapose 님이 기다리시던 차단 기능이 구현되었습니다. 차단할 사용자의 프로필 페이지에 가서 팔로·언팔로 버튼 오른쪽에 보이는 말줄임표 아이콘에 마우스 커서를 갖다 대면 (모바일에서는 터치하면) 상세 메뉴가 나오는데, 그 안에 팔로워 삭제 버튼과 차단 버튼이 생겼습니다.

ActivityPub 프로토콜 수준에서는 차단은 Block 액티비티를 차단한 액터에게 보내며, 차단을 해제할 경우 Undo(Block) 액티비티를 보냅니다. 그러나, 그 액티비티를 받은 인스턴스의 구현이 차단한 사용자의 콘텐츠를 볼 수 없도록 막지 않을 수도 있습니다…만, 실질적으로는 모든 구현이 막고 있습니다. 아, 당연하지만 차단은 자동적으로 상호 언팔로를 수행합니다. 차단을 해제하더라도 풀렸던 팔로 관계는 자동적으로 회복되지 않습니다.

언팔로 버튼 오른쪽에 말줄임표 모양의 아이콘이 보이며, 그 아래 드롭다운 메뉴가 보인다. 드롭다운 메뉴에는 팔로워 삭제 버튼과 차단 버튼이 보인다.
12

개인적으로는 k8s쓰는 가장 큰 이유는 개발자 복지라고 생각한다. 적정기술만 쓰면 대부분의 사람들은 뭔가를 실 서비스에서 경험할 기회를 잃어버린다. 아니 이건 됐고…

온프레미스 클러스터 오퍼레이션 부담이나 EKS같은 서비스의 사용료 걱정만 없다면 쓰는게 무조건 낫다고 생각한다.

일단 k8s뿐만 아니라 컨테이너/머신 오케스트레이션의 세계에서 앱과 머신은 좀 더 잘 죽어도되는 존재가 된다. (물론 stateful한 호스트와 앱을 최대한 stateless하게 하거나, 상태를 분리하여 격리시켜야 하긴 한다)

그러면 docker-compose로 충분하지 않느냐 말할 사람도 있겠지만 처음에야 docker-compose 쓰는거나 k8s 쓰는거나 그게 그거지만(오히려 k8s가 성가실것이다) 마이그레이션의 때가 오면 난 그걸 감당할 자신이 없다.

물론 자신만의 가볍고 쏙 맘에드는 솔루션을 고집할 사람도 있을텐데… 난 남들이 다 쓰는거 쓰는게 편하다.

4
1

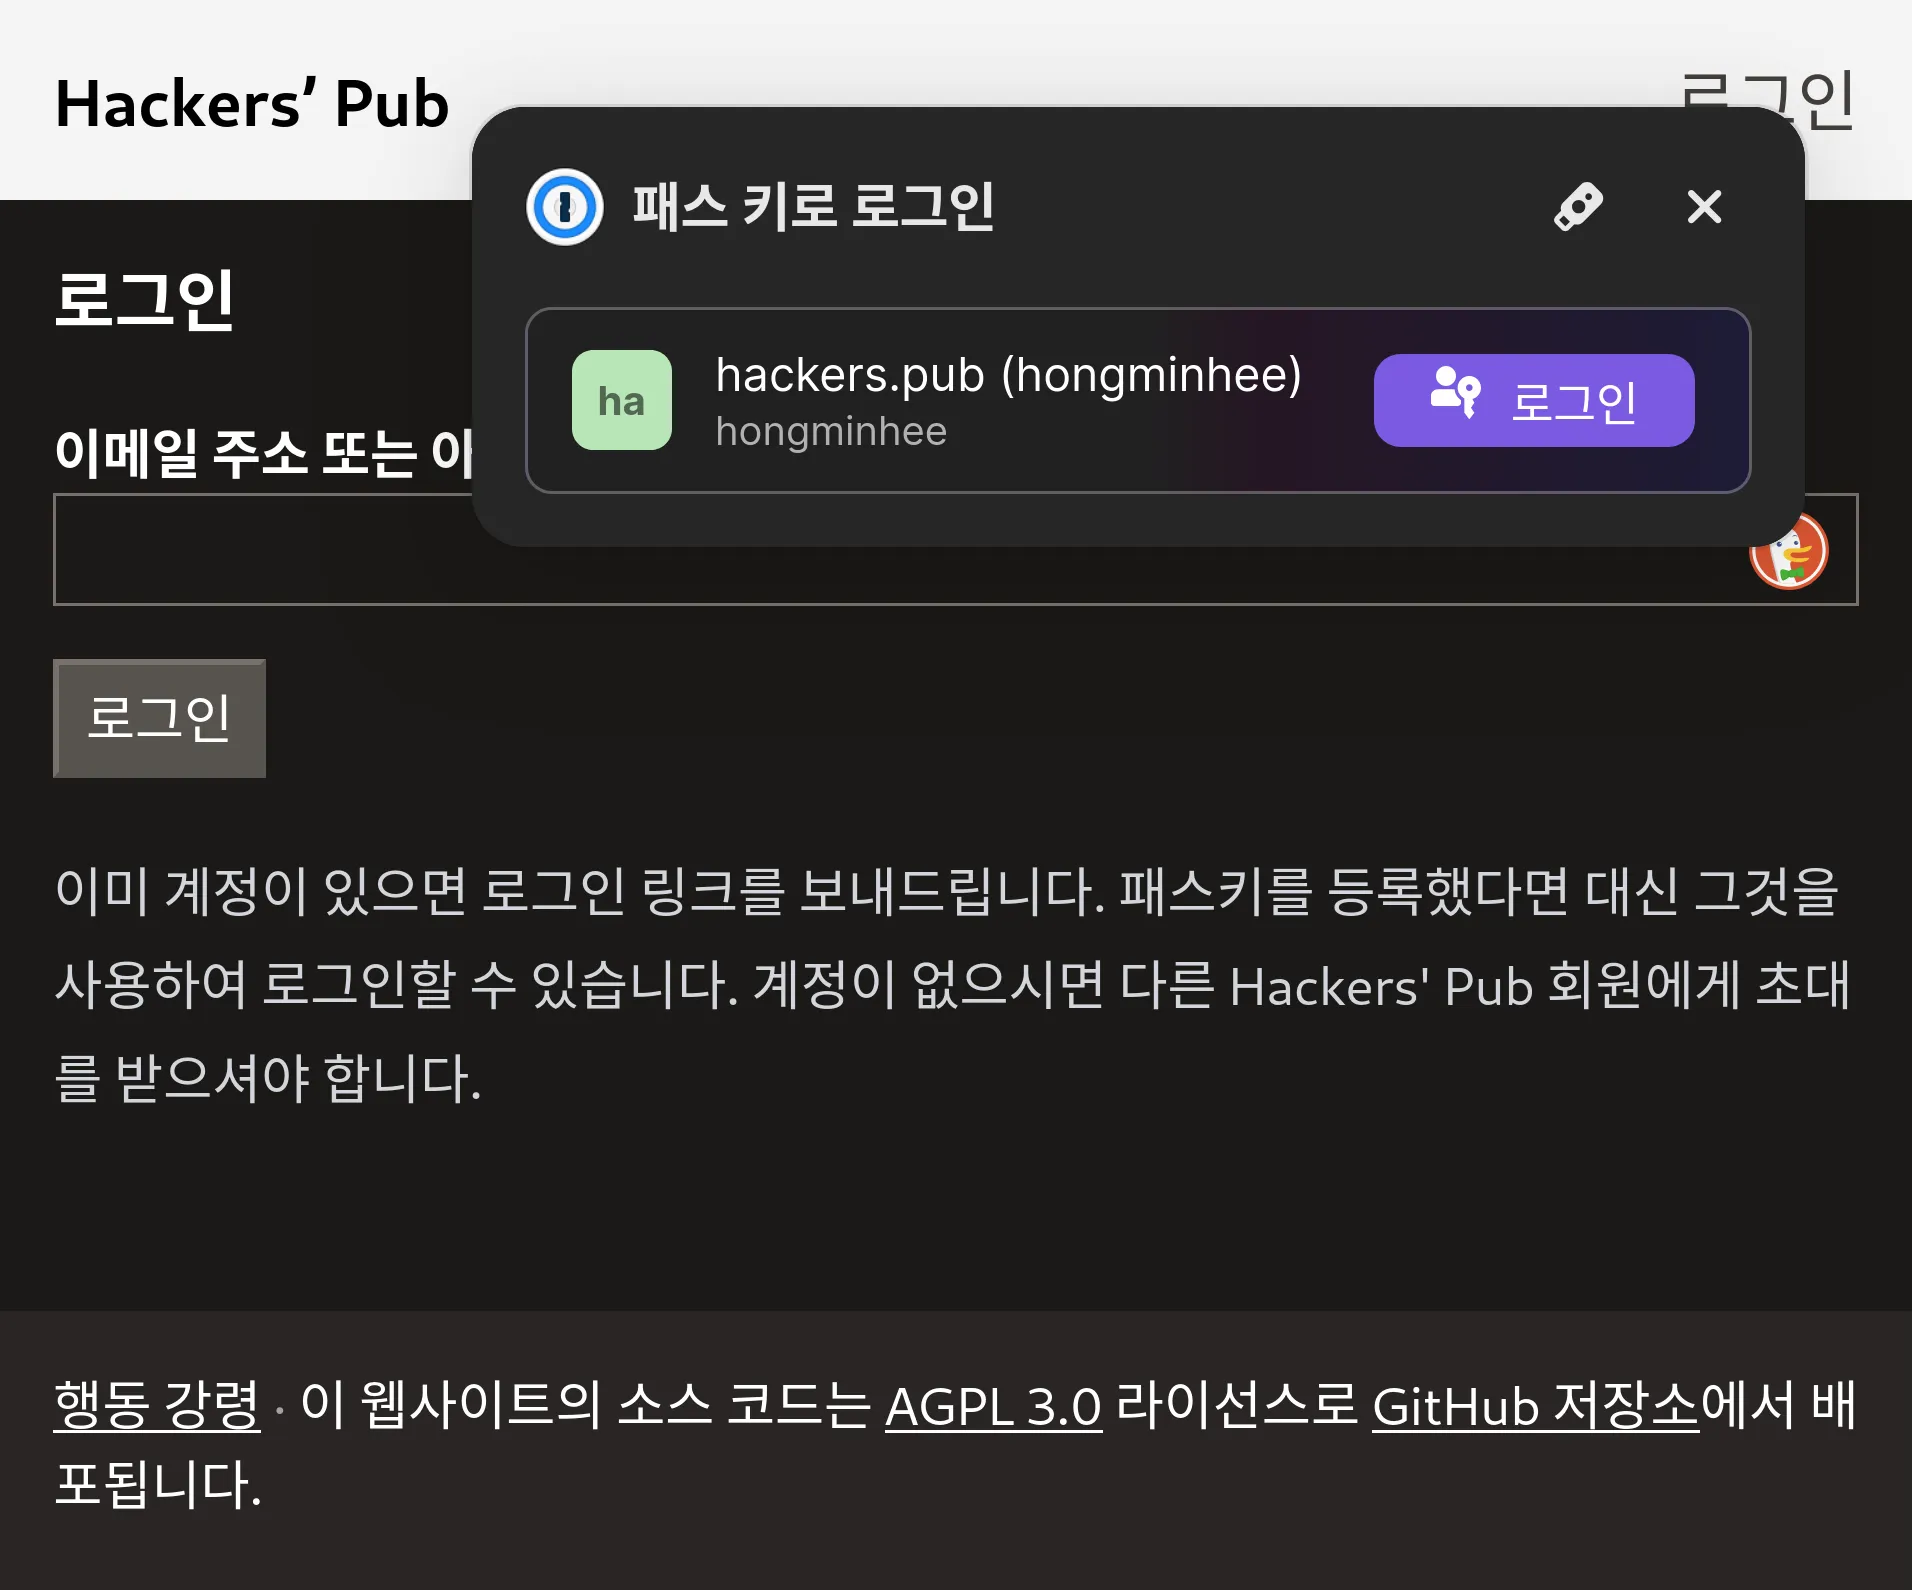
패디버스 앱으로서 해커스펍이 누릴 수 있는 기능 중 하나가 Remote Follow인데, 이건 다른 페디버스 앱에서도 마찬가지로 이런 기능이라는게 있다는걸 알지 못하는 경우가 많다. 새로 진입하는 분들 타겟으로 카드뉴스 같은거라도 만들어야 하나...... 라는 생각이 문득 들었다.

좋은 기능이 있어도 설명이 필요하다는 것 자체가 성공한 UX는 아닌 것 같은데, 이게 구조 상 어쩔 수 없이 생기는 문제인건가 싶기도 하고

4

2025() 오픈소스 컨트리뷰션 아카데미 參與型(참여형) 멘토() 募集(모집) 公告(공고)가 떴다. Fedify 프로젝트의 메인테이너로서 멘토()志願(지원)하고자 한다. 志願書(지원서).hwp 파일이기에 큰 맘 먹고 한컴오피스 한글 for Mac도 購入(구입)했다. (아무래도 앞으로 .hwp 파일 다룰 일이 많을 것 같다는 豫感(예감)이 들어서…)

6

Hackers' Pub에 차단 기능을 만들다 보니 일단 모델 쪽에서 팔로워 삭제 기능이 필요하다는 것을 깨달았다. 즉시 하던 작업 다 git stash하고 팔로워 삭제 먼저 만드는 중… (하지만 UI로 노출하는 건 나중에 할 생각.)

UI로 노출하는 건 나중에 만드려고 했지만, 어차피 테스트도 해야 해서 UI로도 노출했습니다. 자신의 팔로워 목록 페이지에 가시면 각 팔로워마다 오른쪽 위에 X 모양 아이콘이 생겼을 겁니다. 그걸 누르면 팔로워를 삭제할 수 있습니다. (X로 치면 “블언블”한 효과.)

3

협업을 할 때 미묘하게 거슬리는 것들\ldots

  • 텍스트 파일의 마지막 줄 완성 안 하기 Posix 표준 기준으로 각 줄은 새줄 문자(line feed, '\n')로 끝나야 하며, 마지막 줄도 예외는 아님
  • 그리고 위의 일이 주기적으로 재발할 때\ldots
7

쿠버네티스는 컴포즈만으로는 할 수 없는 HA (네트워킹 포함) 까지 책임져주는 솔루션 중 de-facto 라서 쓴다고 생각해요

앵간한 상황 다 대응되고

복잡하고 어려운 이유는 "앵간한 상황 다 대응"되기 때문이 아닐까 싶음... 컨테이너만 띄울거면 이렇게 복잡해질 이유가 없었음 - 사실 그 부분만 보면 컴포즈랑 비슷하기도 하고

2

GeekNews의 〈소프트웨어 엔지니어로 산다는 건 미친 짓이야〉 주제에 @youknowone 님께서 쓰신 좋은 댓글:

소프트웨어 개발이 어려운 일이라는 사람들은 본인이 그 일을 하는 이유가 뭘까요? 고되고 힘든 일이지만 보람있는 일이라서 하시나요? 이 업계에서 그런 분들은 그리 많지는 않았던 것 같습니다. 남들이 못하는 것 같으니까 어렵다고 주장하는거지, 실상은 그게 본인한테 가장 쉬운 일이니까 하시는 것 아닌가요? 남들이 좀 띄워준다고 자화자찬하면서 나만 특별한 양 여기면서 눈을 가리지 말고 주위를 봐야합니다. 이공계에서 어떤 분야가 방구석에서 인터넷 좀 보고 독학한다고 (잘 하면) 몇달만에 현업에 투입할 수 있는 전문가가 됩니까?

(…중략…)

물론 남들이 가지지 못한 훌륭한 손재주를 가진 사람은 존중받아 마땅하지만, 약간의 손재주를 연마했다고 해서 소싯적 배워둔 손재주로 평생 먹고 살면 좋을텐데 왜 그럴수 없을까, 나는 이런 훌륭한 손재주를 가졌는데 다른 사람들처럼 힘들게 일하지 않아야 하는 것 아닐까, 나는 남들은 쉽게 하지 못하는 대단한 재능을 가진 것이 아닐까 등등의 특별한 나에 심취하는건 교만에 가까운 일이 아닐까 합니다.

8
0
0

PostgreSQL에서는 GENERATED ALWAYS AS 절을 통해 생성된 칼럼을 지원하는데, 이게 간단한 사칙연산이나 문자열 연결 정도는 쉽게 가능하지만, 이 안에서 서브쿼리를 쓸 수 없기 때문에 조금만 복잡한 계산도 할 수가 없다. 나 같은 경우에는 {"foo": 1, "bar": 2, "baz": 3}과 같은 jsonb 값이 있을 때 이로부터 6과 같은 합산을 해야 하는 상황인데, sum() 같은 집계 함수를 쓸 수 없기 때문에 원하는 동작을 만들어 내지 못한다… 최후의 카드로 커스텀 함수 정의해서 쓰는 방법이 있긴 한데… 음…

2

메타적인 얘기지만, 저는 오늘 “Kubernetes는 적정 기술인가?”라는 떡밥이 Hackers' Pub 내부적으로 발생했다는 사실이 아주 기쁩니다. 여태까지는 Hackers' Pub 자체에 대한 떡밥이거나, GeekNews나 X에서 넘어온 떡밥이었거든요.

12
0

저, 저도 90% 이상의 경우 도커 컴포즈 정도가 적당한 추상화 수준이라고 생각해요...

실제로 쿠버네티스 쓰는 팀에서 일해 본 경험도 그렇고, 주변 이야기 들어 봐도 그렇고, 도입하면 도입한 것으로 인해 증가하는 엔지니어링 코스트가 분명히 있다는 점은 누구도 부인하지 않는 것 같은데요. 쿠버네티스를 제대로 쓰는 것 자체도 배워야 할 것도 많고, 엔지니어가 유능해야 하고, 망치도 들여야 하고... 웬만하면 전담할 팀이 필요하지 않나 싶어요. (전담할 '사람' 한 명으로 때우기에는, 그 사람 휴가 가면 일이 마비되니까.)

엔지니어만 100명이 넘는 곳이라면 확실히 도입의 이득이 더 크겠지만, 반대로 혼자 하는 프로젝트라면 도무지 수지타산이 안 나올 것이라고 생각합니다. 따라서 쟁점은 그 손익분기점이 어디냐일 텐데... "대부분의" 서비스는 대성공하기 전까지는 도입 안 해도 되지 않나, 조심스럽게 말씀드려 봅니다. 즉 쿠버네티스가 푸는 문제는 마세라티 문제인 것이죠...

특히 클라우드 남의 컴퓨터 를 쓰지 않고 베어메탈 쓰는 경우는 더더욱...


RE: https://hackers.pub/@hongminhee/019618b4-4aa4-7a20-8e02-cd9fed50caae

5
0
2

Hackers' Pub의 에모지 반응 기능은 Mastodon의 좋아요, Misskey 계열, Pleroma 계열, kmyblue 및 Fedibird의 에모지 반응 기능과 호환됩니다. 기술적으로는 기본 에모지인 ❤️는 Like 액티비티로 표현되며 그 외 나머지 에모지는 EmojiReact 액티비티로 표현됩니다. Mastodon, kmyblue, Fedibird의 좋아요는 ❤️ 에모지 반응으로 변환됩니다 (Misskey의 동작과 유사). 또한, Misskey 계열과 달리 한 사람이 한 콘텐츠에 여러 에모지 반응을 남길 수도 있습니다 (Pleroma 계열의 동작과 유사). Hackers' Pub 사용자가 남길 수 있는 에모지 반응은 ❤️, 🎉, 😂, 😲, 🤔, 😢, 👀 이렇게 7종이며, 그 외의 에모지 및 커스텀 에모지는 보낼 수는 없고 받는 것만 됩니다.

12
14
0
0

간혹 "이모지"가 아니라 "에모지"라고 쓰는 이유에 대한 질문을 받습니다. 여기다 써 두면 앞으로 링크만 던지면 되겠지?

요약: 에모지라서 에모지라고 씁니다.

"이모지"라는 표기는 아마도 "emoji"가 "emotion"이나 "emoticon"과 관련이 있다고 생각해서 나오는 것으로 보이는데요. "emoji"와 "emoticon"은 가짜동족어(false cognate)입니다. "emoji"는 일본어 絵文字(에모지)를 영어에서 그대로 받아들여 쓰고 있는 것입니다. 심지어 구성원리도 에모+지가 아니고 에+모지(絵+文字)입니다. "emotion"과 유사해 보이는 것은 순전히 우연일 뿐, 계통적으로 전혀 아무 상관이 없습니다. "이모티콘"과 "이미지"의 합성어가 아닙니다. (그랬으면 "-ji"가 아니라 "-ge"였겠죠.)

그리고 그렇기 때문에 에모지를 에모지로 표기할 실익이 생깁니다. :), ¯\_(ツ)_/¯, ^_^ 등은 이모티콘입니다. 반면 😂는 명확히 에모지입니다.

프로그래머에게 이건 정말 중요한 구분입니다. "이모티콘을 잘 표현하는 시스템"과 "에모지를 잘 표현하는 시스템"은 전혀 다른 과제이기 때문입니다. 에모지는 "그림 문자"라는 원래 뜻 그대로, 어떤 문자 집합(예를 들어 유니코드)에서 그림 문자가 "따로 있는" 것입니다. 내부 표현이야 어떻든, 적어도 최종 렌더링에서는 별도의 글리프가 할당되는 것이 에모지입니다. "무엇이 에모지이고 무엇이 에모지가 아닌가"는 상대적으로 명확합니다(문자 집합에 규정되어 있으니까).

반면 이모티콘은 "무엇이 이모티콘인가?"부터 불명확합니다. 우선 대부분의 이모티콘은 이모티콘이 아닌 문자를 조합하여 이모티콘이 만들어지는 형식입니다. 예를 들어 쌍점(:)이나 닫는 괄호())는 그 자체로는 이모티콘이 아니지만 합쳐 놓으면 :) 이모티콘이 됩니다. 하지만 조합에 새로운 의미를 부여했다고 해서 다 이모티콘이라고 부르지도 않습니다. -_- 같은 것은 대다수가 이모티콘으로 인정하지만, -> 같은 것은 이모티콘이라고 부르지 않는 경향이 있습니다.

- 문자와 > 문자에는 화살표라는 의미가 없기 때문에, -> 조합과 화살표의 시각적 유사성에 기대어 화살표라는 새로운 의미로 "오용"한 것은 이모티콘의 구성 원리에 해당합니다. 하지만 화살표는 인간의 특정한 정서(emotion)에 대응하지 않으므로 이모티콘이라고는 잘 부르지 않습니다. 그렇다고 얼굴 표정을 나타내야만 이모티콘인가 하면 그렇지도 않습니다. orz 같은 것은 이모티콘으로 간주하는 경향이 있어 보입니다. 오징어를 나타내는 <:=는 이모티콘인가? 이모티콘이 맞다면, 왜 ->는 이모티콘이 아니고 <:=는 이모티콘인가? 알 수 없습니다. ㅋㅋㅠㅠ는 둘 다 정서를 나타내는데, ㅠㅠ만이 아이콘적 성질을 가지므로 이모티콘이고 는 이모티콘이 아닌가? 알 수 없습니다. 만약 만 이모티콘이 아니라고 한다면, ㅋ큐ㅠ 에서 는 이모티콘인가 아닌가?? 알 수 없습니다. 이 알 수 없음은 이모티콘의 생래적 성질입니다. 어쩔 수 없죠.

0
0
0
0

Gemini Pro 2.5 엄청 똑똑하다... 기존 모델들은 대화가 길어지고 내용이 깊어지면 그냥 뻔한소리를 반복하기 시작하던데, 얘는 계속 생각해서 아이디어를 살려준다.

0
0
0
0
0
1

생각난 김에 또 하나 들자면, 본문에 대한 내부 표현이 HTML이 아니라 MFM이라는 것. MFM에 별 쓸 데 없는 기능은 다 넣어놓고, 정작 헤딩이나 목록 같이 문서의 의미론을 살리는 요소들은 HTML → MFM으로 번역을 안 해서 다 날아가 버린다. 서식에 굉장히 인색한 Mastodon조차도 원격에서 들어오는 HTML에 대해서는 Misskey보다 훨씬 많은 요소들을 받아들이는데 말이다.

0

Hackers' Pub에 이제 알림 기능이 생겼습니다. 우상단 프로필 사진 바로 왼쪽에 알림 아이콘이 추가되었고, 이제 읽지 않은 알림이 있을 경우 그 위에 빨간 동그라미가 표시됩니다. 알림의 종류는 현재 다음 다섯 가지입니다:

  • 누가 날 팔로했을 때
  • 누가 날 언급했을 때
  • 누가 내 글에 답글을 달았을 때
  • 누가 내 글을 인용했을 때
  • 누가 내 글을 공유했을 때
Hackers' Pub의 우상단에 표시되는 아이콘들. 왼쪽부터 새 게시글 아이콘, 읽지 않은 알림 아이콘, 프로필 사진.
0

지금 Hackers' Pub에는 Fresh 2.0 알파를 쓰고 있는데, 여러 가지 아쉬운 점이 많지만 그 중 하나가 아일랜드 컴포넌트로 콘텍스트가 전달이 안 된다는 것. 현재 아일랜드 컴포넌트에는 로캘 같은 정보를 일일히 프랍(prop)으로 넘겨줘야 한다…


RE: https://hackers.pub/@kodingwarrior/0195f94d-61f3-7cab-8a34-f2a8ab0f9a4a

0

XiNiHa shared the below article:

셸 언어는 때로 추하길 요구 받는다

洪 民憙 (Hong Minhee) @hongminhee@hackers.pub

이 글에서는 명령줄 인터페이스(CLI)를 지배하는 셸 언어의 독특한 설계 철학을 탐구하며, 셸 언어가 왜 때로는 "추함"을 받아들여야 하는지에 대한 이유를 설명합니다. Bash와 PowerShell을 비교하며, PowerShell이 가독성을 높이기 위해 장황해진 반면, Bash는 간결함을 유지하여 빠른 상호작용에 더 적합함을 지적합니다. 현대적인 셸인 Nushell이 이 균형을 맞추기 위해 노력하는 점을 언급하며, 셸 언어의 성공은 "아름다운 코드"와 "효율적인 상호작용" 사이의 균형에 달려 있음을 강조합니다. 마지막으로, 모든 도구는 사용 맥락에 맞게 설계되어야 한다는 더 넓은 소프트웨어 설계 원칙을 제시하며, 셸 언어의 맥락은 키보드와 사용자 사이의 빠른 대화임을 강조합니다. 이 글은 셸 언어 설계에 대한 흥미로운 통찰력을 제공하며, 소프트웨어 설계 시 맥락의 중요성을 일깨워 줍니다.

Read more →
0
0
0

사실 Hackers' Pub은 저희 집 홈 서버인 Mac mini M4 깡통 모델에서 돌아가고 있을 뿐만 아니라, 배포도 compose.yaml 파일의 image: 필드를 매번 손으로 고친 뒤 docker compose up -d를 치는 전근대적인 방식으로 이뤄지고 있습니다… 뭔가 자동화를 하고 싶긴 한데 귀찮은 마음이 커서 아직까지 이대로 살고 있네요.

0

XiNiHa shared the below article:

deno-task-hooks: Git 훅을 Deno 태스크로 쉽게 관리하기

洪 民憙 (Hong Minhee) @hongminhee@hackers.pub

안녕하세요! 오늘은 제가 개발한 deno-task-hooks 패키지를 소개해 드리려고 합니다. 이 도구는 Deno 태스크를 Git 훅으로 사용할 수 있게 해주는 간단하면서도 유용한 패키지입니다.

어떤 문제를 해결하나요?

Git을 사용하는 개발 팀에서는 코드 품질 유지를 위해 커밋이나 푸시 전에 린트, 테스트 등의 검증 작업을 실행하는 것이 일반적입니다. 이러한 작업은 Git 훅을 통해 자동화할 수 있지만, 기존 방식에는 몇 가지 문제가 있었습니다:

  • Git 훅 스크립트를 팀원들과 공유하기 어려움 (.git 디렉토리는 보통 버전 관리에서 제외됨)
  • 각 개발자가 로컬에서 훅을 직접 설정해야 하는 번거로움
  • 훅 스크립트의 일관성 유지가 어려움

deno-task-hooks는 이러한 문제를 해결하기 위해 Deno의 태스크 러너를 활용합니다. Deno 태스크는 deno.json 파일에 정의되어 버전 관리가 가능하므로, 팀 전체가 동일한 Git 훅을 쉽게 공유할 수 있습니다.

어떻게 작동하나요?

deno-task-hooks의 작동 방식은 간단합니다:

  1. deno.json 파일에 Git 훅으로 사용할 Deno 태스크를 정의합니다.
  2. hooks:install 태스크를 실행하면, 정의된 태스크들이 자동으로 .git/hooks/ 디렉토리에 설치됩니다.
  3. 이후 Git 작업 시 해당 훅이 트리거되면 연결된 Deno 태스크가 실행됩니다.

설치 및 사용 방법

1. hooks:install 태스크 추가하기

먼저 deno.json 파일에 hooks:install 태스크를 추가합니다:

{
  "tasks": {
    "hooks:install": "deno run --allow-read=deno.json,.git/hooks/ --allow-write=.git/hooks/ jsr:@hongminhee/deno-task-hooks"
  }
}

2. Git 훅 정의하기

Git 훅은 hooks: 접두사 다음에 훅 이름(케밥 케이스)을 붙여 정의합니다. 예를 들어, pre-commit 훅을 정의하려면:

{
  "tasks": {
    "hooks:pre-commit": "deno check *.ts && deno lint"
  }
}

3. 훅 설치하기

다음 명령어를 실행하여 정의된 훅을 설치합니다:

deno task hooks:install

이제 Git 커밋을 실행할 때마다 pre-commit 훅이 자동으로 실행되어 TypeScript 파일을 검사하고 린트 검사를 수행합니다.

지원되는 Git 훅 종류

deno-task-hooks는 다음과 같은 모든 Git 훅 타입을 지원합니다:

  • applypatch-msg
  • commit-msg
  • fsmonitor-watchman
  • post-update
  • pre-applypatch
  • pre-commit
  • pre-merge-commit
  • pre-push
  • pre-rebase
  • pre-receive
  • prepare-commit-msg
  • push-to-checkout
  • sendemail-validate
  • update

이점

deno-task-hooks를 사용하면 다음과 같은 이점이 있습니다:

  1. 간편한 공유: Git 훅을 deno.json 파일에 정의하여 팀 전체가 동일한 훅을 사용할 수 있습니다.
  2. 설정 용이성: 새 팀원은 저장소를 클론한 후 한 번의 명령어로 모든 훅을 설치할 수 있습니다.
  3. 유지 관리 용이성: 훅 스크립트를 중앙에서 관리하므로 변경 사항을 쉽게 추적하고 적용할 수 있습니다.
  4. Deno의 안전성: Deno의 권한 모델을 활용하여 훅 스크립트의 보안을 강화할 수 있습니다.

마치며

deno-task-hooks는 작은 패키지이지만, Git과 Deno를 함께 사용하는 팀의 개발 경험을 크게 향상시킬 수 있습니다. 코드 품질 유지와 개발 워크플로우 자동화를 위해 한번 사용해 보세요!

패키지는 JSR에서 다운로드할 수 있으며, GitHub에서 소스 코드를 확인할 수 있습니다.

피드백과 기여는 언제나 환영합니다! 😊

Read more →
0

쿨엔조이 M.2 SSD 방열판 벤치마크 4년이 넘은 글이긴 한데...

  • 제조사에서 권장하는 방식을 유유히 비웃으며 직접 이상한 짓(서멀패드를 끼워줬는데 버리고 다른 서멀패드를 쓴다든지)을 해야 실측 결과 더 좋게 나오는 제품이 수두룩... 하긴 M.2 SSD의 표면 요철 형상까지는 표준화가 안 되어 있으니
  • 방열 성능만 따지면 서멀패드보다 서멀그리스가 우월한 것은 어쩔 수 없는 듯
  • "조이쿨 JH-M.2 SSD 30MM"은 당시 6570원이었고 "조이쿨 M.2 SSD 히트파이프 쿨러"는 무려 16000원으로 두 배도 훨씬 넘는 가격이었는데, 6570원짜리가 더 성능 우수. 심지어 같은 회사인데
  • RGB LED 달고 있으면 성능 폭락 ㅋㅋㅋㅋㅋㅋㅋㅋㅋ
0

인용한 글의 내용과는 상관 없는 이야기인데, 현재는 단문에서는 단문이든 게시글이든 인용할 수 있는 반면, 게시글에서는 단문도 게시글도 인용을 못 하게 되어 있다. 별 생각을 안 하고 그렇게 만든 거긴 한데, 잘 생각해 보니 오히려 인용 기능은 게시글에서 더 유용할 것 같다.

하루 빨리 게시글에서도 인용이 가능하게 개선을 하도록 하겠습니다…


RE: https://hackers.pub/@xt/2025/stackage-why

0

XiNiHa shared the below article:

스태키지 큐레이션이 성공할 수 있었던 것은 하스켈이라는 언어와 생태계의 특징도 컸습니다.

juxtapose @xt@hackers.pub

인용: https://hackers.pub/@bgl/0195f0eb-88dd-77e3-a864-f0371e85b270

스태키지(Stackage)는 하스켈이 (의외로) 성공하여 해키지(Hackage)가 거대해지자, 그 거대함 때문에 발생하는 불편을 해소하는 한 방책으로 고안되었습니다. 그런데 당시에 해키지만큼 거대한 생태계를 갖추고 있으면서 동시에 "컴파일이 성공한다면 실행도 아마 성공할 것"이라는 훌륭한 속성을 갖는 언어는 달리 없었죠. 러스트가 있지 않으냐? 스태키지가 처음 나온 게 2012년입니다. 러스트는 아직 crates.io 도 자리잡기 전이었죠. (사실 이 시점의 러스트는 지금과는 언어 자체가 많이 다른 언어였고요.)

하스켈의 패키지 버저닝 정책에 따르면, 후방호환성 깨지는 변경은 반드시 메이저 버전을 올려야 하고, 마이너 버전만 올리는 변경은 후방호환성 유지될 때에만 가능합니다. 이런 정책 당연히 좋지만, 사람이 내용을 잘 숙지하고 지켜야 의미가 있습니다. 후방호환성을 깨면서 마이너 버전만 올리는 실수는 어떤 개발자든 할 수 있죠.

그런데 하스켈의 경우, 인간이 실수해도 기계가 잡아 줄 여지가 처음부터 매우 큰 언어이고, 예를 들어 어떤 함수가 핵미사일을 발사할 수 있는지 아닌지를 함수 실행 없이도 식별할 수 있는 언어라고들 하죠. 하스켈의 마지막 표준이 2010년에 나왔으니 2010년을 기준으로 하면, 당시 하스켈이 제공하는 "컴파일 시간 보장"의 범위는 그야말로 독보적이었습니다. (하스켈보다 더 강한 보장을 제공하는 언어들은 있었지만, 그만한 라이브러리 에코시스템이 없었고요.)

그래서 스태키지라는 모형이 의미가 있었습니다. A라는 패키지의 새 마이너 버전이 해키지에 올라오면, 스태키지에서 자동으로 가져갑니다. 스태키지는 같은 큐레이션에 포함된 다른 패키지들 중 A에 의존하는 패키지들을 추리고, 얘네한테 A의 새 버전을 먹여도 빌드가 잘 되는지 검사합니다. 이들 중 하나라도 깨지면? A 패키지는 해키지에서는 버전이 올랐으나, 스태키지에서는 버전이 오르지 않게 됩니다. 그리고 A 패키지의 제공자에게 자동으로 깃허브 멘션 알림이 갑니다!

("패키지 저자"와 "패키지를 스태키지에 제공하는 제공자"가 같은 사람이 아니어도 된다는 점도, 노동력의 효과적 분담에 한몫했습니다.)

이 모든 과정이 자동화되어 있는데, 이것만으로도 99.99%의 호환성 문제가 사라지고, 그러면서도 웬만한 라이브러리들은 충분히 최신 버전으로 쓸 수 있습니다. LTS와 나이틀리가 구분되어 있는 것도, LTS가 GHC 버전에 대응하여 여러 버전이 유지되는 것도, 실제 개발에서 아주 편리하고요.

스태키지가 개쩌는 부분은 "버저닝 정책에 완벽하게 부합하는데도 현실적으로 후방호환성 파괴를 일으키는" 변경점들도 잡아낸다는 것입니다. 아주 단순한 예시로 "많이 쓰이는 이름"이 있습니다. 예를 들어 어떤 라이브러리가 아주 널리 쓰이는데, 제공하는 네임 바인딩은 몇 개 안 되고, 그래서 대부분의 사용자가 그걸 그냥 전역 네임스페이스에 다 반입해서 쓴다고 칩시다. 어느 날 이 라이브러리가 process 라든지 f 같은 새 네임을 추가 제공하기 시작하면? 정책 규범에 따르면, 이것도 마이너 버전만 올려도 되는 변경점이 맞습니다. 하지만 현실에서는 많은 패키지들을 박살내겠죠. 언어를 막론하고 있을 수 있는 일인데, 이런 것들까지 스태키지에서 아주 높은 확률로 다 잡힙니다.

그리고... 이런 게 잘 된다는 것은 언어 그 자체의 특성도 있지만, 생태계 전체의 문화적인 특성도 있는데요. 하스켈도 라이브러리 제작자가 충분히 악독하다면, 컴파일러에게 안 잡히면서 인류문명멸망시키는 코드 변경을 얼마든지 슬쩍 끼워넣을 수 있습니다. 악의가 아니더라도 부주의로 후방호환성을 깰 수 있고요. 그런데 하스켈은 대부분의 라이브러리 설계자들이 "되도록 많은 것을 컴파일 시간에 잡고 싶다"라는 명확한 욕망으로 설계를 하는 경향이 뚜렷합니다. 그래서 호환성 문제는 웬만하면 스태키지 선에서 잡히고, 스태키지 큐레이션은 지난 10년 동안 실무상 아주 유용한 도구로 기능해 온 것이죠.

어지간하면 큐레이션만 잘 고르고 잘 갱신하면 되고, 종속성 목록에는 mypkg >= 2.1.1 && < 2.1.2 이런 거 하나도 관리 안 하고 그냥 mypkg 라고만 써도 된다는 것이, 솔직히 개짱편합니다. 다행히 지난 10년 동안 "문제의 소지는 컴파일 시간에 검출하는 게 좋다"라는 생각이 더 널리 받아들여져서, 다른 언어들도 이런 접근을 더 시도할 여지가 생긴 것 같군요.

Read more →
2
0
0
0

많은 분들이 인용 방법을 혼란스러워 하셔서, 인용 버튼을 추가했습니다. 게시글이나 단문 아래의 아이콘들 중에 왼쪽에서 세 번째 아이콘을 누르시면 해당 콘텐츠를 인용한 글들이 나열되고, 그 위에 인용 글 입력란이 뜨게 됩니다. 거기서 인용 글을 쓸 수 있습니다. 아, 종래의 인용 UI도 그대로 사용하실 수 있습니다.

참고로 인용 아이콘은 @xtjuxtapose 님께서 수고해 주셨습니다. 감사합니다.


RE: https://hackers.pub/@xt/0195eb06-9f50-763d-85c8-5600ec78c539

Hackers' Pub의 게시글이나 단문 아래에 표시되는 아이콘들. 인용 버튼이 강조되어 있다.
0

요즘 주의 깊게 보고 있는 두 언어:

  • Gleam: Erlang의 OTP 런타임에서 돌아간다는 점에서 Elixir와 비슷한데, 처음부터 정적 타입 언어로 설계되었다. 아, JavaScript 타깃도 지원한다. Haskell의 타입클래스(typeclass)나 Rust의 트레이트(trait)에 해당하는 기능이 없다는 게 개인적으로는 조금 아쉬운 점.

  • MoonBit: 중국 쪽에서 주도해서 만들고 있는 WebAssembly 타깃 언어로, 이지 모드 Rust에 가까워 보인다. 다만 개발 과정이 완전히 오픈 소스는 아니고, (오픈 소스 라이선스이긴 하지만) 소스만 공개하는 형태라 거버넌스 측면에서 아쉬움이 있다.

0

We're incredibly honored to announce that (@indexBuilding ActivityPub) has become a formal sponsor of Fedify through Open Collective!

This is a significant milestone for our project, and we're deeply grateful to @johnonolanJohn O'Nolan and the entire Ghost team for their support and recognition of our work in the ecosystem.

Ghost's social web integration built on is a perfect example of how open standards can connect different publishing platforms in the fediverse. Their backing over the past months has been invaluable, and this formal sponsorship will help ensure Fedify remains sustainable as we continue to develop and improve the framework.

If you're building with ActivityPub or interested in federated applications, please consider joining Ghost in supporting open source development through our Open Collective:

https://opencollective.com/fedify

Every contribution, no matter the size, helps us maintain and enhance the tools that make the fediverse more accessible to developers. Thank you for being part of this journey with us! :fedify: ❤️ :ghost:

0
1
0

Wine을 이용해서 Windows 실행 파일을 곧바로 실행할 수 있는 Linux 배포판이 필요하다는 주장. 황당하긴 한데, 이유를 들어보면 말은 된다. Linux 실행 파일들은 죄다 libc를 링크해서 시스템 콜을 직접 하기에 실행 파일들이 불안정(unstable)한 반면, 사유 소프트웨어인 Windows는 처음부터 실행 파일이 직접 시스템 콜을 하게 하지 않고 user32.dll 같은 시스템에서 제공되는 라이브러리를 동적 링크하여 쓰도록 하기 때문에 Windows 95 시절의 실행 파일도 Windows 11에서 실행할 수 있을 만큼 실행 파일이 안정적(stable)이다. 따라서 Linux에서 안정적으로 배포할 수 있는 유일한 실행 파일 형식은 Wine을 통한 Windows 실행 파일 뿐인 셈이 된다.

0

나도 비슷한 까닭으로 15년 넘게 Vim/Neovim 써 오다가, 몇 해 전부터 VS Code를 써 왔고, 요즘엔 Zed를 함께 쓰고 있다. Zed가 조금만 더 발전하면 Zed를 메인으로 쓰게 될 날이 올 듯…!


RE: https://yuri.garden/notes/a5zx8jmbwl

0
0