from Hackers' Pub Android App👀
洪 民憙 (Hong Minhee)
@hongminhee@hackers.pub · 1031 following · 730 followers
Hi, I'm who's behind Fedify, Hollo, BotKit, and this website, Hackers' Pub! My main account is at ![]() @hongminhee洪 民憙 (Hong Minhee)
@hongminhee洪 民憙 (Hong Minhee)  .
.
Fedify, Hollo, BotKit, 그리고 보고 계신 이 사이트 Hackers' Pub을 만들고 있습니다. 제 메인 계정은: ![]() @hongminhee洪 民憙 (Hong Minhee) .
@hongminhee洪 民憙 (Hong Minhee) .
Fedify、Hollo、BotKit、そしてこのサイト、Hackers' Pubを作っています。私のメインアカウントは「![]() @hongminhee洪 民憙 (Hong Minhee) 」に。
@hongminhee洪 民憙 (Hong Minhee) 」に。
 Website
- hongminhee.org
 GitHub
- @dahlia
 Hollo
Hollo- @hongminhee@hollo.social
 DEV
DEV- @hongminhee
 velog
velog- @hongminhee
 Qiita
Qiita- @hongminhee
 Zenn
Zenn- @hongminhee
 Matrix
- @hongminhee:matrix.org
 X
X- @hongminhee
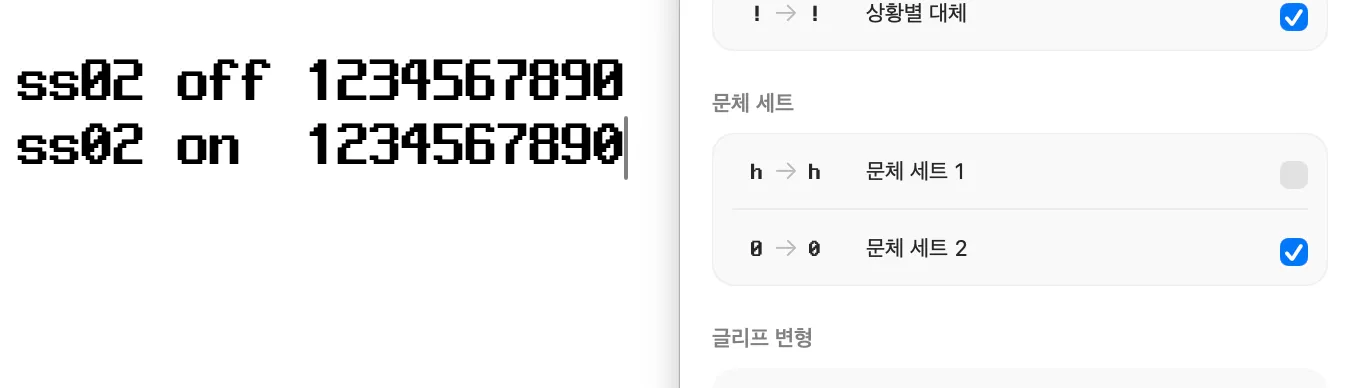
폰트 제작자가 'ss01', 'ss02', ...에 대해 "문체 세트 1", "문체 세트 2", ... 대신 표시할 이름을 직접 지정해 줄 수 있다는 듯하다. 예를 들면 "구버전 라틴 자형", "숫자를 더 둥글게"같이... 이거나 구현해볼까
Androidのクライアントアプリからこんにちは。
![]() @hongminhee洪 民憙 (Hong Minhee)
@hongminhee洪 民憙 (Hong Minhee) ![]() @kodingwarriorJaeyeol Lee
@kodingwarriorJaeyeol Lee ![]() @wakestLiaizon Wakest some things work, some things very buggy
@wakestLiaizon Wakest some things work, some things very buggy
![]() @liaizonwakest likes your bugs ⁂
@liaizonwakest likes your bugs ⁂ ![]() @kodingwarriorJaeyeol Lee
@kodingwarriorJaeyeol Lee ![]() @wakestLiaizon Wakest Yeah, that's probably because it's still in the early stages of development. It'll get better soon as more people contribute. I'd like to help, but I don't know much about Android development, so it's hard for me to contribute. 😅
@wakestLiaizon Wakest Yeah, that's probably because it's still in the early stages of development. It'll get better soon as more people contribute. I'd like to help, but I don't know much about Android development, so it's hard for me to contribute. 😅
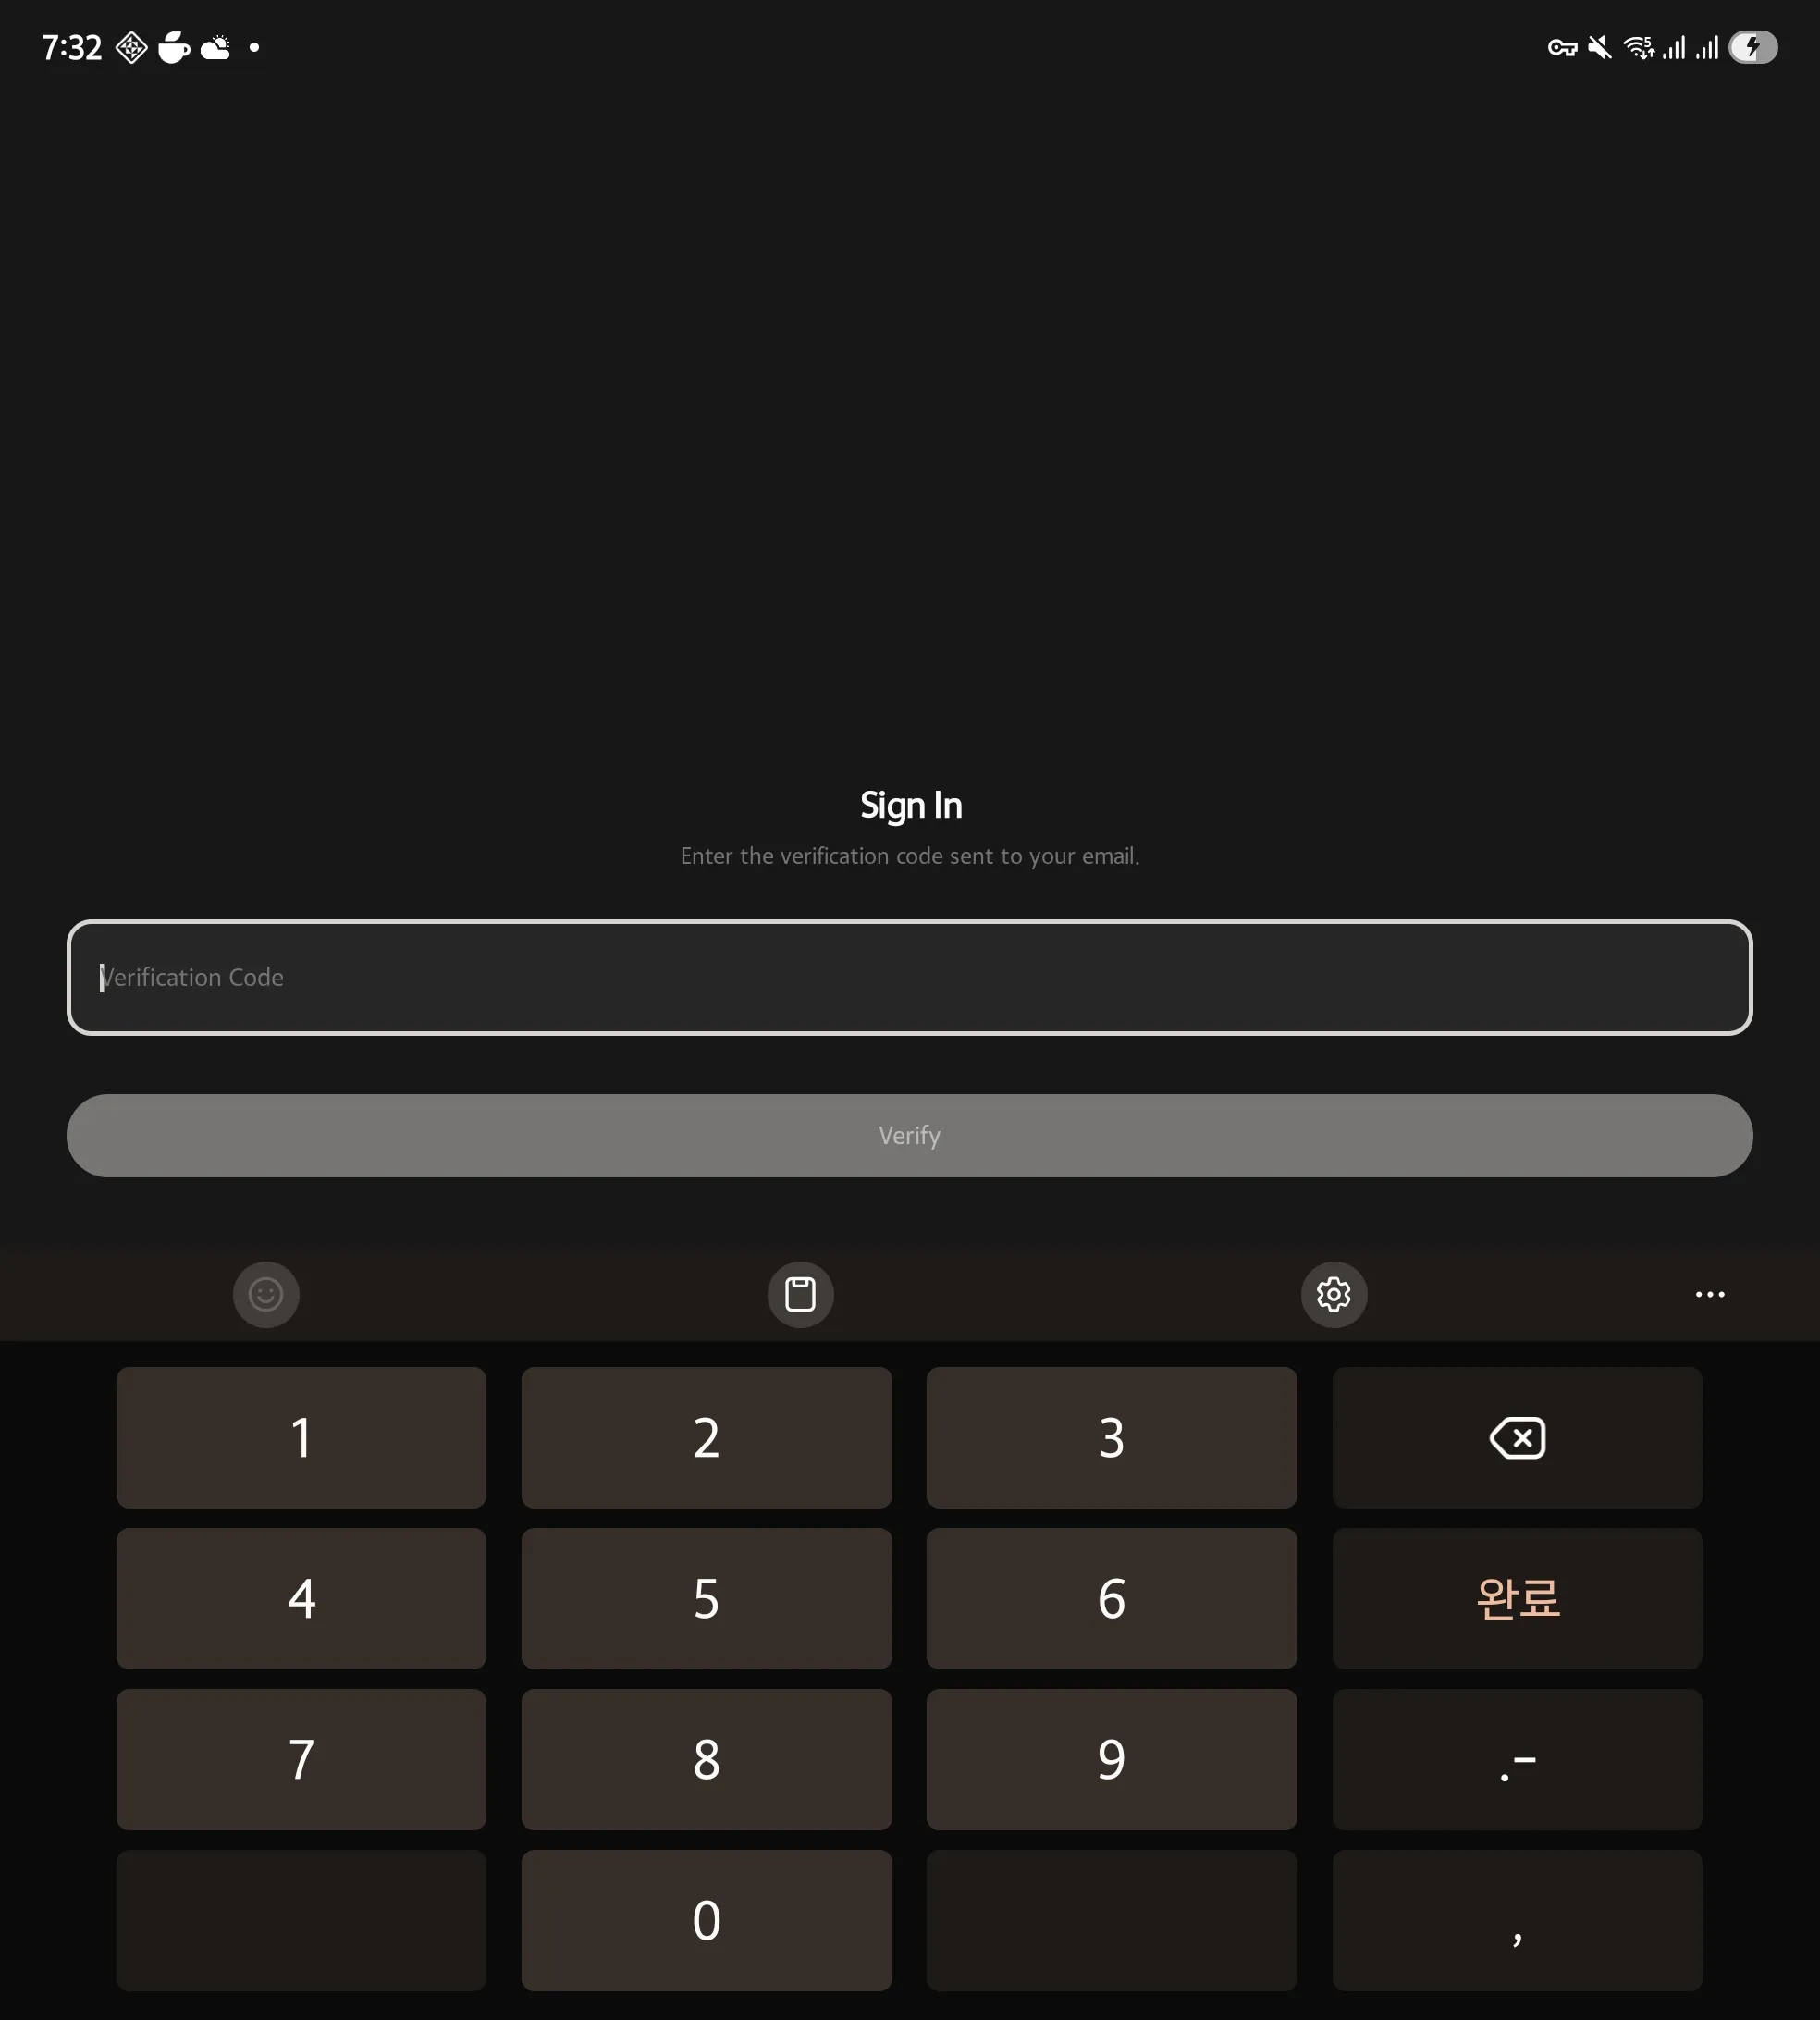
![]() @kodingwarriorJaeyeol Lee 재열님 버그가 있네요. 알파뉴메릭 코드로 인증하려고 했는데, 입력은 숫자만 가능합니다.
@kodingwarriorJaeyeol Lee 재열님 버그가 있네요. 알파뉴메릭 코드로 인증하려고 했는데, 입력은 숫자만 가능합니다.
![]() @hongminhee洪 民憙 (Hong Minhee)
@hongminhee洪 民憙 (Hong Minhee) ![]() @kodingwarriorJaeyeol Lee
@kodingwarriorJaeyeol Lee ![]() @liaizonwakest likes your bugs ⁂ hello from the new app!
@liaizonwakest likes your bugs ⁂ hello from the new app!
![]() @wakestLiaizon Wakest
@wakestLiaizon Wakest ![]() @kodingwarriorJaeyeol Lee
@kodingwarriorJaeyeol Lee ![]() @liaizonwakest likes your bugs ⁂ Oh, how does it feel? Does it work well?
@liaizonwakest likes your bugs ⁂ Oh, how does it feel? Does it work well?
![]() @liaizonwakest likes your bugs ⁂ Not yet, but it would be made soon. It's mostly being done by
@liaizonwakest likes your bugs ⁂ Not yet, but it would be made soon. It's mostly being done by ![]() @kodingwarriorJaeyeol Lee.
@kodingwarriorJaeyeol Lee.
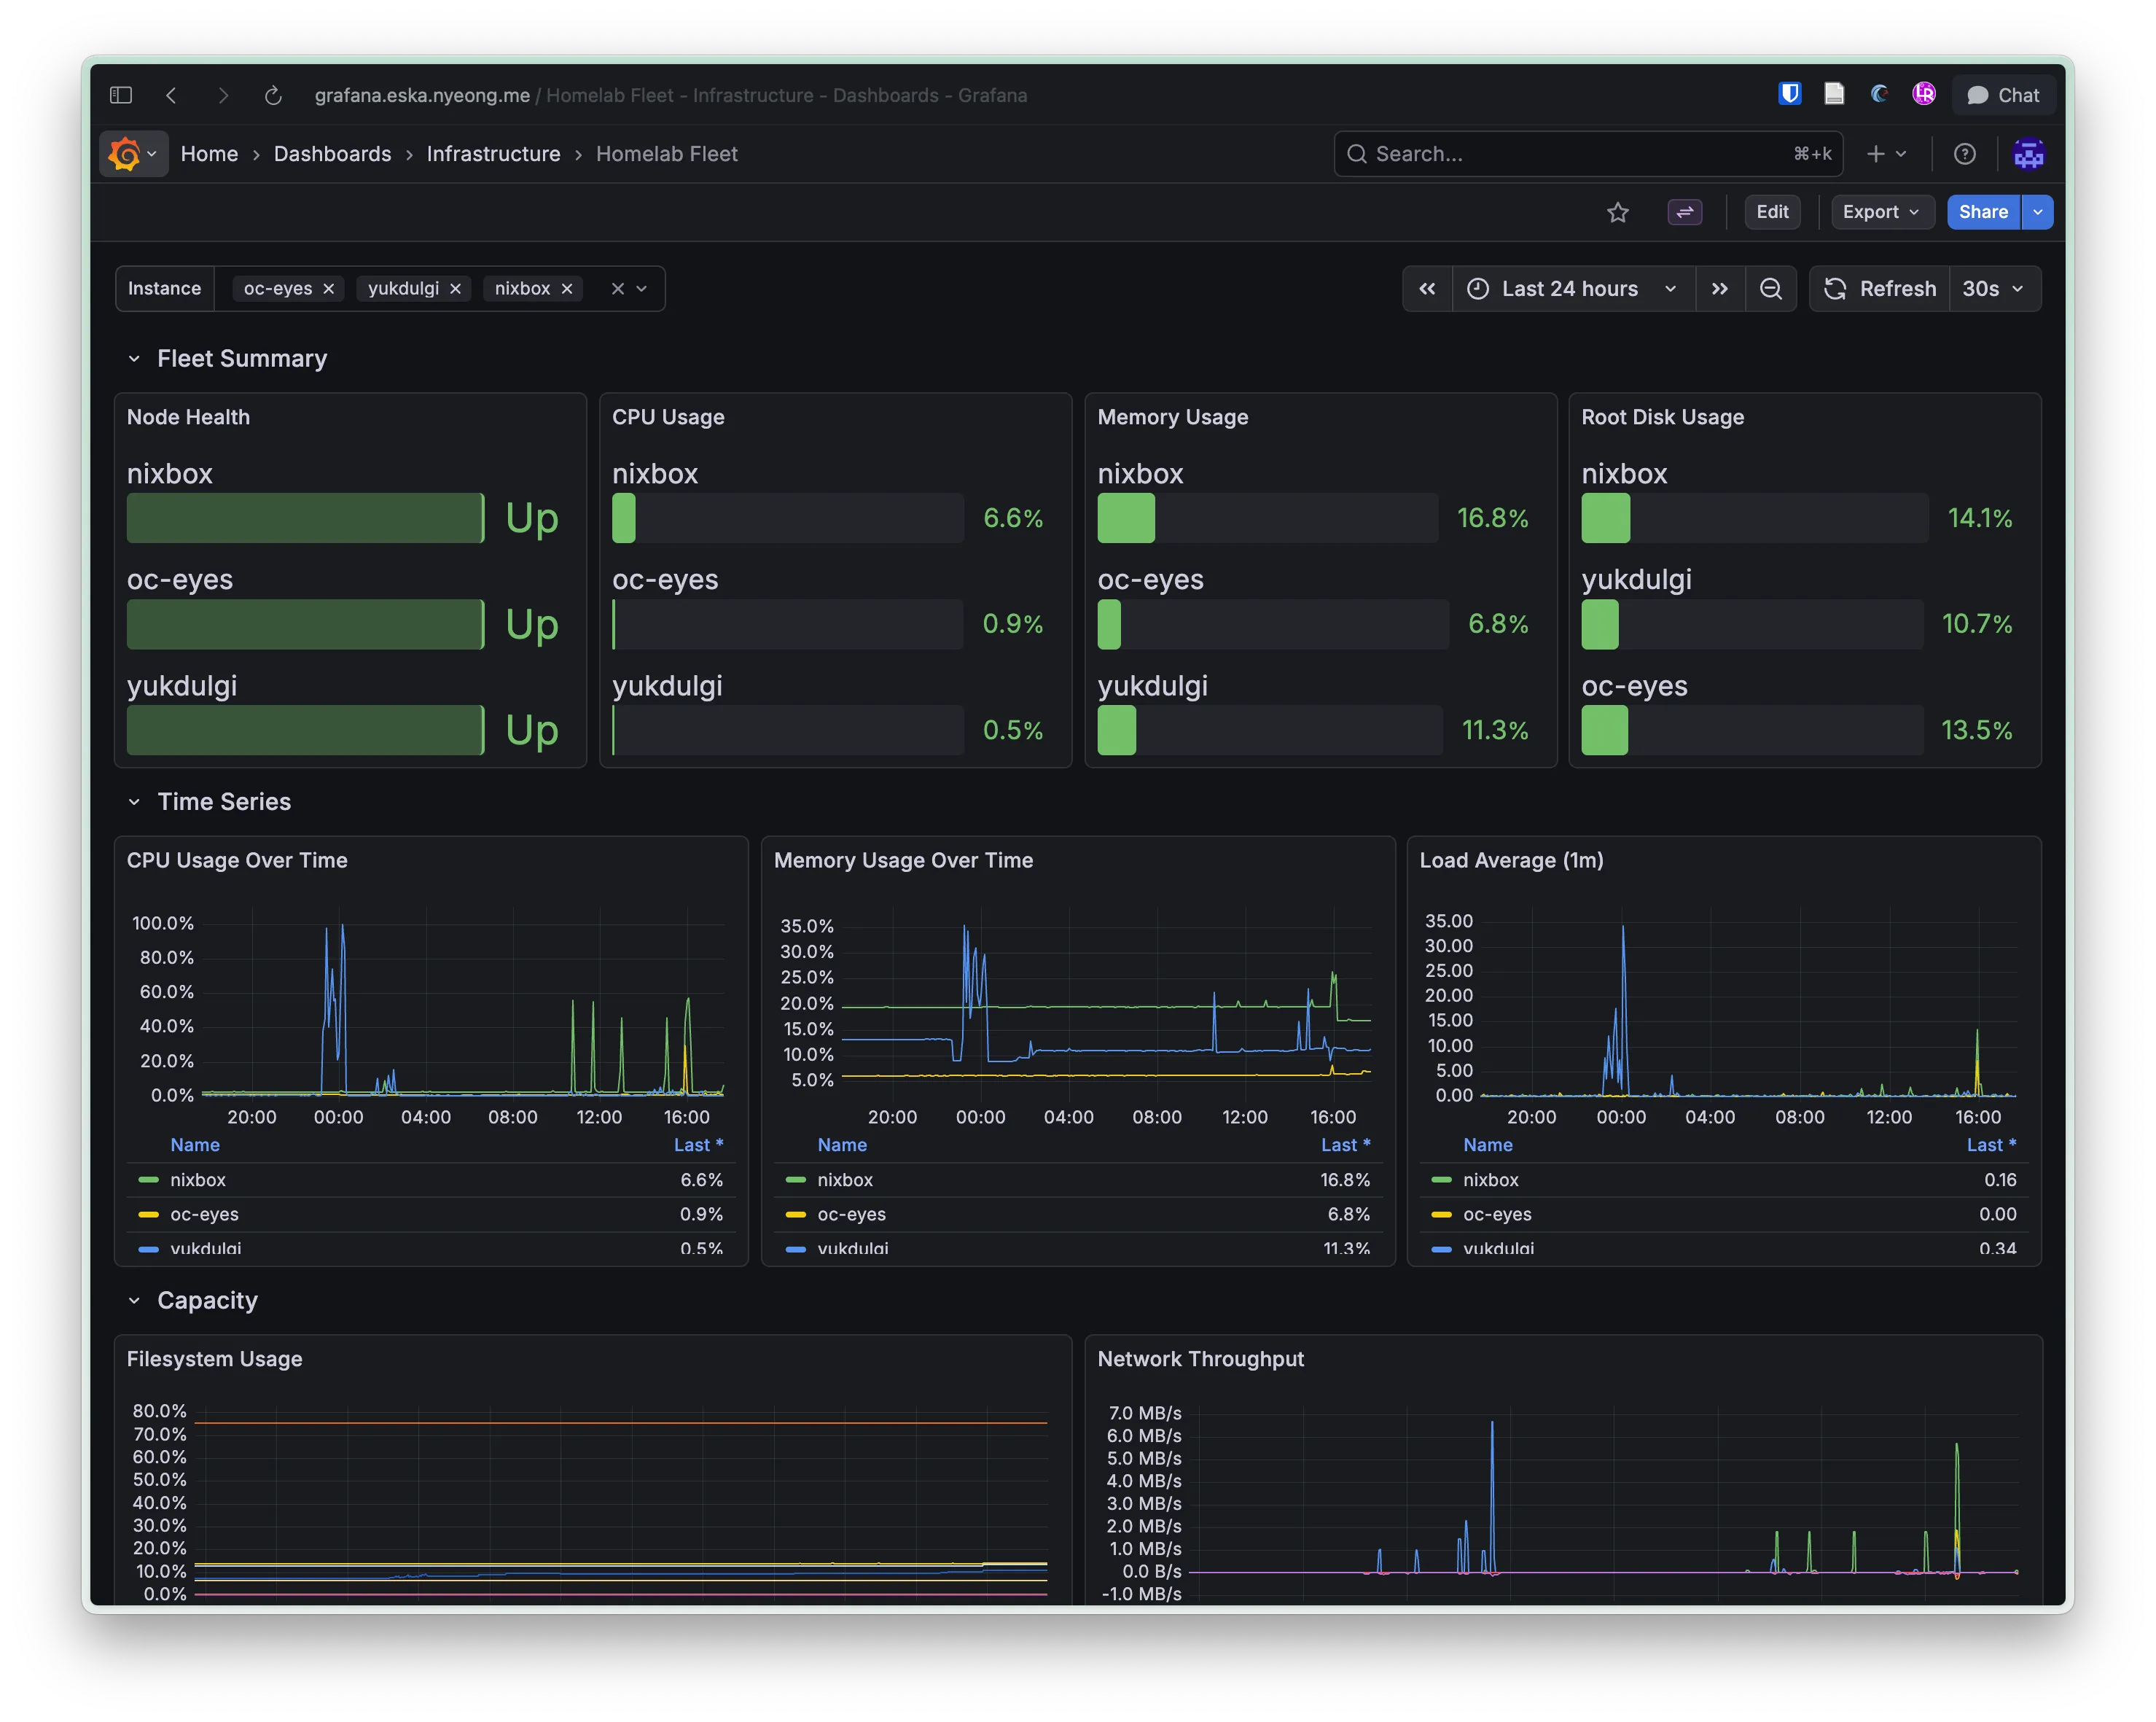
너무 리소스가 놀고 있다 좀 더 굴리고 싶다 🤨🤨
The -f option for the git push command, which is an alias for --force, should be re-aliased to --force-with-lease.
takeown /R /F E:\* Windows장비에 기존 저장장치를 옮겼으면 소유권을 고쳐줍시다... 뭐 그런게 있다는 것도 까먹는 Windows지만...
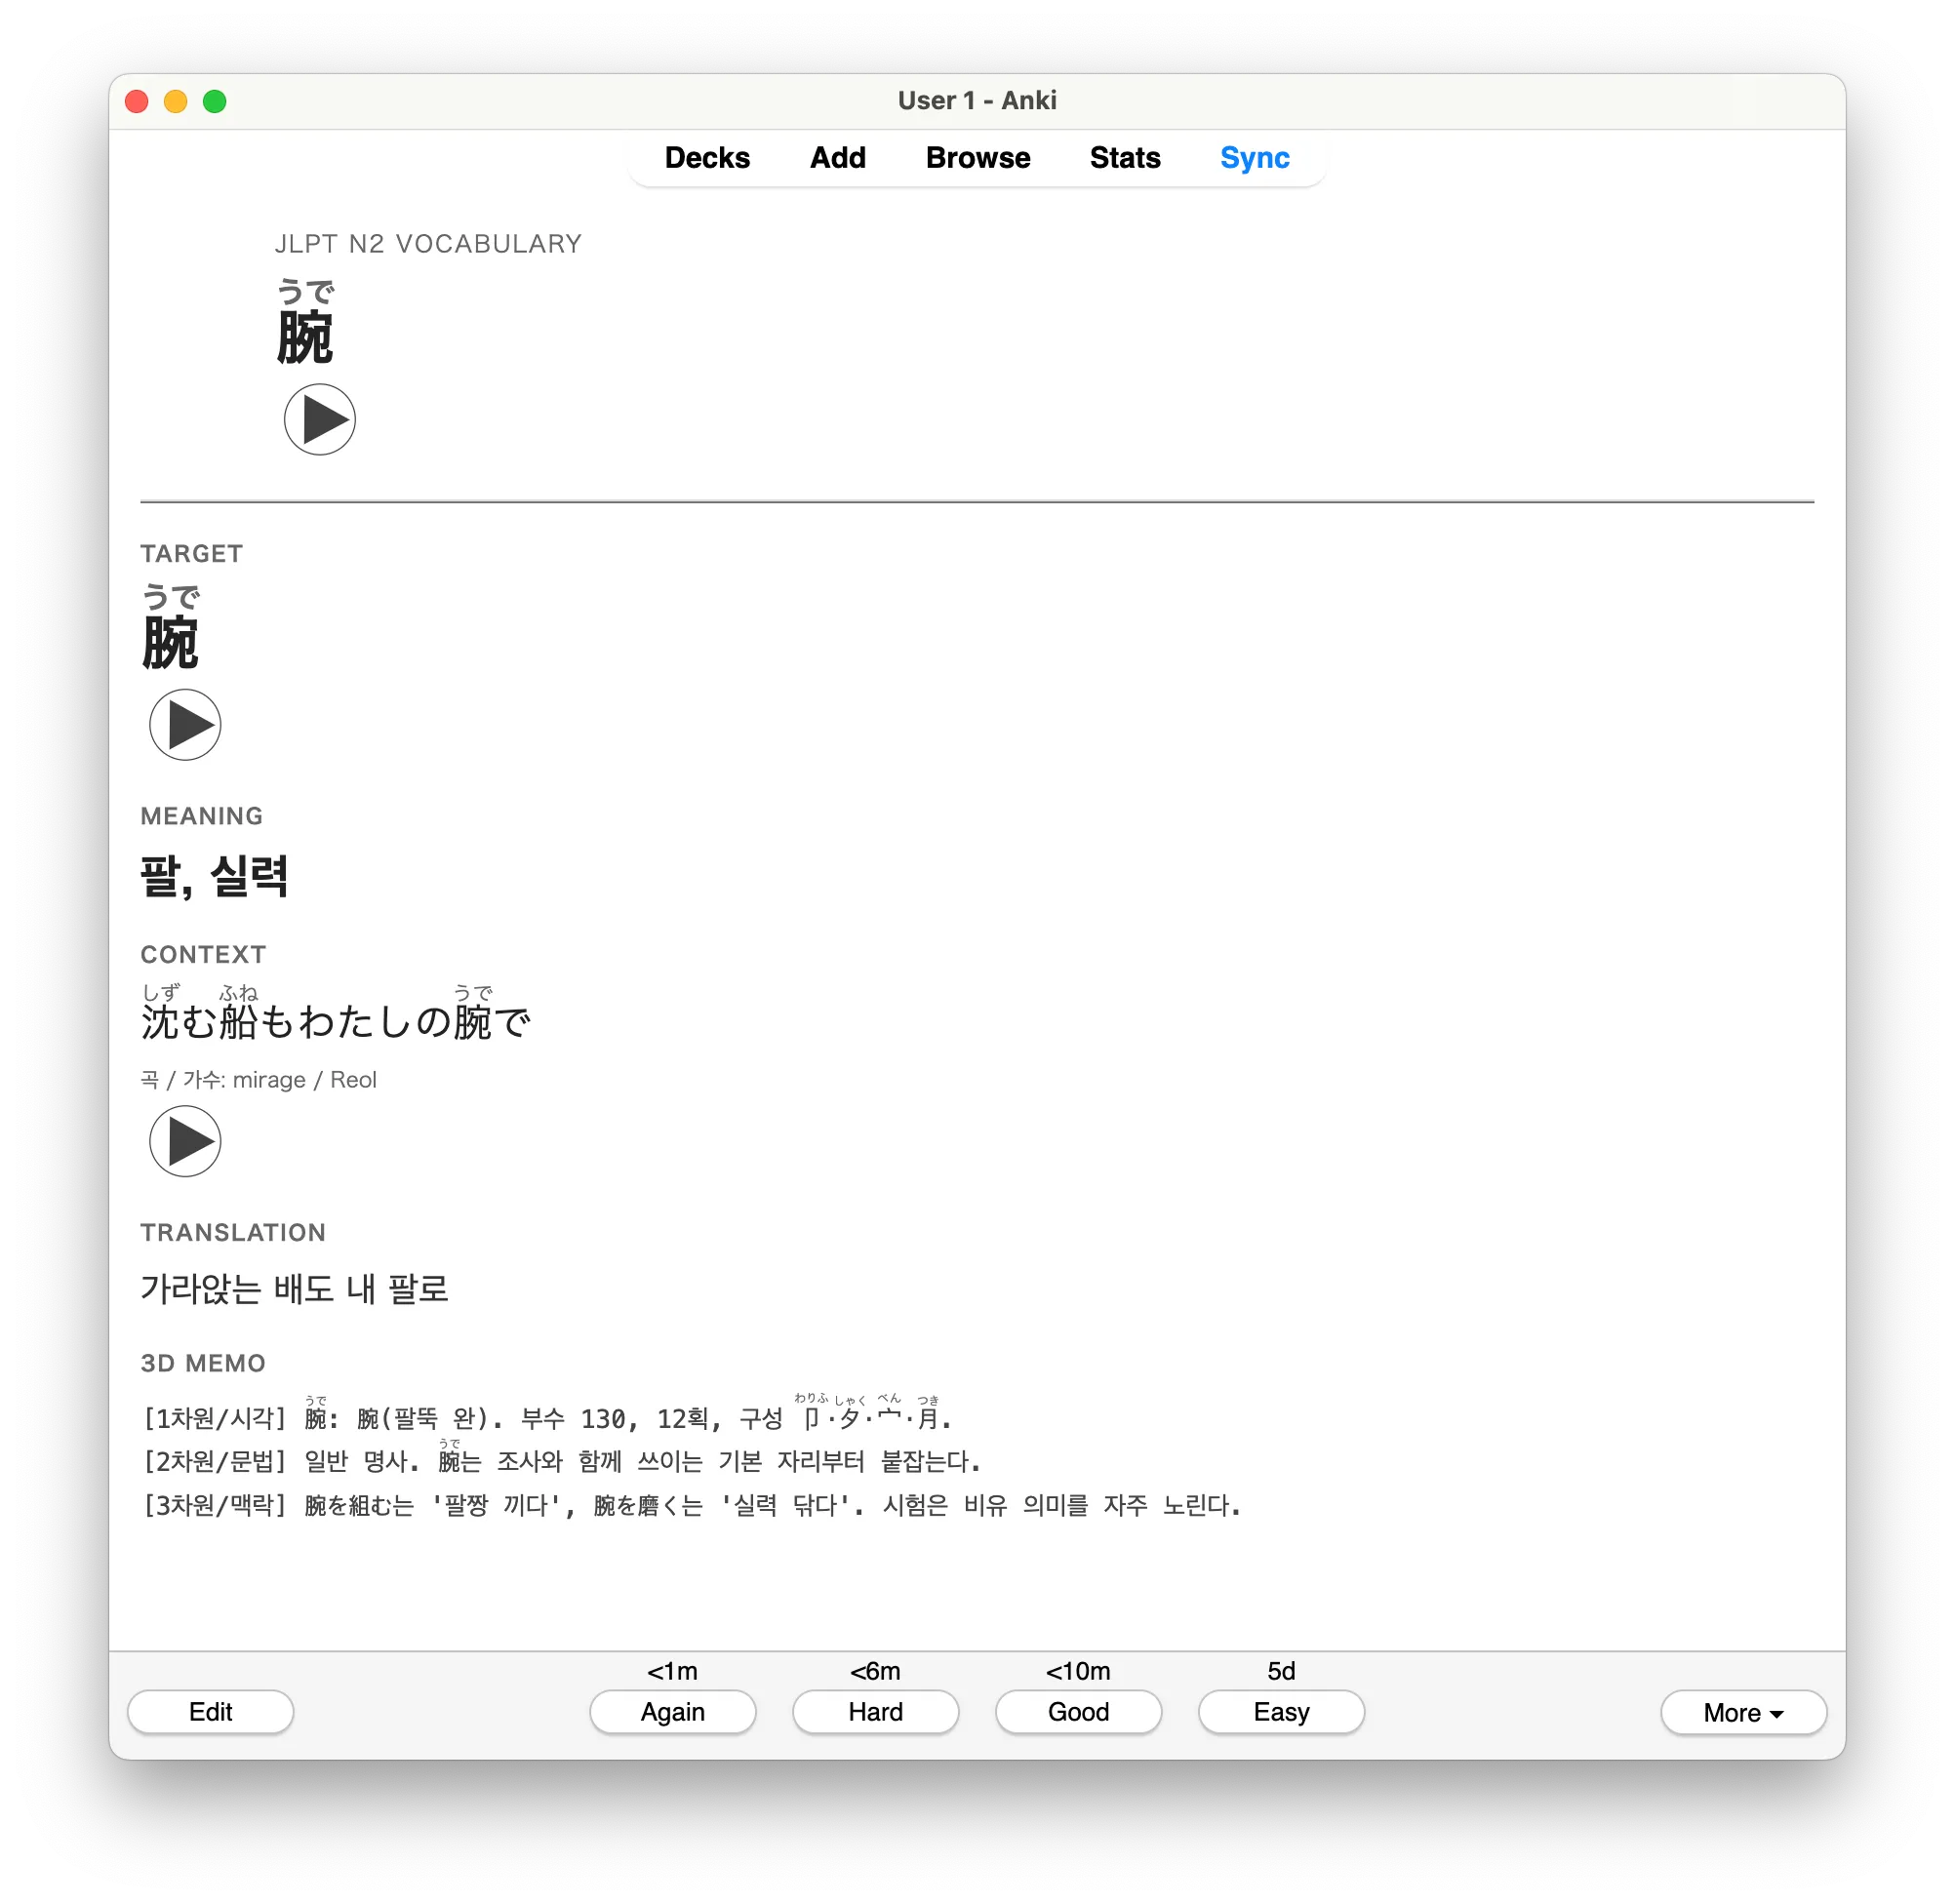
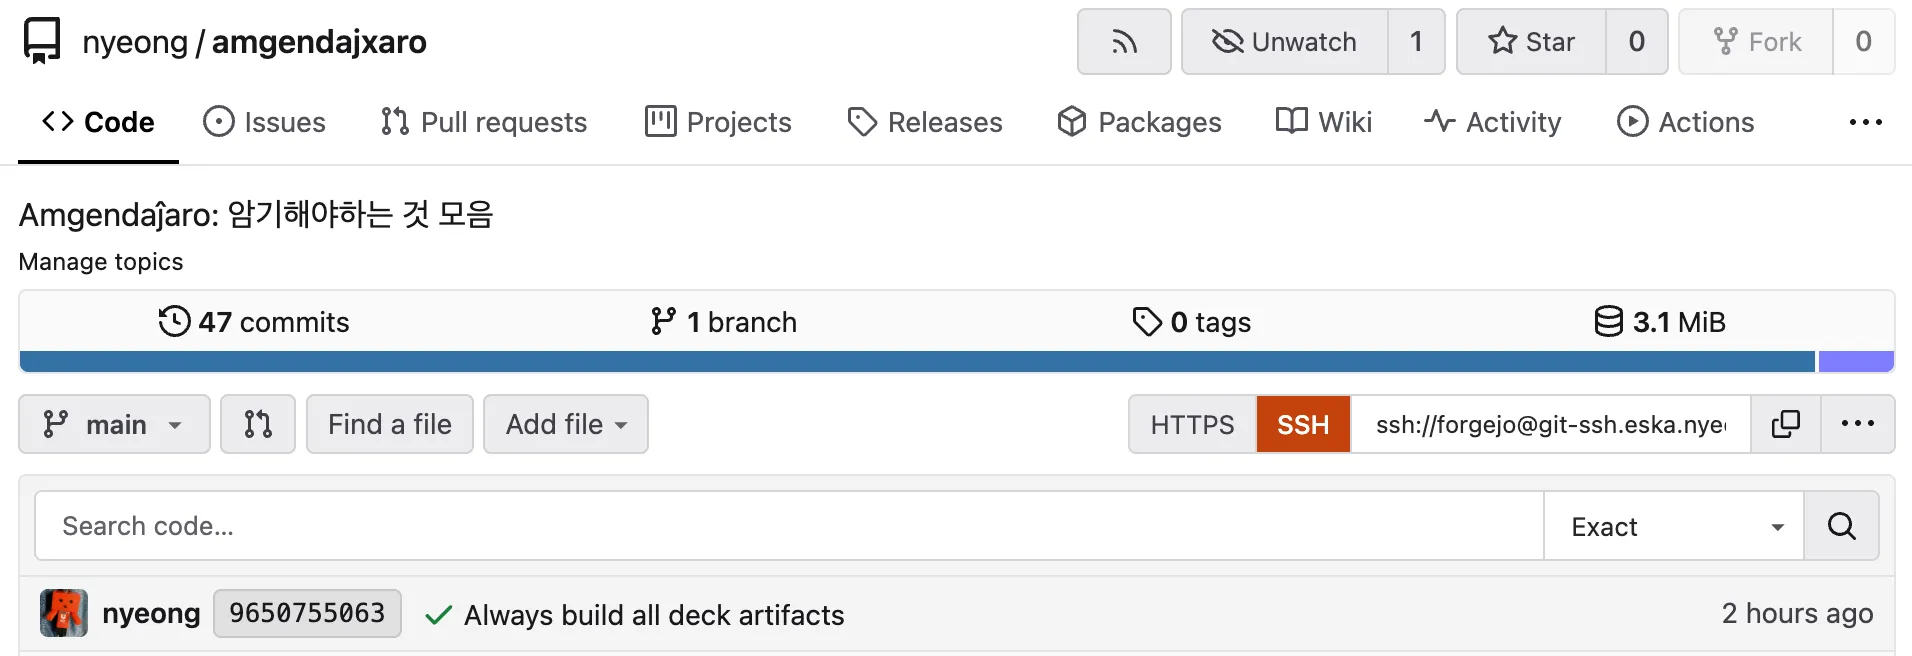
JLPT 따보려구 책 샀는데 단어 외우기가 너무 힘들어서 아래처럼 시도:
- 폰으로 대충 책 촬영 → OCR 인식 → 데이터 획득
- 데이터를 yaml로 정리
- 한자사전, 일본어사전 붙여서 한국어 독음, 예문, 부수 등 가져오고
- 하는 김에 내가 듣는 노래 가사를 DB화하고 여기서 예문을 가져오고
- 정리한 데이터를 Anki 덱으로 빌드 (nyeong/amgi)
- 홈서버에 actions 붙여서 yaml 수정하면 덱 빌드해서 파일만 획득
예전엔 이런 거 만들면 만들다가 토끼굴 파느랴고 단어를 못 외웠을텐데, 요새는 단어 외우다가 이런거 불편한데, 싶으면 AI한테 시키면 되어서 본질에 좀 더 집중할 수 있다

유튜브에 HDR 영상을 자주 올리는데 어느새부턴가 한두개씩 HDR 처리가 안 되기 시작하더니 이제는 아예 안 된다. 나만 그런 것도 아니고 요즘 처리가 제대로 되는 경우가 거의 없다며 불만이 폭발 직전이다. 그리고 이게 요즘 스마트폰 카메라들이 HDR 촬영을 기본적으로 지원하기 시작한 것과 시기적으로 겹친다.
유튜브가 인하우스 ASIC으로 동영상을 처리하는 것은 잘 알려져 있는데 그 덕분에 4K 영상 처리는 올리자마자 금방 된다. 하지만 HDR은 아직 지원을 안 하는지 처리하는데 최소 하루 정도는 걸린다. 아마 HDR 처리는 여전히 CPU에 의존하는 것 같다. 이런 상황에서 HDR로 촬영된 스마트폰 영상이 물밀듯이 들어오기 시작하니까 백엔드에서 백로그를 처리하지 못하고 있는 상황이 아닌가 싶다.
다빈치 리졸브로 일일히 색보정해서 HDR 영상을 만들고 있는 입장에서 너무 짜증나는 상황...
안드로이드 클라이언트 앱 개발의 끝이 보인다 (아마도)
슬슬 사람들이 토큰 태우기의 무상함을 느끼고 함수형에 귀의할때가 됐는데..
해커스펍 안드로이드 버전 뭔가 진척이 생긴것 같기도 하고 아닌 것 같기도 하고
Claud에서 Local agent 기능으로 알아서 작업을 동시에 실행시키는데, Main agent가 다른 Agent가 일하는지 감시하고 일 안한다고 보고하고는 일 시킨다.
Good day all! Upcoming episode of Fireside Fedi!
The #livestream will be on: stream.firesidefedi.live
Special Guest: @hongminhee@hollo.social
An intersectionalist, feminist, and socialist living in Seoul (UTC+09:00). @tokolovesme's spouse. Who's behind @fedify, @hollo, and @botkit. Write some free software in #TypeScript, #Haskell, #Rust, & #Python. They/them.
Follow @ozoned@stream.firesidefedi.live to be alerted when we go live! So don't miss it!
It will happen on 06 April 2026 at 08:30 US Eastern Time ( UTC-4 )
If by any ungodly chance you miss the show:
#PeerTube ( #VOD ): tubefree.org/@firesidefedi #firesidefedi #fediverse #fedi #interview #freesoftware #opensource #userfreedom #freedom #resistance

![]() @hongminhee洪 民憙 (Hong Minhee)
@hongminhee洪 民憙 (Hong Minhee) @kecan0406kec is there a build of the Android client yet? I'd love to try it out
![]() @liaizonwakest likes your bugs ⁂ Not yet, but it would be made soon. It's mostly being done by
@liaizonwakest likes your bugs ⁂ Not yet, but it would be made soon. It's mostly being done by ![]() @kodingwarriorJaeyeol Lee.
@kodingwarriorJaeyeol Lee.
Linux users:
How often do you run your system's update procedure (like an `apt upgrade`, etc)?
(boosts welcome)
다들 페디버스 클라이언트 앱 관련해서 어떤거 사용하시나요? 추천 부탁드립니다
Box-sizing should be border-box by default.
와 같은 실수를 모아놓은 CSS 설계 실수 목록. 설계자들도 인지하고 있다고 생각하니 왠지 덜 불편해졌다.
다들 페디버스 클라이언트 앱 관련해서 어떤거 사용하시나요? 추천 부탁드립니다
@kecan0406kec “페디버스 클라이언트 앱”이라는 건 아직 없고, “Mastodon 클라이언트 앱”을 말씀하신다면 iOS에서는 Ivory를 많이 쓰는 것 같습니다. Android는 잘 안 써서 모르겠네요…
다만 Hackers' Pub은 Mastodon이 아니라서 Mastodon 클라이언트 앱은 못 씁니다. Hackers' Pub 전용 iOS 앱 및 Android 앱이 개발중이긴 합니다.

미니PC 생긴김에 브라우저 기반 에디터에 대해 다시 생각해봤는데, 나는 브라우저의 탭을 그대로 쓰고싶단 말이지. 근데 cross tab 메모리 공유가 아직 제약이 많다. SharedWorker들간에 SharedArrayBuffer도 못보내고, 문자열 전송에도 매번 복사가 발생한다. 뭐 이런 문제 있다고 브라우저 기반 에디터를 못만드는건 아니긴 하지만 아쉽다. 관련한 WHATWG에 제안이 있는데 언제 시간날 때 기여해보면 좋겠군.
혹시 해키지 계정 endorsement해 주실 분이 있을까요? https://hackage.haskell.org/user/jhhuh/endorse
![]() @jhhuhJi-Haeng Huh 했습니다!
@jhhuhJi-Haeng Huh 했습니다!
혹시 해키지 계정 endorsement해 주실 분이 있을까요? https://hackage.haskell.org/user/jhhuh/endorse
존경하는 어떤 분께서 세벌식에 관한 질문을 주셔서, 생각 난 김에 써 봄. 세벌식에도 여러 변형이 있으므로 아래의 설명은 편의상 최종(3-91)을 기준으로 한다.
자판 배열을 보면 'ㅗ' 가 두 개다. 3-91 기준으로 쿼티 'v' 자리에도 'ㅗ' 가 있고, '/' 자리에도 'ㅗ' 가 있다. 왜 'ㅗ' 가 두 개지?
- 'v' 자리에 있는 것은 그냥 'ㅗ' 이고,
- '/' 자리에 있는 것은 조합용 'ㅗ' 다. 'ㅘ, ㅙ, ㅚ' 등의 겹모음을 만들 때 쓴다.
'조합용' 모음이 따로 있는 것은 원래는 기계식 타자기 시절의 흔적인데... 아부기다도 아니고 아브자드도 아니고 굳이 말하자면 알파벳이기는 한데 또 그냥 알파벳이라기에는 어째선지 한 글자가 한 음절에 대응하도록 되어 있는 세계적으로 유례가 드물고 괴상망측한 한글이라는 표기체계에 대하여 완전한 기계식 타자기를 1950년대에 효과적으로 구현했다는 것이 세벌식의 놀라운 위업으로서... 쌍초점 어쩌고... 생략. 아무튼,
그래서 세 칸이 이 용도로 쓰인다.
- 쿼티 '/' 자리에 조합용 'ㅗ'
- 쿼티 '9' 자리에 조합용 'ㅜ'
- 쿼티 '8' 자리에 'ㅢ'
따라서 원칙적으로 'ㅚ' 를 입력하려면 'vd' 하면 안 되고, '/d' 해야 한다. 'gd' 로는 'ㅢ' 를 만들 수 없고, '8' 을 써야 한다.
그런데 이제 기계식 타자기는 매우 드물어졌다. 그리고 현대의 OS 에서 한글을 쓰려면 어차피 입력기라는 소프트웨어 계층이 있어야 한다. 그렇다면 'vd' 로 'ㅚ' 를 만들지 못하게 할 이유는 없는 것 아닌가? 전자식의 시대에도 조합용 모음을 따로 두는 것의 장점이 있는가?
있다.
예를 들어 '강' 은 원래 'kfa' 로 입력해야 한다. 그런데 입력기가 지원하면, 'kaf' 나 'fka' 등으로 순서가 꼬였을 때에도 '강' 으로 완성되게 할 수 있다. 세벌식은 초성과 종성을 구분하므로, 'ㄱㅇㅏ' 가 입력되었을 때 'ㄱ' 과 'ㅇ' 이 각각 어디로 가야 할지 정확히 알 수 있는 것이다. 이것이 (세벌식 사용자들이 그렇게들 자랑스러워하는) 모아치기다.
그런데 모아치기를 지원하면서 'vd' 로 'ㅚ' 를 조합할 수 있도록 허용한다면, 뜻하지 않게 조합 '당하는' 일이 더 많이 발생한다. 예를 들어
- '오이' 를 입력하려고 'jvjd' 를 치려다가 실수로 'jvdj' 를 넣었다면 '외ㅇ' 로 조합당해 버린다.
- 반면에, 겹모음 'ㅚ' 는 오직 '/d' 로만 입력할 수 있다는 규칙이 있으면, 'jvdj' 도 '오이' 로 완성된다.
이건 그냥 우연히 얻어 걸린 장점이 아니다. 조합용 'ㅗ' 가 따로 있기 때문에 내가 'ㅗ' 와 'ㅣ' 를 따로 넣으려는 것인지 겹모음 'ㅚ' 를 넣으려는 것인지 명확히 밝힐 수 있다. 즉 사용자의 '의도' 를 입력기에 더 엄밀하고 정확하게 전달할 수 있다. 인간과 기계 사이의 인터페이스의 해상도가 더 높은 것이다.
문제는 세벌식 입력기 구현하는 프로그래머들이 이런 걸 이해하는 경우가 거의 없다는 것이다. (한탄)
옛날에 윈도 쓰던 시절에는 날개셋 입력기에 '이중 모음 정석 강요' 옵션이 있어서, 그것만 켜면 즉시 "모아치기를 하면서도 겹모음은 항상 조합용 모음으로만 만들어지게" 할 수 있었다. 리눅스 세계로 넘어온 뒤에는 한 번도 이걸 누리지 못하면서 살고 있다. 그동안 nabi, scim-hangul, uim-byeoru, kime, fcitx5-hangul 을 전전했지만 이런 거 제대로 되어 있는 경우는 한 번도 못 봄.
그렇다면 또 입력기도 짜야 한단 말인가. 야크 잡기에 끝이 없구나.
이 글에 댓글 달지 마세요. 어쩔 수 없이 차단합니다. 해커즈 퍼브에 댓글 안 받기 기능이 없기 때문에 부득이 차단밖에 할 수 없다는 것을 알려 드립니다.
끌올~~~ 해커스펍에서 웹개발 하는 분들 많관부~~~

최근 Microsoft가 집중적으로 개발하고 있는 Microsoft Foundry의 주요 기능 중 하나인 Hosted Agent는 Microsoft 스타일의 PaaS 개발의 정수를 보여주는 방식으로 기능이 개발되어가고 있습니다.
이는 Azure Function이나 예전 Windows Azure 시절 (Microsoft Azure로 리브랜딩되기 이전인 극 초창기 Azure 브랜드)의 Compute Role을 생각나게 하는 부분인데, Hosted Agent의 최신 기능을 살펴보면서 다른 한편으로 Microsoft의 기술 철학에 대해 이야기하는 아티클을 작성해보았습니다.

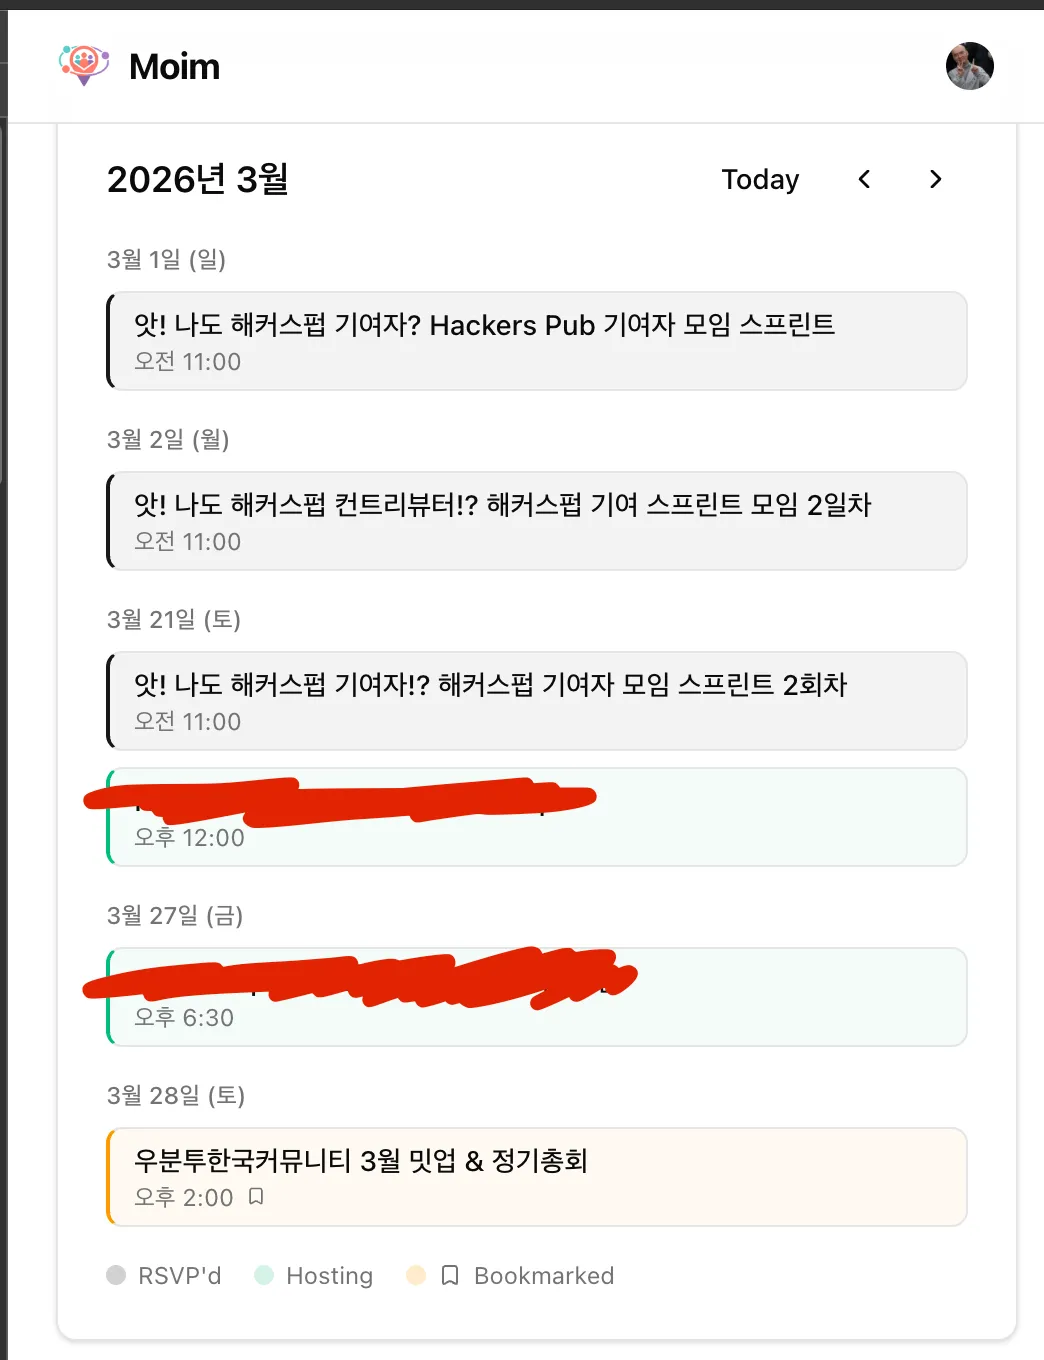
moim.live just crossed 30 members. Shipped calendar subscription today — you can now subscribe to your personal schedule directly in Google Calendar and other apps.
Traffic is still an unknown. But I'm not ready to go door-to-door yet anyway. There's one payment feature missing, and that's what I'm building toward next.
ActivityPub is supported and always will be — but it's not the whole point. The journey to making something genuinely useful is just getting started. Until payments feature shipping, I will not do additional work except for bug fix, changing UI.


@eatch잇창명 EatChangmyeong💕🐱 Markdown 자체가 원래 옛날부터 메일링리스트에서 쓰이던 서식을 최대한 흉내내서 만든 거라 그래요.
다른 영문 키보드 레이아웃을 써보려고 했는데 일단 아이패드에서는 colemak자판 일때는 단축키도 그에 맞는 키 위치가 되는데 한국어일 때는 qwerty자판 기준으로 단축키가 동작한다. 안그래도 아이패드에서는 3벌식 사실상 못 쓰는 것이라 아이패드에서만 2벌식 쓰고 있는데...
소프트웨어 사용의 절망감…을 뭔가 설명할 수 있을 것 같은데
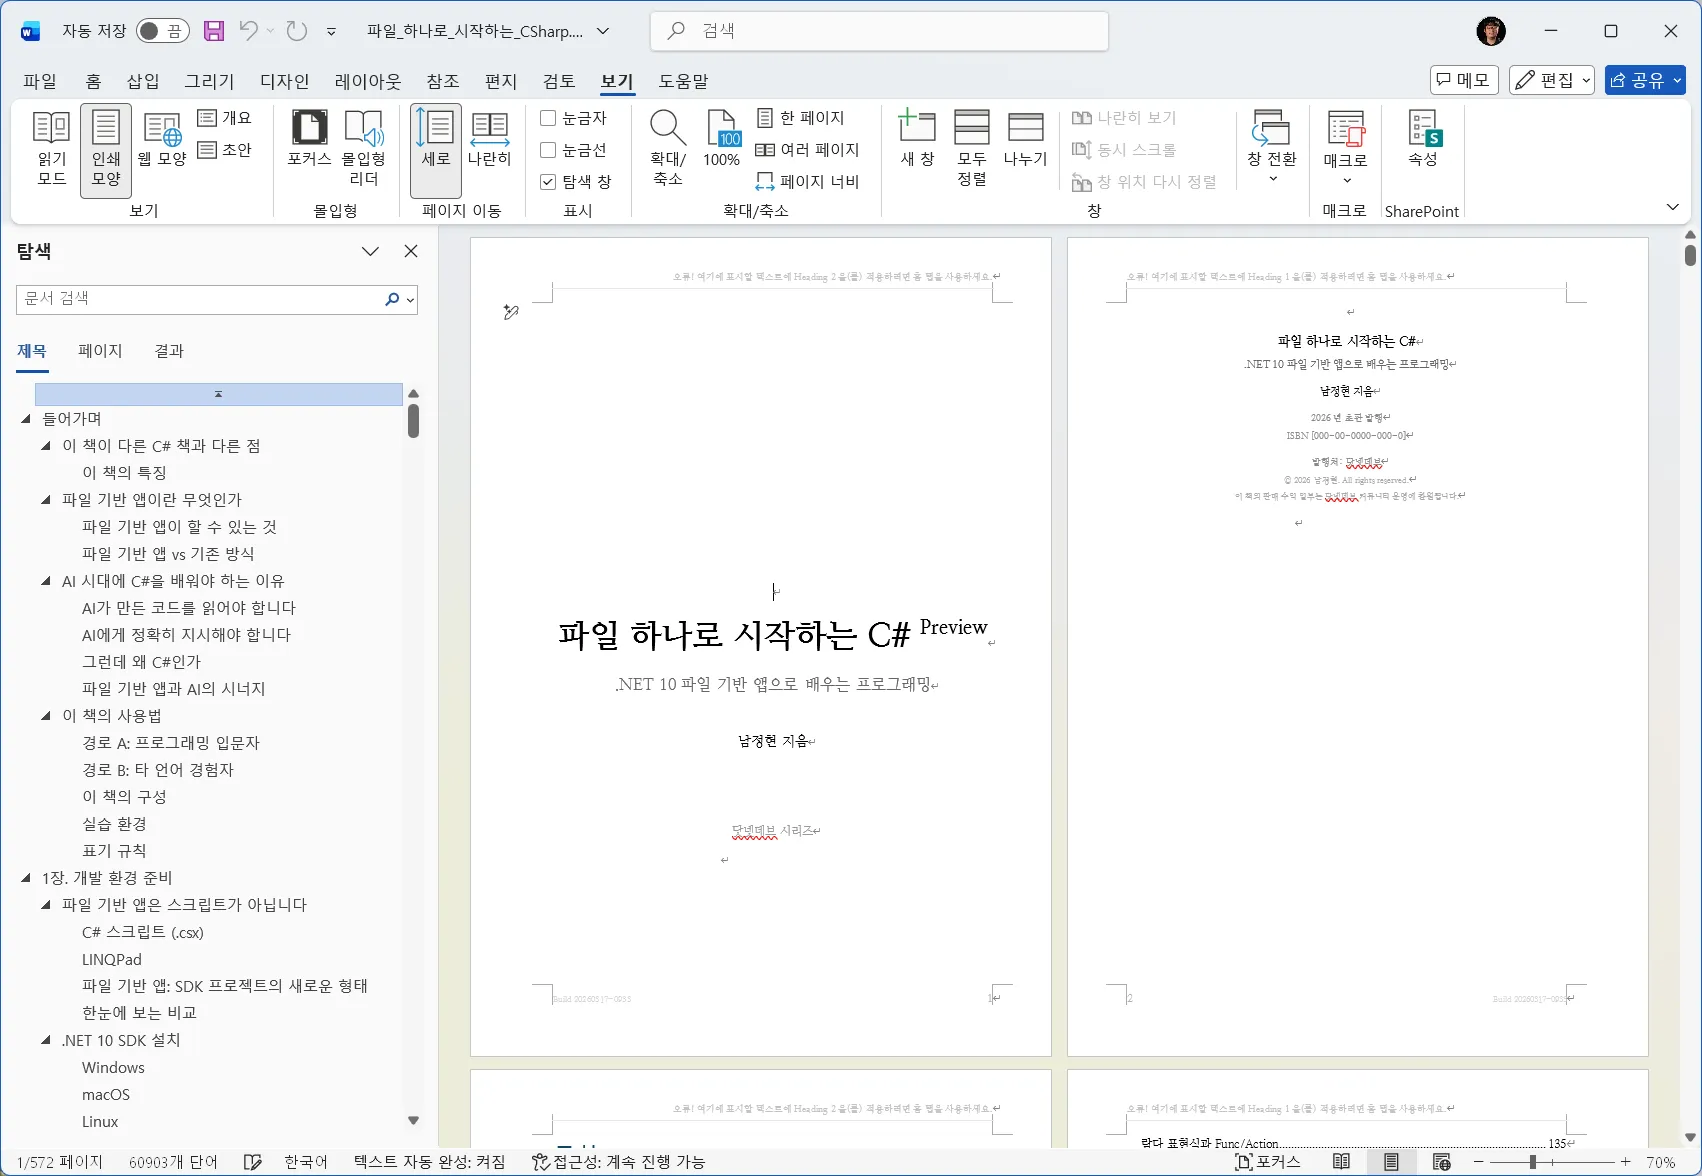
"(가칭) 파일 하나로 시작하는 C#" 이라는 도서를 집필하고 있습니다.
이제까지 전통적인 C# 도서들은 모두 Visual Studio 20xx 시리즈, JetBrains Rider, 혹은 Unity를 중심으로 서술하고 있습니다. 그러나 도구 우선이 아닌 프로그래밍 언어의 본질에 집중하는 책이 항상 아쉬웠습니다.
그러던 중 작년 가을에 출시된 .NET 10부터 기본 제공되는 "파일 기반 앱" 덕분에 드디어 제가 원하는 스타일의 본격적인 프로그래밍 언어에 집중하는 책을 낼 수 있게 되어, Windows 없이, Visual Studio/Rider/Unity 없이 C#을 제대로 사용할 수 있는 방법을 다루는 입문서를 기획하게 되었습니다.
현재 원고 초안을 완료한 상태이며, 베타 리딩을 진행하고 있습니다. 베타 리더로 참여를 희망하시는 분께서는 저에게 DM을 보내주시면 별도 단톡방으로 초대 드리도록 하겠습니다. 이후 자가 출판이 끝나면 무료로 도서도 증정해드리도록 하겠습니다! :-D
오랜만입니다.
Neo둥근모 폰트의 라이선스와 관련해서 커다란 변화를 준비하고 있습니다.
커밍쑨...
Bing Webmaster Tools에 내 웹페이지가 AI 답변에 몇 번 인용되었는지를 알려주는 기능이 붙었다. AI 챗봇이 검색을 대체하는 것이 더욱 실감된다.
difftastic처럼 AST를 활용해서 diff를 뜨는 툴은 이미 있는데, 아예 AST끼리 비교해서 힌트를 활용해 더 관대하게 merge하는 방법도 생각해볼수 있겠다. 여기서 힌트는 가령 하스켈에서 record 문법의 경우 property 순서가 무관하고 이런거.
버그 고쳐야하는데
예전에 OSSCA에서 반영은 됐지만 마음에 걸렸던 게 있었는데 이번에 직접 구현해서 성능 올렸다. 당시에는 활동한 것들 제출까지 시간이 얼마 안 남기도 했고 이걸 계속 해야 하나에 대한 고민이 있어서 안 했는데 이번에 절반까지는 했다.
대충 설명하면 WebAssembly에서 SIMD가 어느정도 지원이 된다는 걸 알게 되어서 그걸 레포에 기여했었는데 정작 성능이 1.2배 정도 밖에 안 올랐다. 뭔가 이상해서 자세히 까보니 OpenBLAS 자체에 WASM 아키텍처가 없던 것이었다. 내가 기여하고 싶던 레포에서 SciPy는 OpenBLAS를 사용하는데 이게 RISCV 경로를 사용하고 있었다.
그래서 이번에 결국 OpenBLAS에 메인테이너(?)에게 직접 말해서 WASM 아키텍처 반영하게 됐고, 거기에 GEMM 커널 추가했다. 성능이 거의 뭐 2배~4배까지 올라가서 뿌듯하다. 이제 하나하나 더 추가를 해야 한다. 그래야 내가 했던 레포에 반영이 되지 않을까.
I have a confession to make: while Haskell will always be my first love, PureScript was the one that truly stole my heart. It felt like a “polished” version of Haskell, smoothing out the rough edges and adding gems like row polymorphism that I still miss dearly. It's heartbreaking to see it labeled a “dead” language now, especially with its primary focus being stuck in the JavaScript ecosystem while other backends remain second-class citizens.
I've tried moving on with ReScript, Elm, or Gleam, but they never quite scratched that itch. They are great for what they are, but for someone used to the sheer expressive power of Haskell-like type systems, they feel a bit too “simple.” I find myself missing the depth and the “if it compiles, it works” confidence that only a truly robust type system provides.
Lately, my eyes have been wandering toward Lean and MoonBit. Lean is fascinatingly powerful, though I'm still searching for a more seamless JavaScript/WebAssembly story there. MoonBit also looks incredibly promising—a WebAssembly-first language that seems to aim for a higher level of sophistication than the usual ML-likes. The quest for the perfect, type-safe web language continues.
뭐같이 못만든 프로그램을 쓰고있으면 방사능에 피폭되는 기분이다. 은행 앱 얘기다.
닷넷 11에서 많은 개선이 예고되어있지만, 개인적으로는 dotnet run file.cs의 BuildLevel.Csc 최적화와 Runtime Async의 결합이 매우 기대됩니다.
이로서 NuGet 패키지 없이 BCL만 사용하는 단일 파일 C# 프로그램이 반복 실행 200ms~630ms의 성능을 달성하며, Python의 편의성과 Go의 배포 단순성, C#의 타입 안전성을 결합한 새로운 코딩 장르가 열리게 됩니다.

다른 분도 같은 문제를 겪었는지, 메인테이너분들 대신 멘션해주셔서 방금 머지되었다 🙏
어제 오후에 Codex에게 Optique 저장소 내의 문서와 예제 코드들을 살펴보고, 이를 기반으로 정형화되지 않은 복잡한 응용 예제들을 잔뜩 작성해서 실제로 의도대로 잘 동작하지 않는 경우에 이슈 트래커에 버그 리포트를 올려달라고 했고, 중간에 멈추지 말라고 했더니, 하룻밤 사이에 이슈를 300개 가까이 만들어 놨다. 그 중에서 오탐도 없지 않겠지만, 대충 훑어 본 바로는 아주 틀린 소리를 올려둔 것 같진 않아서 이제부터 하나씩 고쳐보려고 한다…
일단 이슈 처리 자체는 Claude Code에게 맡기고, 그 다음에 Codex에서 /review 커맨드를 써서 코드 리뷰를 한 다음, 리뷰 결과를 다시 Claude Code에게 전달해서 고치는 식으로 작업하고 있다. Codex에서 /review 커맨드를 써도 아무런 리뷰가 나오지 않을 때까지 이걸 반복한 후, PR을 올린 다음에 거기서 또 Gemini Code Assist와 Codex, GitHub Copilot 세 개의 리뷰 봇에게 리뷰를 받는다. 마찬가지로 아무런 리뷰도 나오지 않을 때까지 수정 커밋을 계속 푸시… 이걸 하고 나면 이슈 하나에 보통 커밋이 20개 정도는 나오는 것 같다.
요즘 코딩 에이전트도 그렇고 TUI 만드는게 유행인데, 여기에 무슨 장점이 있는걸까? 뭔가 까리하고 간지나는건 인정하는데 말이지. 그냥 로컬 웹서버 띄우는게 낫지않나?
ssh를 쓴다면 이해가 되는데, 그건 브라우저에서 인증을 편리하게 만드는게 나은 방향이라고 본다.
![]() @hongminhee洪 民憙 (Hong Minhee) 그런 것도 아마 코딩 에이전트가 잘 해줄 것 같긴 합니다 ㅋㅋㅋㅋ + 전 패키지 매니징은 Lazy 잘 쓰는 중...
@hongminhee洪 民憙 (Hong Minhee) 그런 것도 아마 코딩 에이전트가 잘 해줄 것 같긴 합니다 ㅋㅋㅋㅋ + 전 패키지 매니징은 Lazy 잘 쓰는 중...
![]() @nebuletoHaze 네, 안 그래도 그러려고요 ㅋㅋㅋ
@nebuletoHaze 네, 안 그래도 그러려고요 ㅋㅋㅋ
전에 읽다만 혼공컴운 책을 읽게됐는데 기존에 진법변환에 잘 몰랐다가 이번에 깨달음을 얻었다... 진짜 놀라운책...! CS추천받은 책이라서 전에 구매해놓고 읽다말았는데 이제 곧 대여기간이 얼마안남아서 이번달에 서둘러 읽어야 ㅠㅠ
주말에 Pijul을 연습해봤다. Pijul은 패치 이론 기반의 VCS로, Pijul 패치는 Git의 커밋과 달리 순서가 (완전히는 아니지만) 상관없다. 그래서 Git의 merge, rebase, cherry-pick이 Pijul에서는 그냥 apply이다. 커밋은 나열해야하는 반면 패치는 마치 숫자처럼 '더할' 수 있다. 그래서 그런지 튜토리얼은 오히려 훨씬 쉬웠다. 배울게 적어서 너무 빨리 끝났다고 느꼈을 정도.
물론 실무에 투입하려면 여러가지 애로사항이 있을텐데 차차 공유해보겠다.