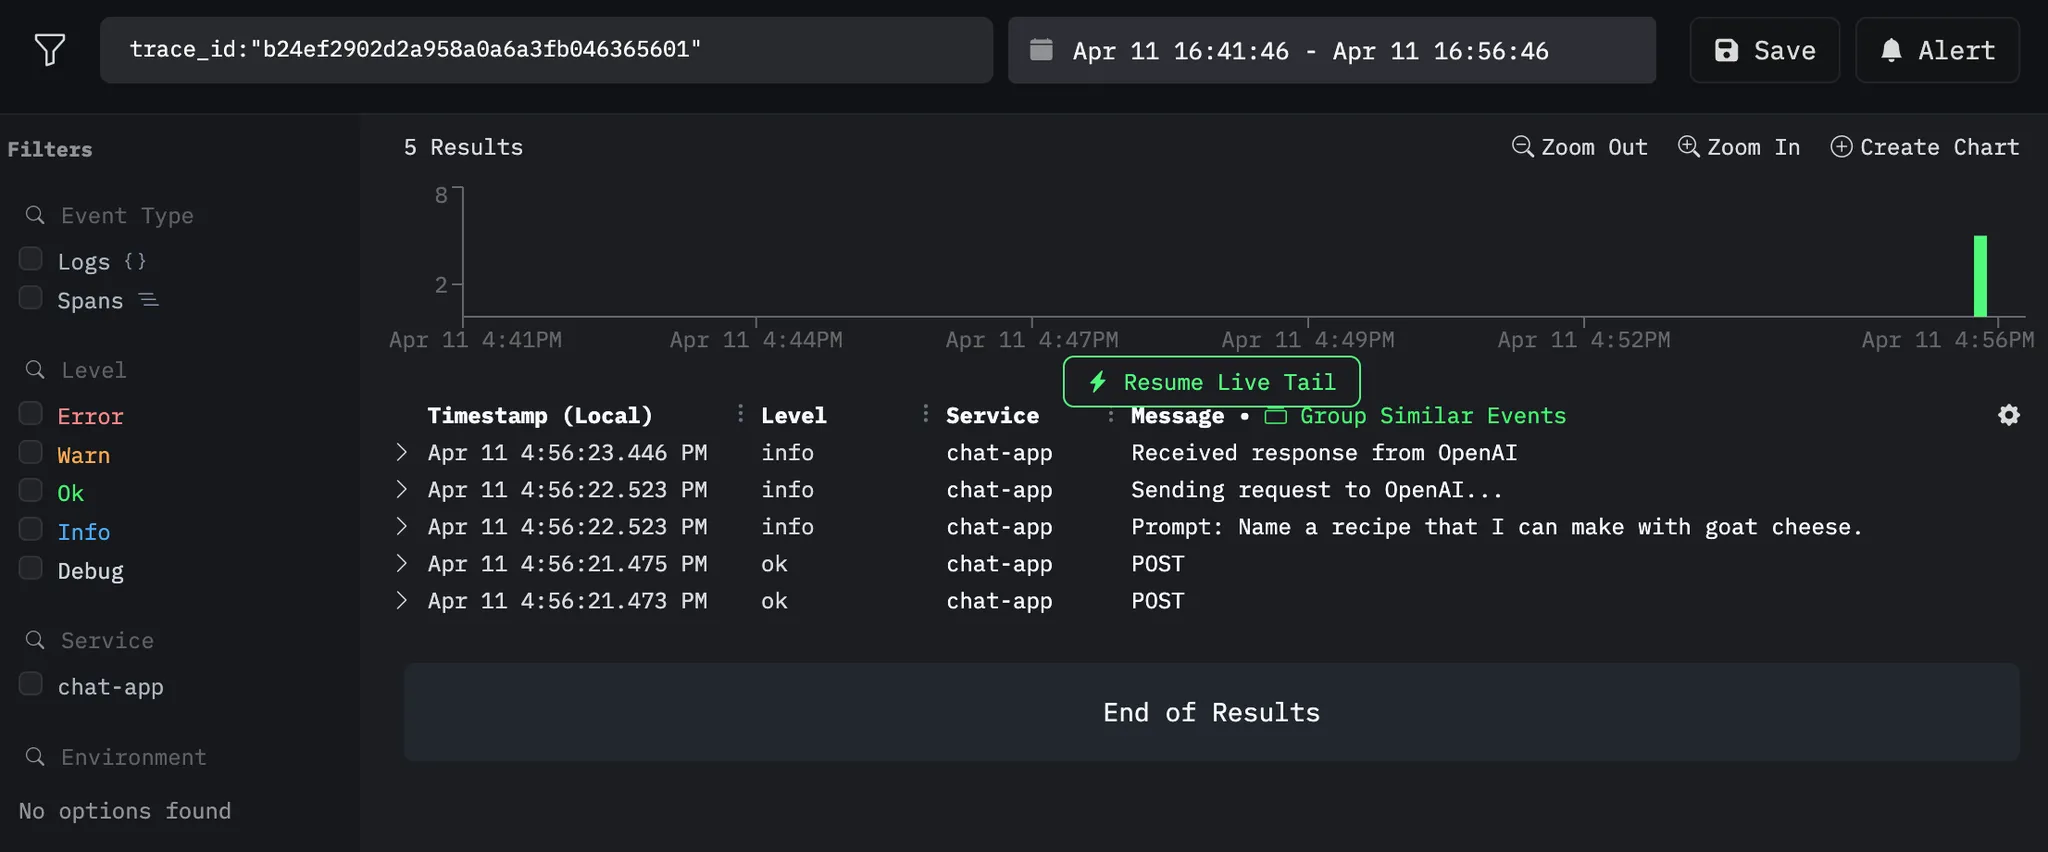
Search results

Hongdown 0.2.0 is out! Hongdown is an opinionated formatter written in , and this release brings support, so you can now use it as a library in .js, , , and browsers.

New features:

  • Smart heading sentence case conversion with ~450 built-in proper nouns
  • SmartyPants-style typographic punctuation ("straight"“curly”)
  • External code formatter integration for code blocks
  • Directory argument support for batch formatting

Try it in the browser: https://dahlia.github.io/hongdown/

Release notes: https://github.com/dahlia/hongdown/discussions/10

1

Building CLI apps with TypeScript in 2026

洪 民憙 (Hong Minhee) @hongminhee@hackers.pub

We've all been there. You start a quick TypeScript CLI with process.argv.slice(2), add a couple of options, and before you know it you're drowning in if/else blocks and parseInt calls. It works, until it doesn't.

In this guide, we'll move from manual argument parsing to a fully type-safe CLI with subcommands, mutually exclusive options, and shell completion.

The naïve approach: parsing process.argv

Let's start with the most basic approach. Say we want a greeting program that takes a name and optionally repeats the greeting:

// greet.ts
const args = process.argv.slice(2);

let name: string | undefined;
let count = 1;

for (let i = 0; i < args.length; i++) {
  if (args[i] === "--name" || args[i] === "-n") {
    name = args[++i];
  } else if (args[i] === "--count" || args[i] === "-c") {
    count = parseInt(args[++i], 10);
  }
}

if (!name) {
  console.error("Error: --name is required");
  process.exit(1);
}

for (let i = 0; i < count; i++) {
  console.log(`Hello, ${name}!`);
}

Run node greet.js --name Alice --count 3 and you'll get three greetings.

But this approach is fragile. count could be NaN if someone passes --count foo, and we'd silently proceed. There's no help text. If someone passes --name without a value, we'd read the next option as the name. And the boilerplate grows fast with each new option.

The traditional libraries

You've probably heard of Commander.js and Yargs. They've been around for years and solve the basic problems:

// With Commander.js
import { program } from "commander";

program
  .requiredOption("-n, --name <n>", "Name to greet")
  .option("-c, --count <number>", "Number of times to greet", "1")
  .parse();

const opts = program.opts();

These libraries handle help text, option parsing, and basic validation. But they were designed before TypeScript became mainstream, and the type safety is bolted on rather than built in.

The real problem shows up when you need mutually exclusive options. Say your CLI works either in "server mode" (with --port and --host) or "client mode" (with --url). With these libraries, you end up with a config object where all options are potentially present, and you're left writing runtime checks to ensure the user didn't mix incompatible flags. TypeScript can't help you because the types don't reflect the actual constraints.

Enter Optique

Optique takes a different approach. Instead of configuring options declaratively, you build parsers by composing smaller parsers together. The types flow naturally from this composition, so TypeScript always knows exactly what shape your parsed result will have.

Optique works across JavaScript runtimes: Node.js, Deno, and Bun are all supported. The core parsing logic has no runtime-specific dependencies, so you can even use it in browsers if you need to parse CLI-like arguments in a web context.

Let's rebuild our greeting program:

import { object } from "@optique/core/constructs";
import { option } from "@optique/core/primitives";
import { integer, string } from "@optique/core/valueparser";
import { withDefault } from "@optique/core/modifiers";
import { run } from "@optique/run";

const parser = object({
  name: option("-n", "--name", string()),
  count: withDefault(option("-c", "--count", integer({ min: 1 })), 1),
});

const config = run(parser);
// config is typed as { name: string; count: number }

for (let i = 0; i < config.count; i++) {
  console.log(`Hello, ${config.name}!`);
}

Types are inferred automatically. config.name is string, not string | undefined. config.count is number, guaranteed to be at least 1. Validation is built in: integer({ min: 1 }) rejects non-integers and values below 1 with clear error messages. Help text is generated automatically, and the run() function handles errors and exits with appropriate codes.

Install it with your package manager of choice:

npm add @optique/core @optique/run
# or: pnpm add, yarn add, bun add, deno add jsr:@optique/core jsr:@optique/run

Building up: a file converter

Let's build something more realistic: a file converter that reads from an input file, converts to a specified format, and writes to an output file.

import { object } from "@optique/core/constructs";
import { optional, withDefault } from "@optique/core/modifiers";
import { argument, option } from "@optique/core/primitives";
import { choice, string } from "@optique/core/valueparser";
import { run } from "@optique/run";

const parser = object({
  input: argument(string({ metavar: "INPUT" })),
  output: option("-o", "--output", string({ metavar: "FILE" })),
  format: withDefault(
    option("-f", "--format", choice(["json", "yaml", "toml"])),
    "json"
  ),
  pretty: option("-p", "--pretty"),
  verbose: option("-v", "--verbose"),
});

const config = run(parser, {
  help: "both",
  version: { mode: "both", value: "1.0.0" },
});

// config.input: string
// config.output: string
// config.format: "json" | "yaml" | "toml"
// config.pretty: boolean
// config.verbose: boolean

The type of config.format isn't just string. It's the union "json" | "yaml" | "toml". TypeScript will catch typos like config.format === "josn" at compile time.

The choice() parser is useful for any option with a fixed set of valid values: log levels, output formats, environment names, and so on. You get both runtime validation (invalid values are rejected with helpful error messages) and compile-time checking (TypeScript knows the exact set of possible values).

Mutually exclusive options

Now let's tackle the case that trips up most CLI libraries: mutually exclusive options. Say our tool can either run as a server or connect as a client, but not both:

import { object, or } from "@optique/core/constructs";
import { withDefault } from "@optique/core/modifiers";
import { argument, constant, option } from "@optique/core/primitives";
import { integer, string, url } from "@optique/core/valueparser";
import { run } from "@optique/run";

const parser = or(
  // Server mode
  object({
    mode: constant("server"),
    port: option("-p", "--port", integer({ min: 1, max: 65535 })),
    host: withDefault(option("-h", "--host", string()), "0.0.0.0"),
  }),
  // Client mode
  object({
    mode: constant("client"),
    url: argument(url()),
  }),
);

const config = run(parser);

The or() combinator tries each alternative in order. The first one that successfully parses wins. The constant() parser adds a literal value to the result without consuming any input, which serves as a discriminator.

TypeScript infers a discriminated union:

type Config =
  | { mode: "server"; port: number; host: string }
  | { mode: "client"; url: URL };

Now you can write type-safe code that handles each mode:

if (config.mode === "server") {
  console.log(`Starting server on ${config.host}:${config.port}`);
} else {
  console.log(`Connecting to ${config.url.hostname}`);
}

Try accessing config.url in the server branch. TypeScript won't let you. The compiler knows that when mode is "server", only port and host exist.

This is the key difference from configuration-based libraries. With Commander or Yargs, you'd get a type like { port?: number; host?: string; url?: string } and have to check at runtime which combination of fields is actually present. With Optique, the types match the actual constraints of your CLI.

Subcommands

For larger tools, you'll want subcommands. Optique handles this with the command() parser:

import { object, or } from "@optique/core/constructs";
import { optional } from "@optique/core/modifiers";
import { argument, command, constant, option } from "@optique/core/primitives";
import { string } from "@optique/core/valueparser";
import { run } from "@optique/run";

const parser = or(
  command("add", object({
    action: constant("add"),
    key: argument(string({ metavar: "KEY" })),
    value: argument(string({ metavar: "VALUE" })),
  })),
  command("remove", object({
    action: constant("remove"),
    key: argument(string({ metavar: "KEY" })),
  })),
  command("list", object({
    action: constant("list"),
    pattern: optional(option("-p", "--pattern", string())),
  })),
);

const result = run(parser, { help: "both" });

switch (result.action) {
  case "add":
    console.log(`Adding ${result.key}=${result.value}`);
    break;
  case "remove":
    console.log(`Removing ${result.key}`);
    break;
  case "list":
    console.log(`Listing${result.pattern ? ` (filter: ${result.pattern})` : ""}`);
    break;
}

Each subcommand gets its own help text. Run myapp add --help and you'll see only the options relevant to add. Run myapp --help and you'll see a summary of all available commands.

The pattern here is the same as mutually exclusive options: or() to combine alternatives, constant() to add a discriminator. This consistency is one of Optique's strengths. Once you understand the basic combinators, you can build arbitrarily complex CLI structures by composing them.

Shell completion

Optique has built-in shell completion for Bash, zsh, fish, PowerShell, and Nushell. Enable it by passing completion: "both" to run():

const config = run(parser, {
  help: "both",
  version: { mode: "both", value: "1.0.0" },
  completion: "both",
});

Users can then generate completion scripts:

$ myapp --completion bash >> ~/.bashrc
$ myapp --completion zsh >> ~/.zshrc
$ myapp --completion fish > ~/.config/fish/completions/myapp.fish

The completions are context-aware. They know about your subcommands, option values, and choice() alternatives. Type myapp --format <TAB> and you'll see json, yaml, toml as suggestions. Type myapp a<TAB> and it'll complete to myapp add.

Completion support is often an afterthought in CLI tools, but it makes a real difference in user experience. With Optique, you get it essentially for free.

Integrating with validation libraries

Already using Zod for validation in your project? The @optique/zod package lets you reuse those schemas as CLI value parsers:

import { z } from "zod";
import { zod } from "@optique/zod";
import { option } from "@optique/core/primitives";

const email = option("--email", zod(z.string().email()));
const port = option("--port", zod(z.coerce.number().int().min(1).max(65535)));

Your existing validation logic just works. The Zod error messages are passed through to the user, so you get the same helpful feedback you're used to.

Prefer Valibot? The @optique/valibot package works the same way:

import * as v from "valibot";
import { valibot } from "@optique/valibot";
import { option } from "@optique/core/primitives";

const email = option("--email", valibot(v.pipe(v.string(), v.email())));

Valibot's bundle size is significantly smaller than Zod's (~10KB vs ~52KB), which can matter for CLI tools where startup time is noticeable.

Tips

A few things I've learned building CLIs with Optique:

Start simple. Begin with object() and basic options. Add or() for mutually exclusive groups only when you need them. It's easy to over-engineer CLI parsers.

Use descriptive metavars. Instead of string(), write string({ metavar: "FILE" }) or string({ metavar: "URL" }). The metavar appears in help text and error messages, so it's worth the extra few characters.

Leverage withDefault(). It's better than making options optional and checking for undefined everywhere. Your code becomes cleaner when you can assume values are always present.

Test your parser. Optique's core parsing functions work without process.argv, so you can unit test your parser logic:

import { parse } from "@optique/core/parser";

const result = parse(parser, ["--name", "Alice", "--count", "3"]);
if (result.success) {
  assert.equal(result.value.name, "Alice");
  assert.equal(result.value.count, 3);
}

This is especially valuable for complex parsers with many edge cases.

Going further

We've covered the fundamentals, but Optique has more to offer:

  • Async value parsers for validating against external sources, like checking if a Git branch exists or if a URL is reachable
  • Path validation with path() for checking file existence, directory structure, and file extensions
  • Custom value parsers for domain-specific types (though Zod/Valibot integration is usually easier)
  • Reusable option groups with merge() for sharing common options across subcommands
  • The @optique/temporal package for parsing dates and times using the Temporal API

Check out the documentation for the full picture. The tutorial walks through the concepts in more depth, and the cookbook has patterns for common scenarios.

That's it

Building CLIs in TypeScript doesn't have to mean fighting with types or writing endless runtime validation. Optique lets you express constraints in a way that TypeScript actually understands, so the compiler catches mistakes before they reach production.

The source is on GitHub, and packages are available on both npm and JSR.


Questions or feedback? Find me on the fediverse or open an issue on the GitHub repo.

Read more →
1

Logging in Node.js (or Deno or Bun or edge functions) in 2026

洪 民憙 (Hong Minhee) @hongminhee@hackers.pub

It's 2 AM. Something is wrong in production. Users are complaining, but you're not sure what's happening—your only clues are a handful of console.log statements you sprinkled around during development. Half of them say things like “here” or “this works.” The other half dump entire objects that scroll off the screen. Good luck.

We've all been there. And yet, setting up “proper” logging often feels like overkill. Traditional logging libraries like winston or Pino come with their own learning curves, configuration formats, and assumptions about how you'll deploy your app. If you're working with edge functions or trying to keep your bundle small, adding a logging library can feel like bringing a sledgehammer to hang a picture frame.

I'm a fan of the “just enough” approach—more than raw console.log, but without the weight of a full-blown logging framework. We'll start from console.log(), understand its real limitations (not the exaggerated ones), and work toward a setup that's actually useful. I'll be using LogTape for the examples—it's a zero-dependency logging library that works across Node.js, Deno, Bun, and edge functions, and stays out of your way when you don't need it.

Starting with console methods—and where they fall short

The console object is JavaScript's great equalizer. It's built-in, it works everywhere, and it requires zero setup. You even get basic severity levels: console.debug(), console.info(), console.warn(), and console.error(). In browser DevTools and some terminal environments, these show up with different colors or icons.

console.debug("Connecting to database...");
console.info("Server started on port 3000");
console.warn("Cache miss for user 123");
console.error("Failed to process payment");

For small scripts or quick debugging, this is perfectly fine. But once your application grows beyond a few files, the cracks start to show:

No filtering without code changes. Want to hide debug messages in production? You'll need to wrap every console.debug() call in a conditional, or find-and-replace them all. There's no way to say “show me only warnings and above” at runtime.

Everything goes to the console. What if you want to write logs to a file? Send errors to Sentry? Stream logs to CloudWatch? You'd have to replace every console.* call with something else—and hope you didn't miss any.

No context about where logs come from. When your app has dozens of modules, a log message like “Connection failed” doesn't tell you much. Was it the database? The cache? A third-party API? You end up prefixing every message manually: console.error("[database] Connection failed").

No structured data. Modern log analysis tools work best with structured data (JSON). But console.log("User logged in", { userId: 123 }) just prints User logged in { userId: 123 } as a string—not very useful for querying later.

Libraries pollute your logs. If you're using a library that logs with console.*, those messages show up whether you want them or not. And if you're writing a library, your users might not appreciate unsolicited log messages.

What you actually need from a logging system

Before diving into code, let's think about what would actually solve the problems above. Not a wish list of features, but the practical stuff that makes a difference when you're debugging at 2 AM or trying to understand why requests are slow.

Log levels with filtering

A logging system should let you categorize messages by severity—trace, debug, info, warning, error, fatal—and then filter them based on what you need. During development, you want to see everything. In production, maybe just warnings and above. The key is being able to change this without touching your code.

Categories

When your app grows beyond a single file, you need to know where logs are coming from. A good logging system lets you tag logs with categories like ["my-app", "database"] or ["my-app", "auth", "oauth"]. Even better, it lets you set different log levels for different categories—maybe you want debug logs from the database module but only warnings from everything else.

Sinks (multiple output destinations)

“Sink” is just a fancy word for “where logs go.” You might want logs to go to the console during development, to files in production, and to an external service like Sentry or CloudWatch for errors. A good logging system lets you configure multiple sinks and route different logs to different destinations.

Structured logging

Instead of logging strings, you log objects with properties. This makes logs machine-readable and queryable:

// Instead of this:
logger.info("User 123 logged in from 192.168.1.1");

// You do this:
logger.info("User logged in", { userId: 123, ip: "192.168.1.1" });

Now you can search for all logs where userId === 123 or filter by IP address.

Context for request tracing

In a web server, you often want all logs from a single request to share a common identifier (like a request ID). This makes it possible to trace a request's journey through your entire system.

Getting started with LogTape

There are plenty of logging libraries out there. winston has been around forever and has a plugin for everything. Pino is fast and outputs JSON. bunyan, log4js, signale—the list goes on.

So why LogTape? A few reasons stood out to me:

Zero dependencies. Not “few dependencies”—actually zero. In an era where a single npm install can pull in hundreds of packages, this matters for security, bundle size, and not having to wonder why your lockfile just changed.

Works everywhere. The same code runs on Node.js, Deno, Bun, browsers, and edge functions like Cloudflare Workers. No polyfills, no conditional imports, no “this feature only works on Node.”

Doesn't force itself on users. If you're writing a library, you can add logging without your users ever knowing—unless they want to see the logs. This is a surprisingly rare feature.

Let's set it up:

npm add @logtape/logtape       # npm
pnpm add @logtape/logtape      # pnpm
yarn add @logtape/logtape      # Yarn
deno add jsr:@logtape/logtape  # Deno
bun add @logtape/logtape       # Bun

Configuration happens once, at your application's entry point:

import { configure, getConsoleSink, getLogger } from "@logtape/logtape";

await configure({
  sinks: {
    console: getConsoleSink(),  // Where logs go
  },
  loggers: [
    { category: ["my-app"], lowestLevel: "debug", sinks: ["console"] },  // What to log
  ],
});

// Now you can log from anywhere in your app:
const logger = getLogger(["my-app", "server"]);
logger.info`Server started on port 3000`;
logger.debug`Request received: ${{ method: "GET", path: "/api/users" }}`;

Notice a few things:

  1. Configuration is explicit. You decide where logs go (sinks) and which logs to show (lowestLevel).
  2. Categories are hierarchical. The logger ["my-app", "server"] inherits settings from ["my-app"].
  3. Template literals work. You can use backticks for a natural logging syntax.

Categories and filtering: Controlling log verbosity

Here's a scenario: you're debugging a database issue. You want to see every query, every connection attempt, every retry. But you don't want to wade through thousands of HTTP request logs to find them.

Categories let you solve this. Instead of one global log level, you can set different verbosity for different parts of your application.

await configure({
  sinks: {
    console: getConsoleSink(),
  },
  loggers: [
    { category: ["my-app"], lowestLevel: "info", sinks: ["console"] },  // Default: info and above
    { category: ["my-app", "database"], lowestLevel: "debug", sinks: ["console"] },  // DB module: show debug too
  ],
});

Now when you log from different parts of your app:

// In your database module:
const dbLogger = getLogger(["my-app", "database"]);
dbLogger.debug`Executing query: ${sql}`;  // This shows up

// In your HTTP module:
const httpLogger = getLogger(["my-app", "http"]);
httpLogger.debug`Received request`;  // This is filtered out (below "info")
httpLogger.info`GET /api/users 200`;  // This shows up

Controlling third-party library logs

If you're using libraries that also use LogTape, you can control their logs separately:

await configure({
  sinks: { console: getConsoleSink() },
  loggers: [
    { category: ["my-app"], lowestLevel: "debug", sinks: ["console"] },
    // Only show warnings and above from some-library
    { category: ["some-library"], lowestLevel: "warning", sinks: ["console"] },
  ],
});

The root logger

Sometimes you want a catch-all configuration. The root logger (empty category []) catches everything:

await configure({
  sinks: { console: getConsoleSink() },
  loggers: [
    // Catch all logs at info level
    { category: [], lowestLevel: "info", sinks: ["console"] },
    // But show debug for your app
    { category: ["my-app"], lowestLevel: "debug", sinks: ["console"] },
  ],
});

Log levels and when to use them

LogTape has six log levels. Choosing the right one isn't just about severity—it's about who needs to see the message and when.

Level When to use it
trace Very detailed diagnostic info. Loop iterations, function entry/exit. Usually only enabled when hunting a specific bug.
debug Information useful during development. Variable values, state changes, flow control decisions.
info Normal operational messages. “Server started,” “User logged in,” “Job completed.”
warning Something unexpected happened, but the app can continue. Deprecated API usage, retry attempts, missing optional config.
error Something failed. An operation couldn't complete, but the app is still running.
fatal The app is about to crash or is in an unrecoverable state.
const logger = getLogger(["my-app"]);

logger.trace`Entering processUser function`;
logger.debug`Processing user ${{ userId: 123 }}`;
logger.info`User successfully created`;
logger.warn`Rate limit approaching: ${980}/1000 requests`;
logger.error`Failed to save user: ${error.message}`;
logger.fatal`Database connection lost, shutting down`;

A good rule of thumb: in production, you typically run at info or warning level. During development or when debugging, you drop down to debug or trace.

Structured logging: Beyond plain text

At some point, you'll want to search your logs. “Show me all errors from the payment service in the last hour.” “Find all requests from user 12345.” “What's the average response time for the /api/users endpoint?”

If your logs are plain text strings, these queries are painful. You end up writing regexes, hoping the log format is consistent, and cursing past-you for not thinking ahead.

Structured logging means attaching data to your logs as key-value pairs, not just embedding them in strings. This makes logs machine-readable and queryable.

LogTape supports two syntaxes for this:

Template literals (great for simple messages)

const userId = 123;
const action = "login";
logger.info`User ${userId} performed ${action}`;

Message templates with properties (great for structured data)

logger.info("User performed action", {
  userId: 123,
  action: "login",
  ip: "192.168.1.1",
  timestamp: new Date().toISOString(),
});

You can reference properties in your message using placeholders:

logger.info("User {userId} logged in from {ip}", {
  userId: 123,
  ip: "192.168.1.1",
});
// Output: User 123 logged in from 192.168.1.1

Nested property access

LogTape supports dot notation and array indexing in placeholders:

logger.info("Order {order.id} placed by {order.customer.name}", {
  order: {
    id: "ORD-001",
    customer: { name: "Alice", email: "alice@example.com" },
  },
});

logger.info("First item: {items[0].name}", {
  items: [{ name: "Widget", price: 9.99 }],
});

Machine-readable output with JSON Lines

For production, you often want logs as JSON (one object per line). LogTape has a built-in formatter for this:

import { configure, getConsoleSink, jsonLinesFormatter } from "@logtape/logtape";

await configure({
  sinks: {
    console: getConsoleSink({ formatter: jsonLinesFormatter }),
  },
  loggers: [
    { category: [], lowestLevel: "info", sinks: ["console"] },
  ],
});

Output:

{"@timestamp":"2026-01-15T10:30:00.000Z","level":"INFO","message":"User logged in","logger":"my-app","properties":{"userId":123}}

Sending logs to different destinations (sinks)

So far we've been sending everything to the console. That's fine for development, but in production you'll likely want logs to go elsewhere—or to multiple places at once.

Think about it: console output disappears when the process restarts. If your server crashes at 3 AM, you want those logs to be somewhere persistent. And when an error occurs, you might want it to show up in your error tracking service immediately, not just sit in a log file waiting for someone to grep through it.

This is where sinks come in. A sink is just a function that receives log records and does something with them. LogTape comes with several built-in sinks, and creating your own is trivial.

Console sink

The simplest sink—outputs to the console:

import { getConsoleSink } from "@logtape/logtape";

const consoleSink = getConsoleSink();

File sink

For writing logs to files, install the @logtape/file package:

npm add @logtape/file
import { getFileSink, getRotatingFileSink } from "@logtape/file";

// Simple file sink
const fileSink = getFileSink("app.log");

// Rotating file sink (rotates when file reaches 10MB, keeps 5 old files)
const rotatingFileSink = getRotatingFileSink("app.log", {
  maxSize: 10 * 1024 * 1024,  // 10MB
  maxFiles: 5,
});

Why rotating files? Without rotation, your log file grows indefinitely until it fills up the disk. With rotation, old logs are automatically archived and eventually deleted, keeping disk usage under control. This is especially important for long-running servers.

External services

For production systems, you often want logs to go to specialized services that provide search, alerting, and visualization. LogTape has packages for popular services:

// OpenTelemetry (for observability platforms like Jaeger, Honeycomb, Datadog)
import { getOpenTelemetrySink } from "@logtape/otel";

// Sentry (for error tracking with stack traces and context)
import { getSentrySink } from "@logtape/sentry";

// AWS CloudWatch Logs (for AWS-native log aggregation)
import { getCloudWatchLogsSink } from "@logtape/cloudwatch-logs";

The OpenTelemetry sink is particularly useful if you're already using OpenTelemetry for tracing—your logs will automatically correlate with your traces, making debugging distributed systems much easier.

Multiple sinks

Here's where things get interesting. You can send different logs to different destinations based on their level or category:

await configure({
  sinks: {
    console: getConsoleSink(),
    file: getFileSink("app.log"),
    errors: getSentrySink(),
  },
  loggers: [
    { category: [], lowestLevel: "info", sinks: ["console", "file"] },  // Everything to console + file
    { category: [], lowestLevel: "error", sinks: ["errors"] },  // Errors also go to Sentry
  ],
});

Notice that a log record can go to multiple sinks. An error log in this configuration goes to the console, the file, and Sentry. This lets you have comprehensive local logs while also getting immediate alerts for critical issues.

Custom sinks

Sometimes you need to send logs somewhere that doesn't have a pre-built sink. Maybe you have an internal logging service, or you want to send logs to a Slack channel, or store them in a database.

A sink is just a function that takes a LogRecord. That's it:

import type { Sink } from "@logtape/logtape";

const slackSink: Sink = (record) => {
  // Only send errors and fatals to Slack
  if (record.level === "error" || record.level === "fatal") {
    fetch("https://hooks.slack.com/services/YOUR/WEBHOOK/URL", {
      method: "POST",
      headers: { "Content-Type": "application/json" },
      body: JSON.stringify({
        text: `[${record.level.toUpperCase()}] ${record.message.join("")}`,
      }),
    });
  }
};

The simplicity of sink functions means you can integrate LogTape with virtually any logging backend in just a few lines of code.

Request tracing with contexts

Here's a scenario you've probably encountered: a user reports an error, you check the logs, and you find a sea of interleaved messages from dozens of concurrent requests. Which log lines belong to the user's request? Good luck figuring that out.

This is where request tracing comes in. The idea is simple: assign a unique identifier to each request, and include that identifier in every log message produced while handling that request. Now you can filter your logs by request ID and see exactly what happened, in order, for that specific request.

LogTape supports this through contexts—a way to attach properties to log messages without passing them around explicitly.

Explicit context

The simplest approach is to create a logger with attached properties using .with():

function handleRequest(req: Request) {
  const requestId = crypto.randomUUID();
  const logger = getLogger(["my-app", "http"]).with({ requestId });

  logger.info`Request received`;  // Includes requestId automatically
  processRequest(req, logger);
  logger.info`Request completed`;  // Also includes requestId
}

This works well when you're passing the logger around explicitly. But what about code that's deeper in your call stack? What about code in libraries that don't know about your logger instance?

Implicit context

This is where implicit contexts shine. Using withContext(), you can set properties that automatically appear in all log messages within a callback—even in nested function calls, async operations, and third-party libraries (as long as they use LogTape).

First, enable implicit contexts in your configuration:

import { configure, getConsoleSink } from "@logtape/logtape";
import { AsyncLocalStorage } from "node:async_hooks";

await configure({
  sinks: { console: getConsoleSink() },
  loggers: [
    { category: ["my-app"], lowestLevel: "debug", sinks: ["console"] },
  ],
  contextLocalStorage: new AsyncLocalStorage(),
});

Then use withContext() in your request handler:

import { withContext, getLogger } from "@logtape/logtape";

function handleRequest(req: Request) {
  const requestId = crypto.randomUUID();

  return withContext({ requestId }, async () => {
    // Every log message in this callback includes requestId—automatically
    const logger = getLogger(["my-app"]);
    logger.info`Processing request`;

    await validateInput(req);   // Logs here include requestId
    await processBusinessLogic(req);  // Logs here too
    await saveToDatabase(req);  // And here

    logger.info`Request complete`;
  });
}

The magic is that validateInput, processBusinessLogic, and saveToDatabase don't need to know anything about the request ID. They just call getLogger() and log normally, and the request ID appears in their logs automatically. This works even across async boundaries—the context follows the execution flow, not the call stack.

This is incredibly powerful for debugging. When something goes wrong, you can search for the request ID and see every log message from every module that was involved in handling that request.

Framework integrations

Setting up request tracing manually can be tedious. LogTape has dedicated packages for popular frameworks that handle this automatically:

// Express
import { expressLogger } from "@logtape/express";
app.use(expressLogger());

// Fastify
import { getLogTapeFastifyLogger } from "@logtape/fastify";
const app = Fastify({ loggerInstance: getLogTapeFastifyLogger() });

// Hono
import { honoLogger } from "@logtape/hono";
app.use(honoLogger());

// Koa
import { koaLogger } from "@logtape/koa";
app.use(koaLogger());

These middlewares automatically generate request IDs, set up implicit contexts, and log request/response information. You get comprehensive request logging with a single line of code.

Using LogTape in libraries vs applications

If you've ever used a library that spams your console with unwanted log messages, you know how annoying it can be. And if you've ever tried to add logging to your own library, you've faced a dilemma: should you use console.log() and annoy your users? Require them to install and configure a specific logging library? Or just... not log anything?

LogTape solves this with its library-first design. Libraries can add as much logging as they want, and it costs their users nothing unless they explicitly opt in.

If you're writing a library

The rule is simple: use getLogger() to log, but never call configure(). Configuration is the application's responsibility, not the library's.

// my-library/src/database.ts
import { getLogger } from "@logtape/logtape";

const logger = getLogger(["my-library", "database"]);

export function connect(url: string) {
  logger.debug`Connecting to ${url}`;
  // ... connection logic ...
  logger.info`Connected successfully`;
}

What happens when someone uses your library?

If they haven't configured LogTape, nothing happens. The log calls are essentially no-ops—no output, no errors, no performance impact. Your library works exactly as if the logging code wasn't there.

If they have configured LogTape, they get full control. They can see your library's debug logs if they're troubleshooting an issue, or silence them entirely if they're not interested. They decide, not you.

This is fundamentally different from using console.log() in a library. With console.log(), your users have no choice—they see your logs whether they want to or not. With LogTape, you give them the power to decide.

If you're writing an application

You configure LogTape once in your entry point. This single configuration controls logging for your entire application, including any libraries that use LogTape:

await configure({
  sinks: { console: getConsoleSink() },
  loggers: [
    { category: ["my-app"], lowestLevel: "debug", sinks: ["console"] },  // Your app: verbose
    { category: ["my-library"], lowestLevel: "warning", sinks: ["console"] },  // Library: quiet
    { category: ["noisy-library"], lowestLevel: "fatal", sinks: [] },  // That one library: silent
  ],
});

This separation of concerns—libraries log, applications configure—makes for a much healthier ecosystem. Library authors can add detailed logging for debugging without worrying about annoying their users. Application developers can tune logging to their needs without digging through library code.

Migrating from another logger?

If your application already uses winston, Pino, or another logging library, you don't have to migrate everything at once. LogTape provides adapters that route LogTape logs to your existing logging setup:

import { install } from "@logtape/adaptor-winston";
import winston from "winston";

install(winston.createLogger({ /* your existing config */ }));

This is particularly useful when you want to use a library that uses LogTape, but you're not ready to switch your whole application over. The library's logs will flow through your existing winston (or Pino) configuration, and you can migrate gradually if you choose to.

Production considerations

Development and production have different needs. During development, you want verbose logs, pretty formatting, and immediate feedback. In production, you care about performance, reliability, and not leaking sensitive data. Here are some things to keep in mind.

Non-blocking mode

By default, logging is synchronous—when you call logger.info(), the message is written to the sink before the function returns. This is fine for development, but in a high-throughput production environment, the I/O overhead of writing every log message can add up.

Non-blocking mode buffers log messages and writes them in the background:

const consoleSink = getConsoleSink({ nonBlocking: true });
const fileSink = getFileSink("app.log", { nonBlocking: true });

The tradeoff is that logs might be slightly delayed, and if your process crashes, some buffered logs might be lost. But for most production workloads, the performance benefit is worth it.

Sensitive data redaction

Logs have a way of ending up in unexpected places—log aggregation services, debugging sessions, support tickets. If you're logging request data, user information, or API responses, you might accidentally expose sensitive information like passwords, API keys, or personal data.

LogTape's @logtape/redaction package helps you catch these before they become a problem:

import {
  redactByPattern,
  EMAIL_ADDRESS_PATTERN,
  CREDIT_CARD_NUMBER_PATTERN,
  type RedactionPattern,
} from "@logtape/redaction";
import { defaultConsoleFormatter, configure, getConsoleSink } from "@logtape/logtape";

const BEARER_TOKEN_PATTERN: RedactionPattern = {
  pattern: /Bearer [A-Za-z0-9\-._~+\/]+=*/g,
  replacement: "[REDACTED]",
};

const formatter = redactByPattern(defaultConsoleFormatter, [
  EMAIL_ADDRESS_PATTERN,
  CREDIT_CARD_NUMBER_PATTERN,
  BEARER_TOKEN_PATTERN,
]);

await configure({
  sinks: {
    console: getConsoleSink({ formatter }),
  },
  // ...
});

With this configuration, email addresses, credit card numbers, and bearer tokens are automatically replaced with [REDACTED] in your log output. The @logtape/redaction package comes with built-in patterns for common sensitive data types, and you can define custom patterns for anything else. It's not foolproof—you should still be mindful of what you log—but it provides a safety net.

See the redaction documentation for more patterns and field-based redaction.

Edge functions and serverless

Edge functions (Cloudflare Workers, Vercel Edge Functions, etc.) have a unique constraint: they can be terminated immediately after returning a response. If you have buffered logs that haven't been flushed yet, they'll be lost.

The solution is to explicitly flush logs before returning:

import { configure, dispose } from "@logtape/logtape";

export default {
  async fetch(request, env, ctx) {
    await configure({ /* ... */ });
    
    // ... handle request ...
    
    ctx.waitUntil(dispose());  // Flush logs before worker terminates
    
    return new Response("OK");
  },
};

The dispose() function flushes all buffered logs and cleans up resources. By passing it to ctx.waitUntil(), you ensure the worker stays alive long enough to finish writing logs, even after the response has been sent.

Wrapping up

Logging isn't glamorous, but it's one of those things that makes a huge difference when something goes wrong. The setup I've described here—categories for organization, structured data for queryability, contexts for request tracing—isn't complicated, but it's a significant step up from scattered console.log statements.

LogTape isn't the only way to achieve this, but I've found it hits a nice sweet spot: powerful enough for production use, simple enough that you're not fighting the framework, and light enough that you don't feel guilty adding it to a library.

If you want to dig deeper, the LogTape documentation covers advanced topics like custom filters, the “fingers crossed” pattern for buffering debug logs until an error occurs, and more sink options. The GitHub repository is also a good place to report issues or see what's coming next.

Now go add some proper logging to that side project you've been meaning to clean up. Your future 2 AM self will thank you.

Read more →
2

Sending emails in Node.js, Deno, and Bun in 2026: a practical guide

洪 民憙 (Hong Minhee) @hongminhee@hackers.pub

So you need to send emails from your JavaScript application. Email remains one of the most essential features in web apps—welcome emails, password resets, notifications—but the ecosystem is fragmented. Nodemailer doesn't work on edge functions. Each provider has its own SDK. And if you're using Deno or Bun, good luck finding libraries that actually work.

This guide covers how to send emails across modern JavaScript runtimes using Upyo, a cross-runtime email library.

Disclosure

I'm the author of Upyo. This guide focuses on Upyo because I built it to solve problems I kept running into, but you should know that going in. If you're looking for alternatives: Nodemailer is the established choice for Node.js (though it doesn't work on Deno/Bun/edge), and most email providers offer their own official SDKs.

TL;DR for the impatient

If you just want working code, here's the quickest path to sending an email:

import { createMessage } from "@upyo/core";
import { SmtpTransport } from "@upyo/smtp";

const transport = new SmtpTransport({
  host: "smtp.gmail.com",
  port: 465,
  secure: true,
  auth: {
    user: "your-email@gmail.com",
    pass: "your-app-password", // Not your regular password!
  },
});

const message = createMessage({
  from: "your-email@gmail.com",
  to: "recipient@example.com",
  subject: "Hello from my app!",
  content: { text: "This is my first email." },
});

const receipt = await transport.send(message);
if (receipt.successful) {
  console.log("Sent:", receipt.messageId);
} else {
  console.log("Failed:", receipt.errorMessages);
}

Install with:

npm add @upyo/core @upyo/smtp

That's it. This exact code works on Node.js, Deno, and Bun. But if you want to understand what's happening and explore more powerful options, read on.


Why Upyo?

  • Cross-runtime: Works on Node.js, Deno, Bun, and edge functions with the same API
  • Zero dependencies: Keeps your bundle small
  • Provider independence: Switch between SMTP, Mailgun, Resend, SendGrid, or Amazon SES without changing your application code
  • Type-safe: Full TypeScript support with discriminated unions for error handling
  • Built for testing: Includes a mock transport for unit tests

Part 1: Getting started with Gmail SMTP

Let's start with the most accessible option: Gmail's SMTP server. It's free, requires no additional accounts, and works great for development and low-volume production use.

Step 1: Generate a Gmail app password

Gmail doesn't allow you to use your regular password for SMTP. You need to create an app-specific password:

  1. Go to your Google Account
  2. Navigate to Security2-Step Verification (enable it if you haven't)
  3. At the bottom, click App passwords
  4. Select Mail and your device, then click Generate
  5. Copy the 16-character password

Step 2: Install dependencies

Choose your runtime and package manager:

Node.js

npm add @upyo/core @upyo/smtp
# or: pnpm add @upyo/core @upyo/smtp
# or: yarn add @upyo/core @upyo/smtp

Deno

deno add jsr:@upyo/core jsr:@upyo/smtp

Bun

bun add @upyo/core @upyo/smtp

The same code works across all three runtimes—that's the beauty of Upyo.

Step 3: Send your first email

import { createMessage } from "@upyo/core";
import { SmtpTransport } from "@upyo/smtp";

// Create the transport (reuse this for multiple emails)
const transport = new SmtpTransport({
  host: "smtp.gmail.com",
  port: 465,
  secure: true,
  auth: {
    user: "your-email@gmail.com",
    pass: "abcd efgh ijkl mnop", // Your app password
  },
});

// Create and send a message
const message = createMessage({
  from: "your-email@gmail.com",
  to: "recipient@example.com",
  subject: "Welcome to my app!",
  content: {
    text: "Thanks for signing up. We're excited to have you!",
    html: "<h1>Welcome!</h1><p>Thanks for signing up. We're excited to have you!</p>",
  },
});

const receipt = await transport.send(message);

if (receipt.successful) {
  console.log("Email sent successfully! Message ID:", receipt.messageId);
} else {
  console.error("Failed to send email:", receipt.errorMessages.join(", "));
}

// Don't forget to close connections when done
await transport.closeAllConnections();

Let me highlight a few important details:

  • secure: true with port 465: This establishes a TLS-encrypted connection from the start. Gmail requires encryption, so this combination is essential.
  • Separate text and html content: Always provide both. Some email clients don't render HTML, and spam filters look more favorably on emails with plain text alternatives.
  • The receipt pattern: Upyo uses discriminated unions for type-safe error handling. When receipt.successful is true, you get messageId. When it's false, you get errorMessages. This makes it impossible to forget error handling.
  • Closing connections: SMTP maintains persistent TCP connections. Always close them when you're done, or use await using (shown next) to handle this automatically.

Pro tip: automatic resource cleanup with await using

Managing resources manually is error-prone—what if an exception occurs before closeAllConnections() is called? Modern JavaScript (ES2024) solves this with explicit resource management.

import { createMessage } from "@upyo/core";
import { SmtpTransport } from "@upyo/smtp";

// Transport is automatically disposed when it goes out of scope
await using transport = new SmtpTransport({
  host: "smtp.gmail.com",
  port: 465,
  secure: true,
  auth: {
    user: "your-email@gmail.com",
    pass: "your-app-password",
  },
});

const message = createMessage({
  from: "your-email@gmail.com",
  to: "recipient@example.com",
  subject: "Hello!",
  content: { text: "This email was sent with automatic cleanup!" },
});

await transport.send(message);
// No need to call `closeAllConnections()` - it happens automatically!

The await using keyword tells JavaScript to call the transport's cleanup method when execution leaves this scope—even if an error is thrown. This pattern is similar to Python's with statement or C#'s using block. It's supported in Node.js 22+, Deno, and Bun.

What if your environment doesn't support await using?

For older Node.js versions or environments without ES2024 support, use try/finally to ensure cleanup:

const transport = new SmtpTransport({
  host: "smtp.gmail.com",
  port: 465,
  secure: true,
  auth: { user: "your-email@gmail.com", pass: "your-app-password" },
});

try {
  await transport.send(message);
} finally {
  await transport.closeAllConnections();
}

This achieves the same result—cleanup happens whether the send succeeds or throws an error.


Part 2: Adding attachments and rich content

Real-world emails often need more than plain text.

HTML emails with inline images

Inline images appear directly in the email body rather than as downloadable attachments. The trick is to reference them using a Content-ID (CID) URL scheme.

import { createMessage } from "@upyo/core";
import { SmtpTransport } from "@upyo/smtp";
import { readFile } from "node:fs/promises";

await using transport = new SmtpTransport({
  host: "smtp.gmail.com",
  port: 465,
  secure: true,
  auth: { user: "your-email@gmail.com", pass: "your-app-password" },
});

// Read your logo file
const logoContent = await readFile("./assets/logo.png");

const message = createMessage({
  from: "your-email@gmail.com",
  to: "customer@example.com",
  subject: "Your order confirmation",
  content: {
    html: `
      <div style="font-family: sans-serif; max-width: 600px; margin: 0 auto;">
        <img src="cid:company-logo" alt="Company Logo" style="width: 150px;">
        <h1>Order Confirmed!</h1>
        <p>Thank you for your purchase. Your order #12345 has been confirmed.</p>
      </div>
    `,
    text: "Order Confirmed! Thank you for your purchase. Your order #12345 has been confirmed.",
  },
  attachments: [
    {
      filename: "logo.png",
      content: logoContent,
      contentType: "image/png",
      contentId: "company-logo", // Referenced as cid:company-logo in HTML
      inline: true,
    },
  ],
});

await transport.send(message);

Key points about inline images:

  • contentId: This is the identifier you use in the HTML's src="cid:..." attribute. It can be any unique string.
  • inline: true: This tells the email client to display the image within the message body, not as a separate attachment.
  • Always include alt text: Some email clients block images by default, so the alt text ensures your message is still understandable.

File attachments

For regular attachments that recipients can download, use the standard File API. This approach works across all JavaScript runtimes.

import { createMessage } from "@upyo/core";
import { SmtpTransport } from "@upyo/smtp";
import { readFile } from "node:fs/promises";

await using transport = new SmtpTransport({
  host: "smtp.gmail.com",
  port: 465,
  secure: true,
  auth: { user: "your-email@gmail.com", pass: "your-app-password" },
});

// Read files to attach
const invoicePdf = await readFile("./invoices/invoice-2024-001.pdf");
const reportXlsx = await readFile("./reports/monthly-report.xlsx");

const message = createMessage({
  from: "billing@yourcompany.com",
  to: "client@example.com",
  cc: "accounting@yourcompany.com",
  subject: "Invoice #2024-001",
  content: {
    text: "Please find your invoice and monthly report attached.",
  },
  attachments: [
    new File([invoicePdf], "invoice-2024-001.pdf", { type: "application/pdf" }),
    new File([reportXlsx], "monthly-report.xlsx", {
      type: "application/vnd.openxmlformats-officedocument.spreadsheetml.sheet",
    }),
  ],
  priority: "high", // Sets email priority headers
});

await transport.send(message);

A few notes on attachments:

  • MIME types matter: Setting the correct type helps email clients display the right icon and open the file with the appropriate application.
  • priority: "high": This sets the X-Priority header, which some email clients use to highlight important messages. Use it sparingly—overuse can trigger spam filters.

Multiple recipients with different roles

Email supports several recipient types, each with different visibility rules:

import { createMessage } from "@upyo/core";

const message = createMessage({
  from: { name: "Support Team", address: "support@yourcompany.com" },
  to: [
    "primary-recipient@example.com",
    { name: "John Smith", address: "john@example.com" },
  ],
  cc: "manager@yourcompany.com",
  bcc: ["archive@yourcompany.com", "compliance@yourcompany.com"],
  replyTo: "no-reply@yourcompany.com",
  subject: "Your support ticket has been updated",
  content: { text: "We've responded to your ticket #5678." },
});

Understanding recipient types:

  • to: Primary recipients. Everyone can see who else is in this field.
  • cc (Carbon Copy): Secondary recipients. Visible to all recipients—use for people who should be informed but aren't the primary audience.
  • bcc (Blind Carbon Copy): Hidden recipients. No one can see BCC addresses—useful for archiving or compliance without revealing internal processes.
  • replyTo: Where replies should go. Useful when sending from a no-reply address but wanting responses to reach a real inbox.

You can specify addresses as simple strings ("email@example.com") or as objects with name and address properties for display names.


Part 3: Moving to production with email service providers

Gmail SMTP is great for getting started, but for production applications, you'll want a dedicated email service provider. Here's why:

  • Higher sending limits: Gmail caps you at ~500 emails/day for personal accounts
  • Better deliverability: Dedicated services maintain sender reputation and handle bounces properly
  • Analytics and tracking: See who opened your emails, clicked links, etc.
  • Webhook notifications: Get real-time callbacks for delivery events
  • No dependency on personal accounts: Production systems shouldn't rely on someone's Gmail

The best part? With Upyo, switching providers requires minimal code changes—just swap the transport.

Option A: Resend (modern and developer-friendly)

Resend is a newer email service with an excellent developer experience.

npm add @upyo/resend
import { createMessage } from "@upyo/core";
import { ResendTransport } from "@upyo/resend";

const transport = new ResendTransport({
  apiKey: process.env.RESEND_API_KEY!,
});

const message = createMessage({
  from: "hello@yourdomain.com", // Must be verified in Resend
  to: "user@example.com",
  subject: "Welcome aboard!",
  content: {
    text: "Thanks for joining us!",
    html: "<h1>Welcome!</h1><p>Thanks for joining us!</p>",
  },
  tags: ["onboarding", "welcome"], // For analytics
});

const receipt = await transport.send(message);

if (receipt.successful) {
  console.log("Sent via Resend:", receipt.messageId);
}

Notice how similar this looks to the SMTP example? The only differences are the import and the transport configuration. Your message creation and sending logic stays exactly the same—that's Upyo's transport abstraction at work.

Option B: SendGrid (enterprise-grade)

SendGrid is a popular choice for high-volume senders, offering advanced analytics, template management, and a generous free tier.

SendGrid is a popular choice for high-volume senders.

npm add @upyo/sendgrid
import { createMessage } from "@upyo/core";
import { SendGridTransport } from "@upyo/sendgrid";

const transport = new SendGridTransport({
  apiKey: process.env.SENDGRID_API_KEY!,
  clickTracking: true,
  openTracking: true,
});

const message = createMessage({
  from: "notifications@yourdomain.com",
  to: "user@example.com",
  subject: "Your weekly digest",
  content: {
    html: "<h1>This Week's Highlights</h1><p>Here's what you missed...</p>",
    text: "This Week's Highlights\n\nHere's what you missed...",
  },
  tags: ["digest", "weekly"],
});

await transport.send(message);

Option C: Mailgun (reliable workhorse)

Mailgun offers robust infrastructure with strong EU support—important if you need GDPR-compliant data residency.

npm add @upyo/mailgun
import { createMessage } from "@upyo/core";
import { MailgunTransport } from "@upyo/mailgun";

const transport = new MailgunTransport({
  apiKey: process.env.MAILGUN_API_KEY!,
  domain: "mg.yourdomain.com",
  region: "eu", // or "us"
});

const message = createMessage({
  from: "team@yourdomain.com",
  to: "user@example.com",
  subject: "Important update",
  content: { text: "We have some news to share..." },
});

await transport.send(message);

Option D: Amazon SES (cost-effective at scale)

Amazon SES is incredibly affordable—about $0.10 per 1,000 emails. If you're already in the AWS ecosystem, it integrates seamlessly with IAM, CloudWatch, and other services.

npm add @upyo/ses
import { createMessage } from "@upyo/core";
import { SesTransport } from "@upyo/ses";

const transport = new SesTransport({
  authentication: {
    type: "credentials",
    accessKeyId: process.env.AWS_ACCESS_KEY_ID!,
    secretAccessKey: process.env.AWS_SECRET_ACCESS_KEY!,
  },
  region: "us-east-1",
  configurationSetName: "my-config-set", // Optional: for tracking
});

const message = createMessage({
  from: "alerts@yourdomain.com",
  to: "admin@example.com",
  subject: "System alert",
  content: { text: "CPU usage exceeded 90%" },
  priority: "high",
});

await transport.send(message);

Part 4: Sending emails from edge functions

Here's where many email solutions fall short. Edge functions (Cloudflare Workers, Vercel Edge, Deno Deploy) run in a restricted environment—they can't open raw TCP connections, which means SMTP is not an option.

You must use an HTTP-based transport like Resend, SendGrid, Mailgun, or Amazon SES. The good news? Your code barely changes.

Cloudflare Workers example

// src/index.ts
import { createMessage } from "@upyo/core";
import { ResendTransport } from "@upyo/resend";

export default {
  async fetch(request: Request, env: Env): Promise<Response> {
    const transport = new ResendTransport({
      apiKey: env.RESEND_API_KEY,
    });

    const message = createMessage({
      from: "noreply@yourdomain.com",
      to: "user@example.com",
      subject: "Request received",
      content: { text: "We got your request and are processing it." },
    });

    const receipt = await transport.send(message);

    if (receipt.successful) {
      return new Response(`Email sent: ${receipt.messageId}`);
    } else {
      return new Response(`Failed: ${receipt.errorMessages.join(", ")}`, {
        status: 500,
      });
    }
  },
};

interface Env {
  RESEND_API_KEY: string;
}

Vercel Edge Functions example

// app/api/send-email/route.ts
import { createMessage } from "@upyo/core";
import { SendGridTransport } from "@upyo/sendgrid";

export const runtime = "edge";

export async function POST(request: Request) {
  const { to, subject, body } = await request.json();

  const transport = new SendGridTransport({
    apiKey: process.env.SENDGRID_API_KEY!,
  });

  const message = createMessage({
    from: "app@yourdomain.com",
    to,
    subject,
    content: { text: body },
  });

  const receipt = await transport.send(message);

  if (receipt.successful) {
    return Response.json({ success: true, messageId: receipt.messageId });
  } else {
    return Response.json(
      { success: false, errors: receipt.errorMessages },
      { status: 500 }
    );
  }
}

Deno Deploy example

// main.ts
import { createMessage } from "jsr:@upyo/core";
import { MailgunTransport } from "jsr:@upyo/mailgun";

Deno.serve(async (request: Request) => {
  if (request.method !== "POST") {
    return new Response("Method not allowed", { status: 405 });
  }

  const { to, subject, body } = await request.json();

  const transport = new MailgunTransport({
    apiKey: Deno.env.get("MAILGUN_API_KEY")!,
    domain: Deno.env.get("MAILGUN_DOMAIN")!,
    region: "us",
  });

  const message = createMessage({
    from: "noreply@yourdomain.com",
    to,
    subject,
    content: { text: body },
  });

  const receipt = await transport.send(message);

  if (receipt.successful) {
    return Response.json({ success: true, messageId: receipt.messageId });
  } else {
    return Response.json(
      { success: false, errors: receipt.errorMessages },
      { status: 500 }
    );
  }
});

Part 5: Improving deliverability with DKIM

Ever wonder why some emails land in spam while others don't? Email authentication plays a huge role. DKIM (DomainKeys Identified Mail) is one of the key mechanisms—it lets you digitally sign your emails so recipients can verify they actually came from your domain and weren't tampered with in transit.

Without DKIM:

  • Your emails are more likely to be flagged as spam
  • Recipients have no way to verify you're really who you claim to be
  • Sophisticated phishing attacks can impersonate your domain

Setting up DKIM with Upyo

First, generate a DKIM key pair. You can use OpenSSL:

# Generate a 2048-bit RSA private key
openssl genrsa -out dkim-private.pem 2048

# Extract the public key
openssl rsa -in dkim-private.pem -pubout -out dkim-public.pem

Then configure your SMTP transport:

import { createMessage } from "@upyo/core";
import { SmtpTransport } from "@upyo/smtp";
import { readFileSync } from "node:fs";

const transport = new SmtpTransport({
  host: "smtp.example.com",
  port: 587,
  secure: false,
  auth: {
    user: "user@yourdomain.com",
    pass: "password",
  },
  dkim: {
    signatures: [
      {
        signingDomain: "yourdomain.com",
        selector: "mail", // Creates DNS record at mail._domainkey.yourdomain.com
        privateKey: readFileSync("./dkim-private.pem", "utf8"),
        algorithm: "rsa-sha256", // or "ed25519-sha256" for shorter keys
      },
    ],
  },
});

The key configuration options:

  • signingDomain: Must match your email's "From" domain
  • selector: An arbitrary name that becomes part of your DNS record (e.g., mail creates a record at mail._domainkey.yourdomain.com)
  • algorithm: RSA-SHA256 is widely supported; Ed25519-SHA256 offers shorter keys (see below)

Adding the DNS record

Add a TXT record to your domain's DNS:

  • Name: mail._domainkey (or mail._domainkey.yourdomain.com depending on your DNS provider)
  • Value: v=DKIM1; k=rsa; p=YOUR_PUBLIC_KEY_HERE

Extract the public key value (remove headers, footers, and newlines from the .pem file):

cat dkim-public.pem | grep -v "^-" | tr -d '\n'

Using Ed25519 for shorter keys

RSA-2048 keys are long—about 400 characters for the public key. This can be problematic because DNS TXT records have size limits, and some DNS providers struggle with long records.

Ed25519 provides equivalent security with much shorter keys (around 44 characters). If your email infrastructure supports it, Ed25519 is the modern choice.

# Generate Ed25519 key pair
openssl genpkey -algorithm ed25519 -out dkim-ed25519-private.pem
openssl pkey -in dkim-ed25519-private.pem -pubout -out dkim-ed25519-public.pem
const transport = new SmtpTransport({
  // ... other config
  dkim: {
    signatures: [
      {
        signingDomain: "yourdomain.com",
        selector: "mail2025",
        privateKey: readFileSync("./dkim-ed25519-private.pem", "utf8"),
        algorithm: "ed25519-sha256",
      },
    ],
  },
});

Part 6: Bulk email sending

When you need to send emails to many recipients—newsletters, notifications, marketing campaigns—you have two approaches:

The wrong way: looping with send()

// ❌ Don't do this for bulk sending
for (const subscriber of subscribers) {
  await transport.send(createMessage({
    from: "newsletter@example.com",
    to: subscriber.email,
    subject: "Weekly update",
    content: { text: "..." },
  }));
}

This works, but it's inefficient:

  • Each send() call waits for the previous one to complete
  • No automatic batching or optimization
  • Harder to track overall progress

The right way: using sendMany()

The sendMany() method is designed for bulk operations:

import { createMessage } from "@upyo/core";
import { ResendTransport } from "@upyo/resend";

const transport = new ResendTransport({
  apiKey: process.env.RESEND_API_KEY!,
});

const subscribers = [
  { email: "alice@example.com", name: "Alice" },
  { email: "bob@example.com", name: "Bob" },
  { email: "charlie@example.com", name: "Charlie" },
  // ... potentially thousands more
];

// Create personalized messages
const messages = subscribers.map((subscriber) =>
  createMessage({
    from: "newsletter@yourdomain.com",
    to: subscriber.email,
    subject: "Your weekly digest",
    content: {
      html: `<h1>Hi ${subscriber.name}!</h1><p>Here's what's new this week...</p>`,
      text: `Hi ${subscriber.name}!\n\nHere's what's new this week...`,
    },
    tags: ["newsletter", "weekly"],
  })
);

// Send all messages efficiently
let successCount = 0;
let failureCount = 0;

for await (const receipt of transport.sendMany(messages)) {
  if (receipt.successful) {
    successCount++;
  } else {
    failureCount++;
    console.error("Failed:", receipt.errorMessages.join(", "));
  }
}

console.log(`Sent: ${successCount}, Failed: ${failureCount}`);

Why sendMany() is better:

  • Automatic batching: Some transports (like Resend) combine multiple messages into a single API call
  • Connection reuse: SMTP transport reuses connections from the pool
  • Streaming results: You get receipts as they complete, not all at once
  • Resilient: One failure doesn't stop the rest

Progress tracking for large batches

const totalMessages = messages.length;
let processed = 0;

for await (const receipt of transport.sendMany(messages)) {
  processed++;

  if (processed % 100 === 0) {
    console.log(`Progress: ${processed}/${totalMessages} (${Math.round((processed / totalMessages) * 100)}%)`);
  }

  if (!receipt.successful) {
    console.error(`Message ${processed} failed:`, receipt.errorMessages);
  }
}

console.log("Batch complete!");

When to use send() vs sendMany()

Scenario Use
Single transactional email (welcome, password reset) send()
A few emails (under 10) send() in a loop is fine
Newsletters, bulk notifications sendMany()
Batch processing from a queue sendMany()

Part 7: Testing without sending real emails

Upyo includes a MockTransport for testing:

  • No external dependencies: Tests run offline, in CI, anywhere
  • Deterministic: No flaky tests due to network issues
  • Fast: No HTTP requests or SMTP handshakes
  • Inspectable: You can verify exactly what would have been sent

Basic testing setup

import { createMessage } from "@upyo/core";
import { MockTransport } from "@upyo/mock";
import assert from "node:assert";
import { describe, it, beforeEach } from "node:test";

describe("Email functionality", () => {
  let transport: MockTransport;

  beforeEach(() => {
    transport = new MockTransport();
  });

  it("should send welcome email after registration", async () => {
    // Your application code would call this
    const message = createMessage({
      from: "welcome@yourapp.com",
      to: "newuser@example.com",
      subject: "Welcome to our app!",
      content: { text: "Thanks for signing up!" },
    });

    const receipt = await transport.send(message);

    // Assertions
    assert.strictEqual(receipt.successful, true);
    assert.strictEqual(transport.getSentMessagesCount(), 1);

    const sentMessage = transport.getLastSentMessage();
    assert.strictEqual(sentMessage?.subject, "Welcome to our app!");
    assert.strictEqual(sentMessage?.recipients[0].address, "newuser@example.com");
  });

  it("should handle email failures gracefully", async () => {
    // Simulate a failure
    transport.setNextResponse({
      successful: false,
      errorMessages: ["Invalid recipient address"],
    });

    const message = createMessage({
      from: "test@yourapp.com",
      to: "invalid-email",
      subject: "Test",
      content: { text: "Test" },
    });

    const receipt = await transport.send(message);

    assert.strictEqual(receipt.successful, false);
    assert.ok(receipt.errorMessages.includes("Invalid recipient address"));
  });
});

The key testing methods:

  • getSentMessagesCount(): How many emails were “sent”
  • getLastSentMessage(): The most recent message
  • getSentMessages(): All messages as an array
  • setNextResponse(): Force the next send to succeed or fail with specific errors

Simulating real-world conditions

import { MockTransport } from "@upyo/mock";

// Simulate network delays
const slowTransport = new MockTransport({
  delay: 500, // 500ms delay per email
});

// Simulate random failures (10% failure rate)
const unreliableTransport = new MockTransport({
  failureRate: 0.1,
});

// Simulate variable latency
const realisticTransport = new MockTransport({
  randomDelayRange: { min: 100, max: 500 },
});

Testing async email workflows

import { MockTransport } from "@upyo/mock";

const transport = new MockTransport();

// Start your async operation that sends emails
startUserRegistration("newuser@example.com");

// Wait for the expected emails to be sent
await transport.waitForMessageCount(2, 5000); // Wait for 2 emails, 5s timeout

// Or wait for a specific email
const welcomeEmail = await transport.waitForMessage(
  (msg) => msg.subject.includes("Welcome"),
  3000
);

console.log("Welcome email was sent:", welcomeEmail.subject);

Part 8: Provider failover with PoolTransport

What happens if your email provider goes down? For mission-critical applications, you need redundancy. PoolTransport combines multiple providers with automatic failover—if one fails, it tries the next.

import { PoolTransport } from "@upyo/pool";
import { ResendTransport } from "@upyo/resend";
import { SendGridTransport } from "@upyo/sendgrid";
import { MailgunTransport } from "@upyo/mailgun";
import { createMessage } from "@upyo/core";

// Create multiple transports
const resend = new ResendTransport({ apiKey: process.env.RESEND_API_KEY! });
const sendgrid = new SendGridTransport({ apiKey: process.env.SENDGRID_API_KEY! });
const mailgun = new MailgunTransport({
  apiKey: process.env.MAILGUN_API_KEY!,
  domain: "mg.yourdomain.com",
});

// Combine them with priority-based failover
const transport = new PoolTransport({
  strategy: "priority",
  transports: [
    { transport: resend, priority: 100 },    // Try first
    { transport: sendgrid, priority: 50 },   // Fallback
    { transport: mailgun, priority: 10 },    // Last resort
  ],
  maxRetries: 3,
});

const message = createMessage({
  from: "critical@yourdomain.com",
  to: "admin@example.com",
  subject: "Critical alert",
  content: { text: "This email will try multiple providers if needed." },
});

const receipt = await transport.send(message);
// Automatically tries Resend first, then SendGrid, then Mailgun if others fail

The priority values determine the order—higher numbers are tried first. If Resend fails (network error, rate limit, etc.), the pool automatically retries with SendGrid, then Mailgun.

For more advanced routing strategies (weighted distribution, content-based routing), see the pool transport documentation.


Part 9: Observability with OpenTelemetry

In production, you'll want to track email metrics: send rates, failure rates, latency. Upyo integrates with OpenTelemetry:

import { createOpenTelemetryTransport } from "@upyo/opentelemetry";
import { SmtpTransport } from "@upyo/smtp";

const baseTransport = new SmtpTransport({
  host: "smtp.example.com",
  port: 587,
  auth: { user: "user", pass: "password" },
});

const transport = createOpenTelemetryTransport(baseTransport, {
  serviceName: "email-service",
  tracing: { enabled: true },
  metrics: { enabled: true },
});

// Now all email operations generate traces and metrics automatically
await transport.send(message);

This gives you:

  • Delivery success/failure rates
  • Send operation latency histograms
  • Error classification by type
  • Distributed tracing for debugging

See the OpenTelemetry documentation for details.


Quick reference: choosing the right transport

Scenario Recommended Transport
Development/testing Gmail SMTP or MockTransport
Small production app Resend or SendGrid
High volume (100k+/month) Amazon SES
Edge functions Resend, SendGrid, or Mailgun
Self-hosted infrastructure SMTP with DKIM
Mission-critical PoolTransport with failover
EU data residency Mailgun (EU region) or self-hosted

Wrapping up

This guide covered the most popular transports, but Upyo also supports:

  • JMAP: Modern email protocol (RFC 8620/8621) for JMAP-compatible servers like Fastmail and Stalwart
  • Plunk: Developer-friendly email service with self-hosting option

And you can always create a custom transport for any email service not yet supported.

Resources

  • 📚 Documentation
  • 📦 npm packages
  • 📦 JSR packages
  • 🐙 GitHub repository

Have questions or feedback? Feel free to open an issue.


What's been your biggest pain point when sending emails from JavaScript? Let me know in the comments—I'm curious what challenges others have run into.


Upyo (pronounced /oo-pyo/) comes from the Korean word 郵票, meaning “postage stamp.”

Read more →
2

BotKit은 ActivityPub 봇을 만드는 프레임워크입니다. 일반적인 Mastodon/Misskey 봇과 다른 점은, 봇 자체가 독립된 서버로 돌아간다는 겁니다. 플랫폼 계정이 필요 없습니다.

글자 수 제한도 없고, API 호출 제한에 시달릴 일도 없습니다.

bot.onMention = async (session, message) => {
  await message.reply(text`안녕하세요, ${message.actor}님!`);
};

연합(federation), HTTP Signatures, 메시지 전달 같은 관련 처리는 Fedify가 알아서 해줍니다. 봇 로직만 짜면 되는 거죠.

.js 둘 다 지원합니다.

https://botkit.fedify.dev/

BotKitは、ActivityPubボットを作るためのTypeScriptフレームワークです。既存のMastodon/Misskeyボットとの違いは、ボット自体が独立したサーバーとして動作すること。プラットフォームのアカウントは不要です。

文字数制限もなければ、APIレート制限に悩まされることもありません。

bot.onMention = async (session, message) => {
  await message.reply(text`こんにちは、${message.actor}さん!`);
};

フェデレーション、HTTP Signatures、配送キューといったActivityPub周りの処理はFedifyがすべて引き受けます。ボットのロジックを書くだけです。

DenoでもNode.jsでも動きます。

https://botkit.fedify.dev/

0

is a framework for building bots. The difference from typical Mastodon/Misskey bots? Your bot runs as its own independent server—no platform account needed.

This means no character limits, no rate limiting headaches, no API restrictions.

bot.onMention = async (session, message) => {
  await message.reply(text`Hi, ${message.actor}!`);
};

The ActivityPub stuff (federation, HTTP Signatures, delivery queues) is handled by under the hood. You just write your bot logic.

Works with both and .js.

https://botkit.fedify.dev/

BotKit은 ActivityPub 봇을 만드는 프레임워크입니다. 일반적인 Mastodon/Misskey 봇과 다른 점은, 봇 자체가 독립된 서버로 돌아간다는 겁니다. 플랫폼 계정이 필요 없습니다.

글자 수 제한도 없고, API 호출 제한에 시달릴 일도 없습니다.

bot.onMention = async (session, message) => {
  await message.reply(text`안녕하세요, ${message.actor}님!`);
};

연합(federation), HTTP Signatures, 메시지 전달 같은 관련 처리는 Fedify가 알아서 해줍니다. 봇 로직만 짜면 되는 거죠.

.js 둘 다 지원합니다.

https://botkit.fedify.dev/

1

is a framework for building bots. The difference from typical Mastodon/Misskey bots? Your bot runs as its own independent server—no platform account needed.

This means no character limits, no rate limiting headaches, no API restrictions.

bot.onMention = async (session, message) => {
  await message.reply(text`Hi, ${message.actor}!`);
};

The ActivityPub stuff (federation, HTTP Signatures, delivery queues) is handled by under the hood. You just write your bot logic.

Works with both and .js.

https://botkit.fedify.dev/

0
2
0

Fresh와의 안 좋은 첫 만남: @fedify/fresh 제작기 - 1

개발곰 @gaebalgom@hackers.pub

Deno 팀에서 개발하는 Fresh 프레임워크를 Fedify 프로젝트에 통합하는 과정에서 겪은 문제점을 공유합니다. Fresh 2.X 버전으로 업데이트되면서 기존 코드와의 호환성 문제가 발생했고, Fedify 패키지 구조 변경으로 인해 Fresh 통합을 위한 별도 패키지를 만들어야 했습니다. 개발 환경 설정 중 `node_modules` 관련 오류와 Preact 렌더링 문제가 발생했으며, Fedify 미들웨어 적용 시 Vite의 SSR Module Runner가 CJS를 지원하지 않아 서버 실행에 실패했습니다. Vite 설정에서 외부 의존성을 지정하여 개발 서버 문제를 해결했지만, 빌드 후 실행 시 CJS 관련 문제가 다시 발생하여 Rollup 옵션을 조정해야 했습니다. 이 글은 Fresh와 Fedify를 통합하려는 개발자들이 겪을 수 있는 어려움을 해결하는 데 도움이 될 것입니다.

Read more →
4

Okay, so either Deno's OpenTelemetry metric “http.server.active_requests” (docs.deno.com/runtime/fundamen) is actually cumulative over the lifetime of the process, or I have found the explanation for why I can't get the Encyclia server to behave.

Next question is what I could be doing wrong. 🤔 All it does is “deno run” and everything that doesn't time out seems to return what it should.

(The middle of the graph is where I restarted Deno twice.)

Line graph showing "http_server_active_requests" over a 9 hour duration. It starts at 0, climbs to 5000 almost in a slow straight line over 3 hours, then drops back down to 0, makes a tiny, quick bump up to 100 and back down to 0, only to start climbing again, slightly slower, to 3000 over the course of about 3.5 hours

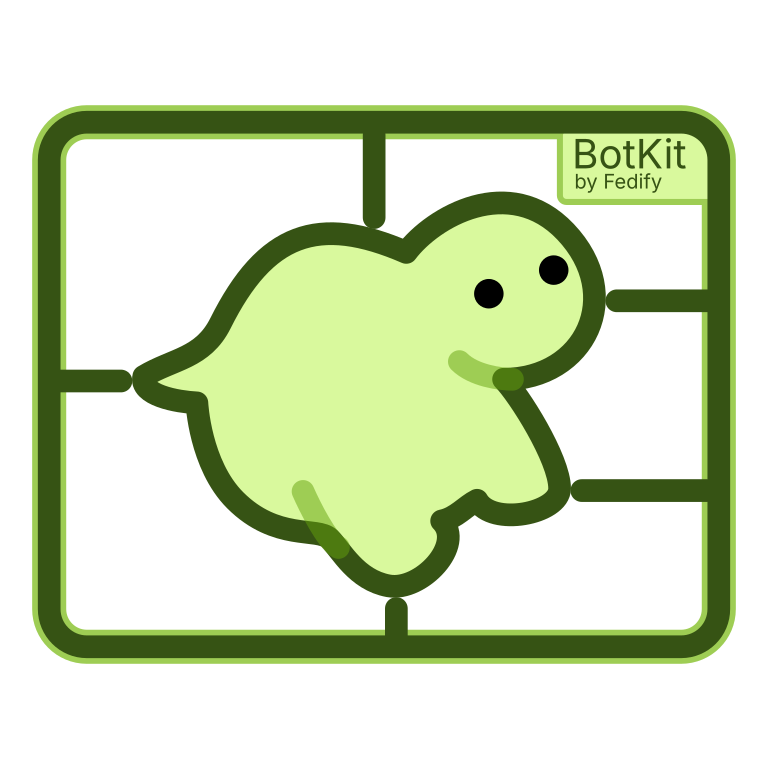
Ah, found the culprit. It was one of the spots where I told the program to do nothing later. Turns out my wording was slightly off.

Before:

return new Promise(() => {});

After:

return Promise.resolve(null);

The number of concurrent connections looks negligible now, and no more timeouts either. Calling it a success for tonight, we'll see how things look in the morning. 🥱

As underwhelming as the cause is, that journey might deserve a blog post if I find the time!

0

Okay, so either Deno's OpenTelemetry metric “http.server.active_requests” (docs.deno.com/runtime/fundamen) is actually cumulative over the lifetime of the process, or I have found the explanation for why I can't get the Encyclia server to behave.

Next question is what I could be doing wrong. 🤔 All it does is “deno run” and everything that doesn't time out seems to return what it should.

(The middle of the graph is where I restarted Deno twice.)

Line graph showing "http_server_active_requests" over a 9 hour duration. It starts at 0, climbs to 5000 almost in a slow straight line over 3 hours, then drops back down to 0, makes a tiny, quick bump up to 100 and back down to 0, only to start climbing again, slightly slower, to 3000 over the course of about 3.5 hours
0

Exciting news for developers! We've just landed a major milestone for Fedify 2.0—the now runs natively on .js and , not just (#456). If you install @fedify/cli@2.0.0-dev.1761 from npm, you'll get actual JavaScript that executes directly in your runtime, no more pre-compiled binaries from deno compile. This is part of our broader transition to Optique, a new cross-runtime CLI framework we've developed specifically for Fedify's needs (#374).

This change means a more natural development experience regardless of your runtime preference. Node.js developers can now run the CLI tools directly through their familiar ecosystem, and the same goes for Bun users. While Fedify 2.0 isn't released yet, we're excited to share this progress with the community—feel free to try out the dev version and let us know how it works for you!

2
0
0

Optique 0.6.0: Shell completion support for type-safe CLI parsers

洪 民憙 (Hong Minhee) @hongminhee@hackers.pub

Optique 0.6.0 introduces intelligent shell completion to type-safe command-line applications, supporting Bash, zsh, fish, PowerShell, and Nushell. Unlike traditional CLI frameworks, Optique leverages the same parser structure for both argument parsing and completion, eliminating duplicate definitions and ensuring synchronization. Setting up completion is straightforward, with users generating and sourcing a completion script for their shell. The system works automatically with all Optique parser types, offering context-aware suggestions, including file system completion and custom logic for domain-specific value parsers. Additionally, the release enhances command documentation with separate brief, description, and footer texts, and introduces a `commandLine()` message term for clearer command-line examples in help text. Existing Optique users can easily migrate by adding a `completion` option to their `run()` configuration. This release aims to make Optique-based CLIs more user-friendly without sacrificing type safety and composability, providing sophisticated runtime features while maintaining compile-time guarantees.

Read more →
5

Optique 0.5.0: Enhanced error handling and message customization

洪 民憙 (Hong Minhee) @hongminhee@hackers.pub

Optique 0.5.0 is now available, bringing enhancements to error handling, help text generation, and overall developer experience while maintaining full backward compatibility. The update introduces better code organization by refactoring the large `@optique/core/parser` module into three focused modules: `@optique/core/primitives`, `@optique/core/modifiers`, and `@optique/core/constructs`. Error handling is improved with automatic conversion of default value callback errors into parser-level errors, and the new `WithDefaultError` class allows for structured error messages. Customization of default values in help text is now possible via an optional third parameter to `withDefault()`, enabling descriptive text instead of actual values. Additionally, the release provides comprehensive error message customization across all parser types and combinators, allowing context-specific feedback. These improvements aim to make Optique more user-friendly, especially for building CLI applications that require clear error messages and helpful documentation, making this release a significant step forward for developers using Optique.

Read more →
5
0

Upyo 0.3.0: Multi-provider resilience and deployment flexibility

洪 民憙 (Hong Minhee) @hongminhee@hackers.pub

Upyo 0.3.0 introduces three new transports designed to enhance email delivery capabilities and reliability. The update focuses on multi-provider support and flexible deployment options. The new pool transport, via the `@upyo/pool` package, combines multiple email providers with routing strategies like round-robin, weighted distribution, and priority-based routing, ensuring high availability and cost optimization. Additionally, the `@upyo/resend` package integrates Resend, an email service provider known for its developer-friendly approach and intelligent batch optimization. For those needing self-hosting options, the `@upyo/plunk` package supports Plunk, offering both cloud-hosted and Docker-based self-hosted deployments. These new transports maintain Upyo's consistent API design, ensuring they can be easily integrated into existing workflows. This release expands Upyo's utility by providing more robust and adaptable email delivery solutions.

Read more →
3

Optique 0.4.0 Released!

Big update for our type-safe combinatorial parser for :

  • Labeled merge groups: organize options logically
  • Rich docs: brief, description & footer support
  • @optique/temporal: new package for date/time parsing
  • showDefault: automatic default value display

The help text has never looked this good!

.js

0

Optique 0.3.0: Dependent options and flexible composition

洪 民憙 (Hong Minhee) @hongminhee@hackers.pub

Optique 0.3.0 introduces several enhancements aimed at simplifying the development of complex CLI applications. This release focuses on expanding parser flexibility and refining the help system, incorporating valuable community feedback. Key updates include the introduction of required Boolean flags using the new `flag()` parser, more flexible type defaults in `withDefault()` to support union types, and an extended `or()` capacity that now supports up to 10 parsers. The `merge()` combinator has also been enhanced to work with any object-producing parser, and context-aware help is now available through the `longestMatch()` combinator. Additionally, version display support has been added to both `@optique/core` and `@optique/run`, along with structured output functions for consistent terminal formatting. These improvements collectively provide developers with more powerful tools for building intuitive and feature-rich command-line interfaces.

Read more →
3

We're excited to announce the release of BotKit 0.3.0! This release marks a significant milestone as now supports .js alongside , making it accessible to a wider audience. The minimum required Node.js version is 22.0.0. This dual-runtime support means you can now choose your preferred runtime while building with the same powerful BotKit APIs.

One of the most requested features has landed: poll support! You can now create interactive polls in your messages, allowing followers to vote on questions with single or multiple-choice options. Polls are represented as ActivityPub Question objects with proper expiration times, and your bot can react to votes through the new onVote event handler. This feature enhances engagement possibilities and brings BotKit to feature parity with major platforms like Mastodon and Misskey.

// Create a poll with multiple choices
await session.publish(text`What's your favorite programming language?`, {
  class: Question,
  poll: {
    multiple: true,  // Allow multiple selections
    options: ["JavaScript", "TypeScript", "Python", "Rust"],
    endTime: Temporal.Now.instant().add({ hours: 24 }),
  },
});

// Handle votes
bot.onVote = async (session, vote) => {
  console.log(`${vote.actor} voted for "${vote.option}"`);
};

The web frontend has been enhanced with a new followers page, thanks to the contribution from Hyeonseo Kim (@gaebalgom개발곰)! The /followers route now displays a paginated list of your bot's followers, and the follower count on the main profile page is now clickable, providing better visibility into your bot's audience. This improvement makes the web interface more complete and user-friendly.

For developers looking for alternative storage backends, we've introduced the SqliteRepository through the new @fedify/botkit-sqlite package. This provides a production-ready SQLite-based storage solution with ACID compliance, write-ahead logging (WAL) for optimal performance, and proper indexing. Additionally, the new @fedify/botkit/repository module offers MemoryCachedRepository for adding an in-memory cache layer on top of any repository implementation, improving read performance for frequently accessed data.

This release also includes an important security update: we've upgraded to 1.8.8, ensuring your bots stay secure and compatible with the latest ActivityPub standards. The repository pattern has been expanded with new interfaces and types like RepositoryGetMessagesOptions, RepositoryGetFollowersOptions, and proper support for polls storage through the KvStoreRepositoryPrefixes.polls option, providing more flexibility for custom implementations.

2
0
0

Upyo 0.2.0 Release Notes

洪 民憙 (Hong Minhee) @hongminhee@hackers.pub

Upyo 0.2.0 has been released, introducing new features to this cross-runtime email library that supports Node.js, Deno, Bun, and edge functions. The latest version expands its capabilities with Amazon SES transport support, enabling AWS Signature v4 authentication and session-based authentication. Additionally, comprehensive OpenTelemetry integration has been added, offering distributed tracing, metrics collection, and error classification without altering existing code. The OpenTelemetry transport automatically instruments email operations, tracking delivery rates and latency, and integrates with existing OpenTelemetry infrastructure. Community feedback is encouraged to further improve Upyo, whether through testing the new Amazon SES transport, implementing OpenTelemetry, or contributing to the GitHub repository. This release enhances Upyo's utility by providing more transport options and robust observability features, making it a valuable tool for developers needing reliable email sending across various environments.

Read more →
4

Introducing !

A simple, cross-runtime email library that works seamlessly on , .js, , and edge functions. Zero dependencies, unified API, and excellent testability with built-in mock transport.
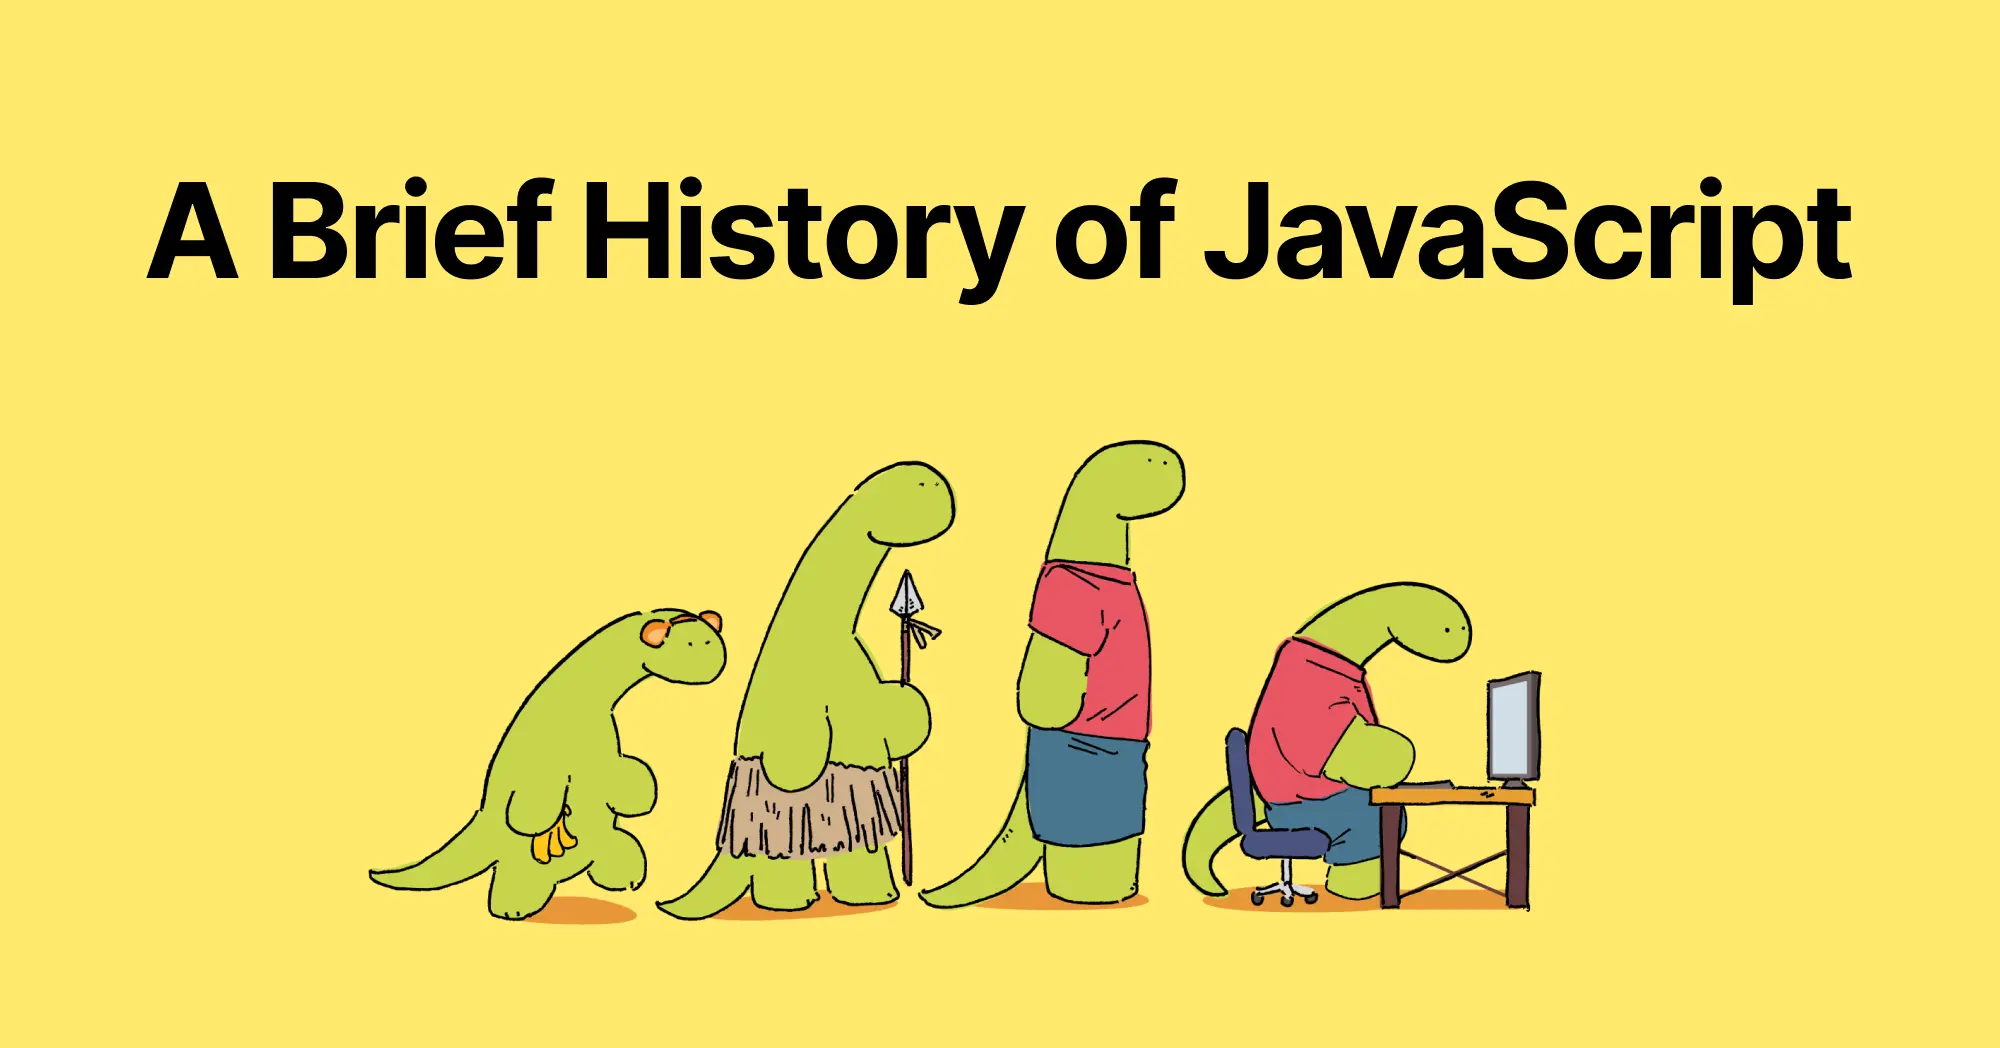
Switch between , , without changing your code. Available on & !

https://upyo.org/

0
2
0

deno-vite-plugin 디버깅 1편

Lee Dogeon @moreal@hackers.pub

이 글은 Deno 런타임 환경에서 SolidStart와 `deno-vite-plugin`을 사용할 때 발생하는 라이브러리 임포트 문제를 해결하는 과정을 담고 있습니다. 특히, `jsr:@fedify/fedify` 라이브러리를 임포트할 때 `deno task build`가 실패하는 상황을 재현하고, 원인을 분석하여 임시 해결책을 제시합니다. 문제의 원인은 `deno info` 명령어가 `kind: asserted`인 모듈을 제대로 처리하지 못하는 데 있었으며, 이를 `esm`으로 취급하도록 수정하여 해결했습니다. 다만, 근본적인 해결책은 아니며, 추가적인 `npm` 관련 에러가 남아있음을 언급합니다. 이 포스팅은 Deno 생태계에서 Vite 플러그인을 사용할 때 발생할 수 있는 문제와 그 해결 과정을 보여주며, 유사한 문제를 겪는 개발자들에게 실질적인 도움을 줄 수 있습니다.

Read more →
2

It's been 30 years we have . So much in technology has changed in that time. It's kind of amazing how much the language and the broader web helped shape the world.

post on the history of Javascript really cements this. Can't believe it's been that long. 😅

deno.com/blog/history-of-javas

0
0

Announcing LogTape 1.0.0

洪 民憙 (Hong Minhee) @hongminhee@hackers.pub

LogTape 1.0.0 has been released, marking a significant milestone for this zero-dependency logging library designed for the modern JavaScript ecosystem. This release emphasizes API stability and introduces high-performance features such as non-blocking sinks for console, stream, and file logging, along with the `fromAsyncSink()` function for integrating asynchronous logging operations. New sink integrations include packages for AWS CloudWatch Logs and Windows Event Log, enhancing LogTape's versatility. The update also brings a visually appealing console logging experience with the `@logtape/pretty` package, and seamless integration with existing Winston or Pino setups through adapter packages. Key developer experience enhancements include programmatic access to log levels and improved browser compatibility. LogTape 1.0.0 streamlines logging infrastructure with a comprehensive package ecosystem, offering specialized packages for various logging needs. This release provides a stable and mature logging solution, making it easier to manage and optimize logging in JavaScript applications.

Read more →
11

LogTape 0.12.0 Release Notes

洪 民憙 (Hong Minhee) @hongminhee@hackers.pub

LogTape, a zero-dependency logging library for JavaScript and TypeScript, has released version 0.12.0 with several enhancements. The update introduces a new `trace` log level for more granular debugging and improves file sink performance through configurable buffering. A significant addition is the `@logtape/syslog` package, enabling log message transmission to syslog servers using RFC 5424. The update also includes `Logger.warning()` as an alias for `Logger.warn()` for consistency. Furthermore, all LogTape packages now share unified versioning for better compatibility. The build infrastructure has been migrated from `dnt` to `tsdown`, enhancing compatibility with modern JavaScript toolchains and improving build times. This release optimizes logging capabilities and ensures smoother integration with various JavaScript runtimes.

Read more →
9

We're migrating Hackers' Pub to a pretty unconventional tech stack, and I'm honestly excited about it!

Thanks to my friend @xiniha, we're diving into , , , , and . In a world dominated by Next.js and React, this feels refreshingly different. And yes, we're sticking with instead of Node.js too.

Some might call it contrarian, but I like to think of it as exploring what's possible beyond the mainstream. Sometimes the road less traveled leads to interesting places.

7
4
1

I think I've fully adopted to writing scripts in with . 😅 It can be so immensely convenient.

You can bundle hack something fairly quickly. With dependencies pinned. And most of all, still have some level of security.

Can't say the same of all my other language scripts. 🫠

0

Hello @hongminhee洪 民憙 (Hong Minhee) :nonbinary:

since multiple hours I was sleepless cause I wondered about how to store anything ActivityPub in

I think, I will finish this crazy code somewhen in the next days :) Would you be interested in such a thing?

If:
Tried to solve the following fully ActivityPub conformant, meaning e.g.
- multiple actors can do an action on multiple objects and it needs to be fully versioned cause Undo or Undo/Undo …
- so anything is RFC 6902 <-> kv where anything is ulid and the "version" for the object is the ulid of an Update/Undo etc.
- JSON Patch acknowledges the limits (e.g. size of kv values), any property is stored versioned
- strongly avoiding duplicates;
the "text properties" like contentMap are stored as cid and similar beneath each other by a numeric nilsimsa hash (though /me bad at math)
- we can query all relationships and
- additionally "where", "when", "what" questions are answered by geohash, ulid ranges or a specific hierarchic hash of as:- and our subtypes

0
1

Ditch the DIY Drama: Why Use Fedify Instead of Building ActivityPub from Scratch?

洪 民憙 (Hong Minhee) @hongminhee@hackers.pub

So, you're captivated by the fediverse—the decentralized social web powered by protocols like ActivityPub. Maybe you're dreaming of building the next great federated app, a unique space connected to Mastodon, Lemmy, Pixelfed, and more. The temptation to dive deep and implement ActivityPub yourself, from the ground up, is strong. Total control, right? Understanding every byte? Sounds cool!

But hold on a sec. Before you embark on that epic quest, let's talk reality. Implementing ActivityPub correctly isn't just one task; it's like juggling several complex standards while riding a unicycle… blindfolded. It’s hard.

That's where Fedify comes in. It's a TypeScript framework designed to handle the gnarliest parts of ActivityPub development, letting you focus on what makes your app special, not reinventing the federation wheel.

This post will break down the common headaches of DIY ActivityPub implementation and show how Fedify acts as the super-powered pain reliever, starting with the very foundation of how data is represented.

Challenge #1: Data Modeling—Speaking ActivityStreams & JSON-LD Fluently

At its core, ActivityPub relies on the ActivityStreams 2.0 vocabulary to describe actions and objects, and it uses JSON-LD as the syntax to encode this vocabulary. While powerful, this combination introduces significant complexity right from the start.

First, understanding and correctly using the vast ActivityStreams vocabulary itself is a hurdle. You need to model everything—posts (Note, Article), profiles (Person, Organization), actions (Create, Follow, Like, Announce)—using the precise terms and properties defined in the specification. Manual JSON construction is tedious and prone to errors.

Second, JSON-LD, the encoding layer, has specific rules that make direct JSON manipulation surprisingly tricky:

  • Missing vs. Empty Array: In JSON-LD, a property being absent is often semantically identical to it being present with an empty array. Your application logic needs to treat these cases equally when checking for values. For example, these two Note objects mean the same thing regarding the name property:
    // No name property
    {
      "@context": "https://www.w3.org/ns/activitystreams",
      "type": "Note",
      "content": ""
    }
    // Equivalent to:
    {
      "@context": "https://www.w3.org/ns/activitystreams",
      "type": "Note",
      "name": [],
      "content": ""
    }
  • Single Value vs. Array: Similarly, a property holding a single value directly is often equivalent to it holding a single-element array containing that value. Your code must anticipate both representations for the same meaning, like for the content property here:
    // Single value
    {
      "@context": "https://www.w3.org/ns/activitystreams",
      "type": "Note",
      "content": "Hello"
    }
    // Equivalent to:
    {
      "@context": "https://www.w3.org/ns/activitystreams",
      "type": "Note",
      "content": ["Hello"]
    }
  • Object Reference vs. Embedded Object: Properties can contain either the full JSON-LD object embedded directly or just a URI string referencing that object. Your application needs to be prepared to fetch the object's data if only a URI is given (a process called dereferencing). These two Announce activities are semantically equivalent (assuming the URIs resolve correctly):
    {
      "@context": "https://www.w3.org/ns/activitystreams",
      "type": "Announce",
      // Embedded objects:
      "actor": {
        "type": "Person",
        "id": "http://sally.example.org/",
        "name": "Sally"
      },
      "object": {
        "type": "Arrive",
        "id": "https://sally.example.com/arrive",
        /* ... */
      }
    }
    // Equivalent to:
    {
      "@context":
      "https://www.w3.org/ns/activitystreams",
      "type": "Announce",
      // URI references:
      "actor": "http://sally.example.org/",
      "object": "https://sally.example.com/arrive"
    }

Attempting to manually handle all these vocabulary rules and JSON-LD variations consistently across your application inevitably leads to verbose, complex, and fragile code, ripe for subtle bugs that break federation.

Fedify tackles this entire data modeling challenge with its comprehensive, type-safe Activity Vocabulary API. It provides TypeScript classes for ActivityStreams types and common extensions, giving you autocompletion and compile-time safety. Crucially, these classes internally manage all the tricky JSON-LD nuances. Fedify's property accessors present a consistent interface—non-functional properties (like tags) always return arrays, functional properties (like content) always return single values or null. It handles object references versus embedded objects seamlessly through dereferencing accessors (like activity.getActor()) which automatically fetch remote objects via URI when needed—a feature known as property hydration. With Fedify, you work with a clean, predictable TypeScript API, letting the framework handle the messy details of AS vocabulary and JSON-LD encoding.

Challenge #2: Discovery & Identity—Finding Your Actors

Once you can model data, you need to make your actors discoverable. This primarily involves the WebFinger protocol (RFC 7033). You'd need to build a server endpoint at /.well-known/webfinger capable of parsing resource queries (like acct: URIs), validating the requested domain against your server, and responding with a precisely formatted JSON Resource Descriptor (JRD). This JRD must include specific links, like a self link pointing to the actor's ActivityPub ID using the correct media type. Getting any part of this wrong can make your actors invisible.

Fedify simplifies this significantly. It automatically handles WebFinger requests based on the actor information you provide through its setActorDispatcher() method. Fedify generates the correct JRD response. If you need more advanced control, like mapping user-facing handles to internal identifiers, you can easily register mapHandle() or mapAlias() callbacks. You focus on defining your actors; Fedify handles making them discoverable.

// Example: Define how to find actors
federation.setActorDispatcher(
  "/users/{username}",
  async (ctx, username) => { /* ... */ }
);
// Now GET /.well-known/webfinger?resource=acct:username@your.domain just works!

Challenge #3: Core ActivityPub Mechanics—Handling Requests and Collections

Serving actor profiles requires careful content negotiation. A request for an actor's ID needs JSON-LD for machine clients (Accept: application/activity+json) but HTML for browsers (Accept: text/html). Handling incoming activities at the inbox endpoint involves validating POST requests, verifying cryptographic signatures, parsing the payload, preventing duplicates (idempotency), and routing based on activity type. Implementing collections (outbox, followers, etc.) with correct pagination adds another layer.

Fedify streamlines all of this. Its core request handler (via Federation.fetch() or framework adapters like @fedify/express) manages content negotiation. You define actors with setActorDispatcher() and web pages with your framework (Hono, Express, SvelteKit, etc.)—Fedify routes appropriately. For the inbox, setInboxListeners() lets you define handlers per activity type (e.g., .on(Follow, ...)), while Fedify automatically handles validation, signature verification, parsing, and idempotency checks using its KV Store. Collection implementation is simplified via dispatchers (e.g., setFollowersDispatcher()); you provide logic to fetch a page of data, and Fedify constructs the correct Collection or CollectionPage with pagination.

// Define inbox handlers
federation.setInboxListeners("/inbox", "/users/{handle}/inbox")
  .on(Follow, async (ctx, follow) => { /* Handle follow */ })
  .on(Undo, async (ctx, undo) => { /* Handle undo */ });

// Define followers collection logic
federation.setFollowersDispatcher(
  "/users/{handle}/followers",
  async (ctx, handle, cursor) => { /* ... */ }
);

Challenge #4: Reliable Delivery & Asynchronous Processing—Sending Activities Robustly

Sending an activity requires more than a simple POST. Networks fail, servers go down. You need robust failure handling and retry logic (ideally with backoff). Processing incoming activities synchronously can block your server. Efficiently broadcasting to many followers (fan-out) requires background processing and using shared inboxes where possible.

Fedify addresses reliability and scalability using its MessageQueue abstraction. When configured (highly recommended), Context.sendActivity() enqueues delivery tasks. Background workers handle sending with automatic retries based on configurable policies (like outboxRetryPolicy). Fedify supports various queue backends (Deno KV, Redis, PostgreSQL, AMQP). For high-traffic fan-out, Fedify uses an optimized two-stage mechanism to distribute the load efficiently.

// Configure Fedify with a persistent queue (e.g., Deno KV)
const federation = createFederation({
  queue: new DenoKvMessageQueue(/* ... */),
  // ...
});
// Sending is now reliable and non-blocking
await ctx.sendActivity({ handle: "myUser" }, recipient, someActivity);

Challenge #5: Security—Avoiding Common Pitfalls

Securing an ActivityPub server is critical. You need to implement HTTP Signatures (draft-cavage-http-signatures-12) for server-to-server authentication—a complex process. You might also need Linked Data Signatures (LDS) or Object Integrity Proofs (OIP) based on FEP-8b32 for data integrity and compatibility. Managing cryptographic keys securely is essential. Lastly, fetching remote resources risks Server-Side Request Forgery (SSRF) if not validated properly.

Fedify is designed with security in mind. It automatically handles the creation and verification of HTTP Signatures, LDS, and OIP, provided you supply keys via setKeyPairsDispatcher(). It includes key management utilities. Crucially, Fedify's default document loader includes built-in SSRF protection, blocking requests to private IPs unless explicitly allowed.

Challenge #6: Interoperability & Maintenance—Playing Nicely with Others

The fediverse is diverse. Different servers have quirks. Ensuring compatibility requires testing and adaptation. Standards evolve with new Federation Enhancement Proposals (FEPs). You also need protocols like NodeInfo to advertise server capabilities.

Fedify aims for broad interoperability and is actively maintained. It includes features like ActivityTransformers to smooth over implementation differences. NodeInfo support is built-in via setNodeInfoDispatcher().

Challenge #7: Developer Experience—Actually Building Your App

Beyond the protocol, building any server involves setup, testing, and debugging. With federation, debugging becomes harder—was the message malformed? Was the signature wrong? Is the remote server down? Is it a compatibility quirk? Good tooling is essential.

Fedify enhances the developer experience significantly. Being built with TypeScript, it offers excellent type safety and editor auto-completion. The fedify CLI is a powerful companion designed to streamline common development tasks.

You can quickly scaffold a new project tailored to your chosen runtime and web framework using fedify init.

For debugging interactions and verifying data, fedify lookup is invaluable. It lets you inspect how any remote actor or object appears from the outside by performing WebFinger discovery and fetching the object's data. Fedify then displays the parsed object structure and properties directly in your terminal. For example, running:

$ fedify lookup @fedify-example@fedify-blog.deno.dev

Will first show progress messages and then output the structured representation of the actor, similar to this:

// Output of fedify lookup command (shows parsed object structure)
Person {
  id: URL "https://fedify-blog.deno.dev/users/fedify-example",
  name: "Fedify Example Blog",
  published: 2024-03-03T13:18:11.857Z, // Simplified timestamp
  summary: "This blog is powered by Fedify, a fediverse server framework.",
  url: URL "https://fedify-blog.deno.dev/",
  preferredUsername: "fedify-example",
  publicKey: CryptographicKey {
    id: URL "https://fedify-blog.deno.dev/users/fedify-example#main-key",
    owner: URL "https://fedify-blog.deno.dev/users/fedify-example",
    publicKey: CryptoKey { /* ... CryptoKey details ... */ }
  },
  // ... other properties like inbox, outbox, followers, endpoints ...
}

This allows you to easily check how data is structured or troubleshoot why an interaction might be failing by seeing the actual properties Fedify parsed.

Testing outgoing activities from your application during development is made much easier with fedify inbox. Running the command starts a temporary local server that acts as a publicly accessible inbox, displaying key information about the temporary actor it creates for receiving messages:

$ fedify inbox
✔ The ephemeral ActivityPub server is up and running: https://<unique_id>.lhr.life/
✔ Sent follow request to @<some_test_account>@activitypub.academy.
╭───────────────┬─────────────────────────────────────────╮
│ Actor handle: │ i@<unique_id>.lhr.life                  │
├───────────────┼─────────────────────────────────────────┤
│   Actor URI:  │ https://<unique_id>.lhr.life/i          │
├───────────────┼─────────────────────────────────────────┤
│  Actor inbox: │ https://<unique_id>.lhr.life/i/inbox    │
├───────────────┼─────────────────────────────────────────┤
│ Shared inbox: │ https://<unique_id>.lhr.life/inbox      │
╰───────────────┴─────────────────────────────────────────╯

Web interface available at: http://localhost:8000/

You then configure your developing application to send an activity to the Actor inbox or Shared inbox URI provided. When an activity arrives, fedify inbox only prints a summary table to your console indicating that a request was received:

╭────────────────┬─────────────────────────────────────╮
│     Request #: │ 2                                   │
├────────────────┼─────────────────────────────────────┤
│ Activity type: │ Follow                              │
├────────────────┼─────────────────────────────────────┤
│  HTTP request: │ POST /i/inbox                       │
├────────────────┼─────────────────────────────────────┤
│ HTTP response: │ 202                                 │
├────────────────┼─────────────────────────────────────┤
│       Details  │ https://<unique_id>.lhr.life/r/2    │
╰────────────────┴─────────────────────────────────────╯

Crucially, the detailed information about the received request—including the full headers (like Signature), the request body (the Activity JSON), and the signature verification status—is only available in the web interface provided by fedify inbox. This web UI allows you to thoroughly inspect incoming activities during development.

Screenshot of the Fedify Inbox web interface showing received activities and their details.
The Fedify Inbox web UI is where you view detailed activity information.

When you need to test interactions with the live fediverse from your local machine beyond just sending, fedify tunnel can securely expose your entire local development server temporarily. This suite of tools significantly eases the process of building and debugging federated applications.

Conclusion: Build Features, Not Plumbing

Implementing the ActivityPub suite of protocols from scratch is an incredibly complex and time-consuming undertaking. It involves deep dives into multiple technical specifications, cryptographic signing, security hardening, and navigating the nuances of a diverse ecosystem. While educational, it dramatically slows down the process of building the actual, unique features of your federated application.

Fedify offers a well-architected, secure, and type-safe foundation, handling the intricacies of federation for you—data modeling, discovery, core mechanics, delivery, security, and interoperability. It lets you focus on your application's unique value and user experience. Stop wrestling with low-level protocol details and start building your vision for the fediverse faster and more reliably. Give Fedify a try!

Getting started is straightforward. First, install the Fedify CLI using your preferred method. Once installed, create a new project template by running fedify init your-project-name.

Check out the Fedify tutorials and Fedify manual to learn more. Happy federating!

Read more →
13
0
3
1
0

is an server framework in & . It aims to eliminate the complexity and redundant boilerplate code when building a federated server app, so that you can focus on your business logic and user experience.

The key features it provides currently are:

• Type-safe objects for Activity Vocabulary (including some vendor-specific extensions)
client and server
• HTTP Signatures
• Middleware for handling webhooks
protocol
.js, , and support
• CLI toolchain for testing and debugging

If you're curious, take a look at the Fedify website! There's comprehensive docs, a demo, a tutorial, example code, and more:
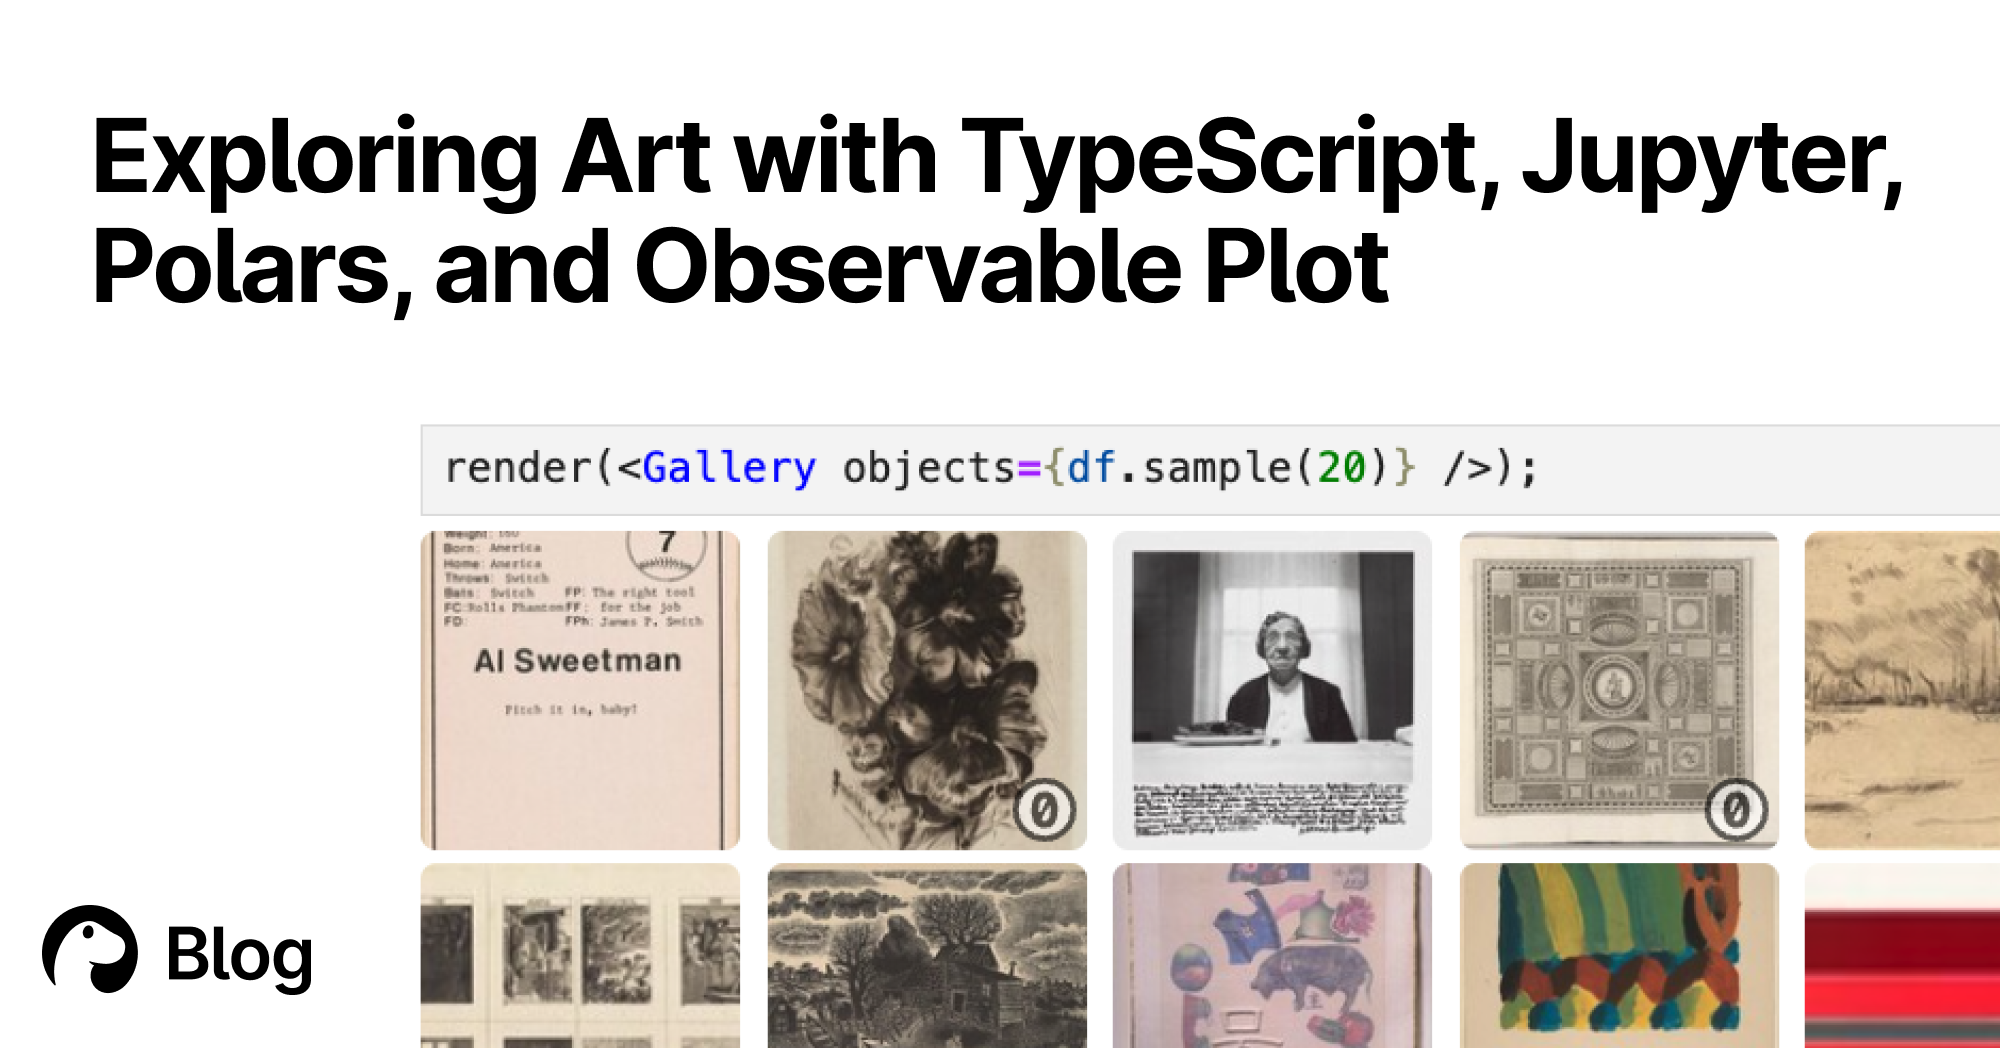
fedify.dev/

0
0
0

deno-task-hooks: Git 훅을 Deno 태스크로 쉽게 관리하기

洪 民憙 (Hong Minhee) @hongminhee@hackers.pub

안녕하세요! 오늘은 제가 개발한 deno-task-hooks 패키지를 소개해 드리려고 합니다. 이 도구는 Deno 태스크를 Git 훅으로 사용할 수 있게 해주는 간단하면서도 유용한 패키지입니다.

어떤 문제를 해결하나요?

Git을 사용하는 개발 팀에서는 코드 품질 유지를 위해 커밋이나 푸시 전에 린트, 테스트 등의 검증 작업을 실행하는 것이 일반적입니다. 이러한 작업은 Git 훅을 통해 자동화할 수 있지만, 기존 방식에는 몇 가지 문제가 있었습니다:

  • Git 훅 스크립트를 팀원들과 공유하기 어려움 (.git 디렉토리는 보통 버전 관리에서 제외됨)
  • 각 개발자가 로컬에서 훅을 직접 설정해야 하는 번거로움
  • 훅 스크립트의 일관성 유지가 어려움

deno-task-hooks는 이러한 문제를 해결하기 위해 Deno의 태스크 러너를 활용합니다. Deno 태스크는 deno.json 파일에 정의되어 버전 관리가 가능하므로, 팀 전체가 동일한 Git 훅을 쉽게 공유할 수 있습니다.

어떻게 작동하나요?

deno-task-hooks의 작동 방식은 간단합니다:

  1. deno.json 파일에 Git 훅으로 사용할 Deno 태스크를 정의합니다.
  2. hooks:install 태스크를 실행하면, 정의된 태스크들이 자동으로 .git/hooks/ 디렉토리에 설치됩니다.
  3. 이후 Git 작업 시 해당 훅이 트리거되면 연결된 Deno 태스크가 실행됩니다.

설치 및 사용 방법

1. hooks:install 태스크 추가하기

먼저 deno.json 파일에 hooks:install 태스크를 추가합니다:

{
  "tasks": {
    "hooks:install": "deno run --allow-read=deno.json,.git/hooks/ --allow-write=.git/hooks/ jsr:@hongminhee/deno-task-hooks"
  }
}

2. Git 훅 정의하기

Git 훅은 hooks: 접두사 다음에 훅 이름(케밥 케이스)을 붙여 정의합니다. 예를 들어, pre-commit 훅을 정의하려면:

{
  "tasks": {
    "hooks:pre-commit": "deno check *.ts && deno lint"
  }
}

3. 훅 설치하기

다음 명령어를 실행하여 정의된 훅을 설치합니다:

deno task hooks:install

이제 Git 커밋을 실행할 때마다 pre-commit 훅이 자동으로 실행되어 TypeScript 파일을 검사하고 린트 검사를 수행합니다.

지원되는 Git 훅 종류

deno-task-hooks는 다음과 같은 모든 Git 훅 타입을 지원합니다:

  • applypatch-msg
  • commit-msg
  • fsmonitor-watchman
  • post-update
  • pre-applypatch
  • pre-commit
  • pre-merge-commit
  • pre-push
  • pre-rebase
  • pre-receive
  • prepare-commit-msg
  • push-to-checkout
  • sendemail-validate
  • update

이점

deno-task-hooks를 사용하면 다음과 같은 이점이 있습니다:

  1. 간편한 공유: Git 훅을 deno.json 파일에 정의하여 팀 전체가 동일한 훅을 사용할 수 있습니다.
  2. 설정 용이성: 새 팀원은 저장소를 클론한 후 한 번의 명령어로 모든 훅을 설치할 수 있습니다.
  3. 유지 관리 용이성: 훅 스크립트를 중앙에서 관리하므로 변경 사항을 쉽게 추적하고 적용할 수 있습니다.
  4. Deno의 안전성: Deno의 권한 모델을 활용하여 훅 스크립트의 보안을 강화할 수 있습니다.

마치며

deno-task-hooks는 작은 패키지이지만, Git과 Deno를 함께 사용하는 팀의 개발 경험을 크게 향상시킬 수 있습니다. 코드 품질 유지와 개발 워크플로우 자동화를 위해 한번 사용해 보세요!

패키지는 JSR에서 다운로드할 수 있으며, GitHub에서 소스 코드를 확인할 수 있습니다.

피드백과 기여는 언제나 환영합니다! 😊

Read more →
0
0

Looking for CMS advice

Hey Web devs!

Do you have any suggestions, tips, opinions, dos, don’ts about headless CMSes?

I have a growing list of small/mid non-profits and collectives asking for my help to (re)make their website. I totally want to help, but I don’t have much time, especially considering that they generally have little or no funding—I would most definitely point them to @VillageOneCoopVillage One Cooperative, otherwise.

Therefore, I want a super simple and replicable solution where I can copy-paste most of the code, while providing them with a stable, fast, and modern solution. I had a look at the Headless CMS section in the Jamstack website, but I need opinions from people who actually used some of that software already.

Needs

  • I want to code and configure everything using @eleventyEleventy 🎈 v3.0.0
  • Admin interface () for the client to add pages and write posts
  • Static website in the front-end
  • Simple and reliable CI/CD
  • No/minimal maintenance after the first setup
  • Self-hostable (I was taking this for granted so much that I forgot to write it)
  • If it requires forge integration, it should support

Nice to have

  • Possibly using , not
  • Allowing the client to customize a bit their website through the admin interface, with a GUI
  • CMS app packaged on @yunohostYunoHost :neopossum_box:
  • No CMS vendor lock-in
  • I’d love to write as little JavaScript as possible

Absolutely not

Please, boost this and ask around! Links to videos, tutorials, and resources are welcome.

People whose perspective I would really value: @zachleatZach Leatherman :11ty: @harryfkHarry Keller @deno_landDeno @jaredwhiteJared “Indie Social Web” White @vanillawebThat HTML Blog & The Spicy Web @stefanStefan Bohacek @mxbckMax Böck @WeirdWriterRobert Kingett @deadsuperheroSean Tilley (Sorry if I am spamming you!)

0
0
0

has an incredibly mature governance model which lacks completely. Its trajectory is completely determined by the VC-backed company behind it.

I feel like this fact is often overlooked in debates whether to choose one or the other.

github.com/nodejs/TSC

0
0