Show HN: HelixDB – Open-source vector-graph database for AI applications (Rust)
Link: https://github.com/HelixDB/helix-db/
Discussion: https://news.ycombinator.com/item?id=43975423

@kodingwarrior@hackers.pub · 688 following · 503 followers
Neovim Super villain. 풀스택 엔지니어 내지는 프로덕트 엔지니어라고 스스로를 소개하지만 사실상 잡부를 담당하는 사람. CLI 도구를 만드는 것에 관심이 많습니다.
Hackers' Pub에서는 자발적으로 바이럴을 담당하고 있는 사람. Hackers' Pub의 무궁무진한 발전 가능성을 믿습니다.
그 외에도 개발자 커뮤니티 생태계에 다양한 시도들을 합니다. 지금은 https://vim.kr / https://fedidev.kr 디스코드 운영 중
Show HN: HelixDB – Open-source vector-graph database for AI applications (Rust)
Link: https://github.com/HelixDB/helix-db/
Discussion: https://news.ycombinator.com/item?id=43975423
5월 24일(土) 한국 연합우주 개발자 모임(FediDev KR)에서 두 번째 스프린트 모임을 개최합니다! 장소는 뚝섬역 5번 출구쪽에 위치한 튜링의 사과(![]() @TuringAppleDev튜링의 사과)입니다.
@TuringAppleDev튜링의 사과)입니다.
참고로 스프린트 모임이란 함께 모여서 오픈 소스 코딩을 하는 자리인데, 한국 연합우주 개발자 모임의 스프린트에서는 새로운 연합우주 서비스나 앱을 개발하거나, 번역이나 문서에 기여하는 등 연합우주와 관련된 다양한 오픈 소스 활동을 모여서 함께 합니다. 지난 스프린트 모임의 기록을 스프린트 블로그(![]() @sprints.fedidev.kr한국 페디버스 개발자 모임)에서 살펴보실 수 있습니다.
@sprints.fedidev.kr한국 페디버스 개발자 모임)에서 살펴보실 수 있습니다.
저는 그날 Fedify, Hollo, Hackers' Pub에 기여하시고자 하는 분들을 옆에서 도와드릴 예정입니다. Fedify, Hollo, Hackers' Pub에 기여해보고 싶었던 분들이 계시다면 모임에 참가하여 저와 함께 스프린트를 해보는 것도 좋을 것 같습니다.
이번 모임에 관심이 있으신 분은 행사 신청 페이지를 참고하시기 바랍니다.
![]() Jaeyeol Lee shared the below article:
Jaeyeol Lee shared the below article:
Ailrun (UTC-5/-4) @ailrun@hackers.pub
이 글은 "논리적"이 되는 두 번째 방법인 논건 대수를 재조명하며, 특히 컴퓨터 공학적 해석에 초점을 맞춥니다. 기존 논건 대수의 한계를 극복하기 위해, 컷 규칙을 적극 활용하는 반(半)공리적 논건 대수(SAX)를 소개합니다. SAX는 추론 규칙의 절반을 공리로 대체하여, 메모리 주소와 접근자를 활용한 저수준 자료 표현과의 커리-하워드 대응을 가능하게 합니다. 글에서는 랜드(∧)와 로어(∨)를 "양의 방법", 임플리케이션(→)을 "음의 방법"으로 구분하고, 각 논리 연산에 대한 메모리 구조와 연산 방식을 상세히 설명합니다. 특히, init 규칙은 메모리 복사, cut 규칙은 메모리 할당과 초기화에 대응됨을 보여줍니다. 이러한 SAX의 컴퓨터 공학적 해석은 함수형 언어의 저수준 컴파일에 응용될 수 있으며, 논리와 컴퓨터 공학의 연결고리를 더욱 강화합니다. 프랭크 페닝 교수의 연구를 바탕으로 한 SAX는 현재도 활발히 연구 중인 체계로, ML 계열 언어 컴파일러 개발에도 기여할 수 있을 것으로 기대됩니다.
Read more →Next.js 서버 액션은 서버 데이터를 가져오는 용도로 사용하기에 적합하지 않다. React 공식문서에서는 다음과 같이 말하고 있다.
Server Functions are designed for mutations that update server-side state; they are not recommended for data fetching. Accordingly, frameworks implementing Server Functions typically process one action at a time and do not have a way to cache the return value.
서버 액션이 여러 호출되면 바로 실행되는 대신 큐에 쌓이고 순차적으로 처리된다. 이미 실행된 서버 액션은 이후 취소할 수 없다.
이에 서버 액션을 데이터 가져오기로 활용하면 끔찍해지는 UX가 생길 수 있는데, 예를 들어 페이지의 목록 검색 화면에서 검색 후 데이터를 가져오는 상황에 않았다고 다른 화면으로 네비게이션이 불가능한 것은 일반적인 경험이 아니다.
이러면 RSC를 통해 무한 스크롤을 구현하지 못하는가? 에 대해서 의문이 생길 수 있는데 여기에 대해서 대안을 발견했다.
function ServerComponent({ searchParams }) {
  const page = parseInt((await searchParams).page ?? "1", 10)
  const items = await getItems(page)
  return (
    <Collection id={page}>
      {items.map(item => <InfiniteListItem key={item.id} {...items} />)}
    </Collection>
  )
}"use client"
function Collection({ id, children }) {
const [collection, setCollection] = useState(new Map([[id, children]]))
const [lastId, setLastId] = useState(id)
if (id !== lastId) {
setCollection(oldCollection => {
const newCollection = new Map(oldCollection)
newCollection.set(id, children)
return newCollection
})
setLastId(id)
}
return Array
.from(collection.entries())
.map(
([id, children]) => <Fragment key={id}>{children}</Fragment>
)
}대충 이런 꼴이다. 이러고 page를 증가시키거나 감소시키는건 intesection observer나 특정 엘리먼트의 onClick 이벤트 따위를 의존하면 된다. 이러면 데이터 가져오기 패턴을 RSC 형태로 의존할 수 있다. InfiniteListItem는 서버컴포넌트, 클라이언트컴포넌트 무엇으로 구현하더라도 상관없다. 가령 아래와 같은 식:
function ServerComponent({ searchParams }) {
  const page = parseInt((await searchParams).page ?? "1", 10)
  const { items, hasNext } = await getItems(page)
  return (
    <div>
      <Collection id={page}>
        {items.map(item => <InfiniteListItem key={item.id} {...items} />)}
      </Collection>
      {hasNext && (
        <IntersectionObserver nextUrl={`/?page=${page + 1}`} />
      )}
    </div>
  )
}
검색 조건이나 검색어에 따라 상태를 초기화시키려면 다음과 같이 표현하면 된다.
function ServerComponent({ searchParams }) {
  const page = parseInt((await searchParams).page ?? "1", 10)
  const query = parseInt((await searchParams).query ?? "")
  const { items, hasNext } = await getItems(page, query)
  return (
    <div>
      <Form action="/">
        <input name="query" />
        <button />
      </Form>
      <Collection id={page} key={query}>
        {items.map(item => <InfiniteListItem key={item.id} {...items} />)}
      </Collection>
      {hasNext && (
        <IntersectionObserver nextUrl={`/?page=${page + 1}&query=${query}`} />
      )}
    </div>
  )
}
매우 PHP스럽고, 암묵적이기도 하다. 다만 RSC의 데이터 가져오기 패턴을 활용하면서 기존 컴포넌트를 최대한 재사용할 수 있게 된다는 점이 좋다.
커서를 제대로 사용하는 12가지 방법
------------------------------
* 커서 디자이너가 말하는 커서 사용법인데, 잘 몰랐던 내용들이 있어 공유드립니다.
1. Cursor는 프로젝트 별로 규칙(Rules)을 세울 수 있음. Cursor > Setting > Cursor Settings로 접근하면 됨
2. Cursor는 .cursurignore 기능이 있어서, 테스트 케이스 파일을 편집할 수 없게 할 수 있음
3. .cursor 폴더 안에…
------------------------------
https://news.hada.io/topic?id=20595&utm_source=googlechat&utm_medium=bot&utm_campaign=1834
이이이얏호우우우!
가자! 댓글 없는 청정 사회로!
フトスト!
오픈 엑세스에 올라와 있는 논문들 중 소프트웨어 공학과 관련된 내용들을 편집하여 책으로 낸 것이다. 원문이 논문이라 그런지 몰라도 주장이 그렇게 혁신적이거나 새로운 것은 없다 다만 연구를 통해서 본인들의 주장에 대한 근거를 확보했다는 것이 유의미하다. 바꿔 말해 이 책에서 말하는 것들은 믿고 따라도 되는 어느 정도의 과학적 근거가 있는 이야기들. #독서
소프트웨어 엔지니어링 생산성 돌아보기
http://aladin.kr/p/7zTVn
시스템 설계 면접 완벽 가이드 - 노련한 소프트웨어 엔지니어가 되기 위한 시스템 설계의 모든 것 (지용 탄 (지은이), 나정호 (옮긴이) / 위키북스 / 2025-05-15 / 35,000원) https://feed.kodingwarrior.dev/r/MgKsYb
https://www.aladin.co.kr/shop/wproduct.aspx?ItemId=363273501&partner=openAPI&start=api
Rust로 작성한 JPEG XL 디코더, jxl-oxide의 버전 0.12.0을 릴리스했습니다. https://github.com/tirr-c/jxl-oxide/releases/tag/0.12.0
CMYK 프로파일 등 복잡한 ICC 프로파일을 지원하기 위해 기존에 사용하던 Little CMS 2 (lcms2) 에 더해, Rust로 작성된 색 관리 시스템인 moxcms 지원을 추가한 것이 주요 변경사항입니다. CLI 툴의 기본 CMS는 아직 lcms2이지만 --cms moxcms 옵션으로 moxcms를 사용할 수 있습니다.
Excited to share that we just released ESMeta v0.6.0! Here's two new features that we're really excited about in this release. Since this is my personal account, I won't be introducing the entire toolchain, but if you're curious, check out on https://github.com/es-meta/esmeta/ (1/n)
Creating your own federated microblog
Link: https://fedify.dev/tutorial/microblog
Discussion: https://news.ycombinator.com/item?id=43780785
Creating your own federated microblog
L: https://fedify.dev/tutorial/microblog
C: https://news.ycombinator.com/item?id=43780785
posted on 2025.04.24 at 05:37:57 (c=0, p=8)
![]() Jaeyeol Lee shared the below article:
Jaeyeol Lee shared the below article:
Perlmint @perlmint@hackers.pub
마지못해 패키지를 만들어야 할 것 같은 사람을 위한 설명입니다. 제대로된 패키지를 만들고 싶은 경우에는 부족한 점이 많습니다.
대부분의 경우에는 프로그램을 직접 소스에서 빌드하는 일도 적고, 그걸 시스템 전역에 설치하는 일도 흔치는 않을 것입니다. 좋은 패키지매니저와 관리가 잘되는 패키지 저장소들을 두고 아주 가끔은 직접 빌드를 할 일이 생기고, 흔치 않게 시스템 전역에 설치할 일이 생길 수 있습니다. 어지간한 프로그램들은 요즈음의 장비에서는 별 불만 없이 빌드 할 만한 시간이 소요되나, 컴파일러처럼 한번 빌드했으면 다시는 하고 싶지 않은 프로그램을 다시 설치해야하는 경우도 있을 수 있습니다. 하필 이런 프로그램들은 결과물도 덩치가 매우 큽니다. 이럴 때는 최대한 간단하고 필요한 항목만 패키지에 넣어서 만들어두고 다시 활용하면 좋을 것이기에 이런 경우를 위한 rpmbuild에 대한 나름 최소한의 사용 방법을 정리해봅니다.
rpmbuild는 rpm-build 패키지로 설치가 가능하며, 나름 단순하게 rpm으로 패키징을 할 수 있는 유틸리티입니다. spec파일에 패키지 정보, 빌드 명령, 설치 명령, 패키지가 포함해야 할 파일 목록을 작성해서 rpmbuild에 입력으로 넣어주면 빌드부터 시작해서 rpm패키지를 만들어줍니다. native 프로그램의 경우 디버그 심볼을 알아서 분리해서 별도의 패키지로 만들어주고, 필요한 의존성도 추정해서 명시해줍니다. 또한, 필요한 경우 하나의 spec 명세로 연관된 서브 패키지도(ex. 실행파일 패키지인 curl과 라이브러리 패키지 libcurl, 라이브러리를 사용하기 위한 개발 패키지 libcurl-devel) 같이 만들 수 있습니다.
rpmbuild는 기본으로 ~/rpmbuild/{BUILD,RPMS,SOURCES,SPECS,SRPMS,BUILDROOT}의 경로에서 동작하며 각 경로의 용도는 다음과 같습니다.
SOURCES에는 압축된 소스코드가 위치합니다.SPECS에는 패키지 정의인 spec파일을 둡니다.BUILD밑에서 빌드 작업이 진행됩니다.RPMS에 바이너리 rpm결과물이 생성됩니다.SRPMS에는 소스 rpm결과물이 생성됩니다.BUILDROOT는 패키징 하기 위해 빌드 결과물을 모으는 경로입니다.spec파일은 패키지를 어떻게 빌드하고 어떤 항목들이 패키지에 포함될지, 패키지의 이름, 설명 및 의존성 등의 메타데이터, 패키지 설치, 삭제시의 스크립트를 정의할 수 있습니다. 보통 시작 부분에는 메타데이터 정의로 시작하며, 다음과 같은 기본적인 형태를 취합니다. 나름 단순하게 만든 python을 위한 spec을 예시로 들어보겠습니다.
Summary: Python %{version}
Name: python-alternative
Version: %{version}
Release: 1%{?dist}
Obsoletes: %{name} <= %{version}
Provides: %{name} = %{version}
URL: https://www.python.org
Requires: libffi openssl
AutoReq: no
License: PSFL

Source: https://www.python.org/ftp/python/%{version}/Python-%{version}.tgz

BuildRequires: libffi-devel openssl-devel
BuiltRoot: %{_tmppath}/%{name}-%{version}-%{release}-root

%define major_version %(echo "%{version}" | sed -E 's/^([0-9]+)\\..+/\1/' | tr -d)
%define minor_version %(echo "%{version}" | sed -E 's/^[0-9]+\\.([0-9]+)\\..+/\1/' | tr -d)

%description
Python

%package devel
Summary: python development files
Requires: %{name} = %{version}-%{release}

%description devel
Python development package

%prep
%setup -q -n Python-%{version}

%build
./configure --prefix=%{_prefix}

%install
%{__make} altinstall DESTDIR=%{buildroot}
%{__ln_s} -f %{_bindir}/python%{major_version}.%{minor_version} %{buildroot}/%{_bindir}/python%{major_version}

%clean
%{__rm} -rf %{buildroot}

%files
%{_bindir}/python*
%exclude %{_bindir}/idle*
%{_bindir}/pip*
%{_bindir}/pydoc*
%exclude %{_bindir}/2to3*
%{_libdir}/libpython*
%{_prefix}/lib/libpython*
%{_prefix}/lib/python*
%{_mandir}/man1/python*

%files devel
%{_includedir}/python*
%{_prefix}/lib/pkgconfig/python*%로 매크로를 사용할 수 있으며, %package, %description, %files 같은 매크로는 인자를 주어서 서브 패키지를 정의하는데도 쓸 수 있습니다.
앞선 예제처럼 devel 이라고작성하면 메인 패키지이름 뒤에 붙여서 python-alternative-devel가 되며, curl - libcurl과 같은 경우에는 메인의 이름은 curl이고, 딸린 패키지를 정의할 때는 %package -n libcurl과 같이 -n옵션을 추가해서 지정할 수 있습니다. 몇몇 매크로는 단계를 정의하는 것과 같은 동작을 하며 다음과 같습니다.
유사성을 보면 spec파일의 맨 첫부분은 메인 패키지의 %package에 해당하는 것이 아닌가 싶습니다. <Key>: <Value>의 형태로 메타정보를 작성합니다. 대부분은 Key를 보면 무슨 값인지 추측 할 만합니다.
나중에 설명할 %files에서 나열한 파일을 rpmbuild가 분석하여 자동으로 패키지가 필요로 하는 의존성을 추정해서 추가 해 줍니다. python 스크립트, perl 스크립트, native 실행파일 등을 분석해서 알아서 추가해주는 것 같은데, 경우에 따라서는 틀린 의존성을 추가해주기도 합니다. 이 때는 AutoReq: no를 설정하여 자동 의존성 추가를 막을 수 있습니다. 이 python-alternative 패키지는 /usr/local/bin/python%{version}을 설치하는데 아마도 같이 포함되는 python 스크립트에 의해서 /bin/python을 의존성으로 추정하여 요구합니다. 패키지 스스로가 제공하는 의존성은 미리 설치 되어있기를 요구하지 않게 동작하는 것 같으니 보통은 문제가 없습니다만, 이 경우에는 스스로 제공을 하지 않기 때문에 python을 설치하기 위해서 python이 필요한 경우가 발생하므로 AutoReq를 껐습니다.
준비단계로 소스코드의 압축을 해제하고 필요한경우 패치를 적용합니다.
%setup 매크로를 이 안에서 보통 사용하며, %setup은 Source에 명시된 파일명의 압축 파일을 SOURCES 밑에서 찾아서 압축을 풉니다. 그리고 동일한 이름의 디렉토리로 이동을 합니다. 앞선 예제에서는 SOURCES/Python-%{version}.tgz의 압축을 풀고 Python-%{version}으로 이동을 합니다.
패치가 필요한 경우 보통 이 뒤에 패치를 적용하는 명령들을 추가 합니다.
설정, 컴파일 등을 수행하는 단계입니다. 이곳에서 자주 하는 매크로로 %configure, %make_build 등이 있습니다. %configure는 configure를 prefix 및 기타 몇가지 일반적으로 쓰이는 옵션을 추가하여 실행해주며, %make_build는 make와 비슷하게 모든 타겟을 빌드 합니다. 예제에서는 둘다 안쓰고 있고, 심지어 실제 빌드는 안하는데 어쨌든 이후의 %install까지 지나고나서 빌드 결과물만 맞는 위치에 만들어지면 대충 패키지를 만드는데는 별 문제는 없는 것 같습니다.
여기서 빌드 결과물을 설치하는 명령을 작성합니다. 일반적으로 %make_install을 사용하여 make install DESTDIR=%{buildroot}와 비슷한 명령을 수행하여 %{buildroot}밑에 빌드 결과물이 prefix를 유지하여 설치되게 합니다. 예제의
%{__ln_s} -f %{_bindir}/python%{major_version}.%{minor_version} %{buildroot}/%{_bindir}/python%{major_version}을 보면 추정 할 수 있듯이, 패키지에 포함시킬 파일들을 %{buildroot}밑에 생성을 하면 되며, 추가적인 심볼릭 링크는 패키지를 빌드하는 시점에는 존재하지 않지만, 패키지를 설치하게되면 존재하게 될 %{_bindir}/python%{major_version}.%{minor_version}를 향하는 것을 %{buildroot} 밑인 %{buildroot}/%{_bindir}/python%{major_version}에 만듭니다.
패키지에 포함될 파일 목록을 작성합니다. glob 양식으로 파일 목록을 작성할 수 있습니다. %{buildroot} 밑에 생성 되었지만 어느 %files에도 포함되지 않은 파일이 있는 경우에는 빌드를 실패합니다. 그러므로 %exclude를 사용해서 명시적으로 제외해줘야 합니다.
rpmbuild에서는 기본으로 다양한 매크로를 제공하고 있습니다. --define "_libdir %{_prefix}/lib64"와 같은 옵션을 실행시에 주어서 실행시점에 매크로를 덮어 쓸 수도 있고, 앞선 spec파일 내의 %define major_version 와 같이 다른 매크로와 셸 명령을 활용하여 매크로를 정의 할 수도 있습니다.
원하는 동작을 안하는 것 같은 경우에는 --show-rc옵션을 사용하여 매크로가 어떻게 정의되어있는지 확인해 볼 수 있습니다.
rpmbuild의 매뉴얼을 보면 자세하게 나와있지만 가장 단순하게는
rpmbuild -bb <specfile>로 바이너리 패키지를 빌드할 수 있습다. 이 때, 압축된 소스코드는 미리 SOURCES밑에 두어야 합니다.
직접 비공개 패키지 저장소 프로그램을 실행하여 제공하는 방법도 있겠지만, 최대한 간단하게 할 수 있는 방법으로, rpm관련 패키지 설치 명령이 입력으로 http등의 URL도 받는 것을 활용하여 적당한 장비에서 http로 서빙을 해주면 됩니다.
간만에 필받아서 aider 커꾸(commit 꾸미기) 함.
gum 이라는 훌륭한 쉘꾸 도구 + git pretty format + delta 썼어요
# Define the git log format string with color formatting for better readability
local GIT_FORMAT="%C(bold yellow)Hash:%C(reset) %C(bold cyan)%h%C(reset) %C(dim white)(%cd)%C(reset)%n"
GIT_FORMAT+="%C(bold yellow)Author:%C(reset) %C(bold white)%an%C(reset) %C(dim white)<%ae>%C(reset)%n"
GIT_FORMAT+="%C(bold yellow)Message:%C(reset) %C(bold white)%s%C(reset)"

# Define the date format
local DATE_FORMAT="%Y-%m-%d %H:%M:%S"

# Perform the commit with aider and show a styled commit summary
aider --commit && \
gum style \
  --border rounded \
  --padding "0 2" \
  --border-foreground 39 \
  "$(git log -1 \
      --pretty=format:"$GIT_FORMAT" \
      --date=format:"$DATE_FORMAT" \
      --color=always)" && \

# Show detailed changes using delta for side-by-side diff with line numbers
git show -1 --color=always --stat --patch | delta --side-by-side --line-numbers🤔
Protocols such as ActivityPub are widely used and useful, but unfortunately are not the best option when efficiency is important. Messages are in plain JSON format, which is wasteful, and extensions by various implementations complicate the implementation.
XQ's focus on replacing JSON with Protocol Buffers seems misguided. While serialization efficiency matters, ActivityPub's fundamental bottlenecks are in its multi-hop network architecture and request patterns. Optimizing message format without addressing these core architectural inefficiencies is like polishing doorknobs on a house with structural issues. True performance gains would require rethinking the communication model itself.
DuckDB 인 액션 - SQL만 알면 되는 로컬 데이터 분석, DuckDB로 가볍게 시작한다 (마크 니드햄, 마이클 헝거, 마이클 시몬스 (지은이), 김의윤 (옮긴이) / 인사이트 / 2025-05-07 / 28,000원) https://feed.kodingwarrior.dev/r/qmINu5
https://www.aladin.co.kr/shop/wproduct.aspx?ItemId=362832219&partner=openAPI&start=api
내가 제일 좋아하는 프로그래밍 문법, "파이프라이닝"
------------------------------
- *파이프라이닝* 은 프로그래밍 언어에서 코드의 가독성과 유지보수성을 높이는 중요한 기능임
- *데이터 흐름을 왼쪽에서 오른쪽, 위에서 아래로 자연스럽게* 표현할 수 있게 해주는 방식
- Rust 와 같은 언어에서 파이프라이닝은 코드의 흐름을 명확하게 하고, IDE 의 자동 완성 기능을 통해 개발 생산성…
------------------------------
https://news.hada.io/topic?id=20473&utm_source=googlechat&utm_medium=bot&utm_campaign=1834
랭체인으로 RAG 개발하기 : VectorRAG & GraphRAG - 현직 AI Specialist에게 배우는 RAG! 파이썬, 오픈AI, Neo4j로 실습하며 개념과 원리를 이해하고, 오픈AI와 딥시크 비교 분석까지! (서지영 (지은이) / 길벗 / 2025-04-25 / 29,000원) https://feed.kodingwarrior.dev/r/9pIEy7
https://www.aladin.co.kr/shop/wproduct.aspx?ItemId=362807100&partner=openAPI&start=api
미래의 기술은 'AI'가 아니라 '집중력'임
------------------------------
- LLM은 반복 작업 자동화와 브레인스토밍 등에 유용하지만, *맹목적인 의존은 문제 해결 능력 저하를 초래할 수 있음*
- 특히 *새로운 문제에 대한 LLM의 신뢰도는 낮아* , 인간 엔지니어의 판단력이 중요함
- 구글 같은 검색엔진은 탐색과 활용의 균형을 제공하지만, LLM은 즉시 ‘활용’(exploitation)만 유…
------------------------------
https://news.hada.io/topic?id=20458&utm_source=googlechat&utm_medium=bot&utm_campaign=1834
Vibe 코딩은 저품질 작업에 대한 변명이 될 수 없어요
------------------------------
- *AI 기반 바이브 코딩* 은 혁신적이지만, *품질 없는 속도는 위험* 하다는 경고의 글
"더 빨리 움직이고, 더 많이 망가뜨려라"- 이 실리콘밸리의 오래된 슬로건을 비튼 표현은 최근 엔지니어링 커뮤니티에서 “vibe coding…
"vibe coding, 두 명의 엔지니어가 50명의 기술 부채를 만들어낼 수 있는 방식"
터미널에 대해 궁금한 점이 생겨 자료를 찾다 보니 Windows Console Team에서 연재한 시리즈물을 발견했는데, 그 내용이 참 유익했다.
Windows Command-Line Series:
콘솔 앱이 터미널과 입출력을 주고 받는 것을 공기처럼 당연하다고 생각했는데, 그 과정에는 커서 이동이나 개행 등과 같은 제어 문자를 렌더링하거나 SIGINT 같은 시그널을 발생시켜주는 처리가 존재했다. 터미널과 콘솔 앱이 서로 분리된 구조가 과거 물리 터미널로부터 비롯된 것도 흥미로웠고 말이다. 사실 이해 못 한 부분이 아직 많아서 다음에 또 읽어볼 생각이다.
배그로 설명하는 수학, 실험, 과학의 관계
수학: 배그에서 총을 쏠 때 총알 궤적
실험: 현실에서 총을 쏘면 배그와 동일한 총알 궤적이 나올까? 궁금한데? 쏴서 비교해보자!
과학: 실험 몇 번 해보니까 배그랑 현실이랑 총알 궤적이 같더라! 앞으로 총알 궤적 예측할 때는 배그켜서 확인하자!
Gemini 2.5 Pro and Flash now have the ability to return image segmentation masks on command, as base64 encoded PNGs embedded in JSON strings
I vibe coded an interactive tool for exploring this new capability - it costs a fraction of a cent per image https://simonwillison.net/2025/Apr/18/gemini-image-segmentation/
가장 선호하는 JetBrains IDE가 AI 시대에 뒤쳐지고 있어서 안타까웠는데 AI assistant 와 Junie 업데이트로 이제 좀 쓸만해진 것 같다.
여전히 부족한 점이 많기는 하다.
Agent는 느리고, 현재 상태에 대한 가시성이 없어 계속 기다려야할지 중단하고 새로운 세션을 열어야 할지에 대한 판단이 안선다.
prompt를 별도 관리할 수 있게 한 점은 훌륭하나 포맷이나 디렉토리를 유저가 선택할 수 있게 했더라면 더욱 유용했을 것이다. 나는 prompt가 다른 에이전트와 공유 가능하길 원한다.
vscode copilot처럼 Claude로부터 mcp 서버 설정을 불러올 수 있다. 하지만 역시 현재 상태 가시성이 없어 제대로 mcp 서버와 인터랙션이 되고 있는지 확인하기 어렵다.
그럼에도 불구하고 Cursor 나 Copilot에 충분히 대항할만한 업데이트라 생각한다. 앞으로를 응원한다!
https://www.jetbrains.com/ko-kr/junie/
Concurrency in Haskell: Fast, Simple, Correct
Link: https://bitbashing.io/haskell-concurrency.html
Discussion: https://news.ycombinator.com/item?id=43679906
실무에 바로 적용하는 웹 접근성 가이드북 - 접근성의 개념부터 태그 의미 있게 사용하기, WAI-ARIA, 리액트 컴포넌트 만들기까지 (김남경, 곽규현 (지은이) / 제이펍 / 2025-05-01 / 42,000원) https://feed.kodingwarrior.dev/r/PJHgZJ
http://www.aladin.co.kr/shop/wproduct.aspx?ItemId=362558470&partner=openAPI&start=api
멀티패러다임 프로그래밍 - 객체지향, 함수형, 명령형의 통합적 사고로 구현하는 소프트웨어 설계와 구현 (유인동 (지은이) / 한빛미디어 / 2025-04-21 / 38,000원) https://feed.kodingwarrior.dev/r/JDRhIG
http://www.aladin.co.kr/shop/wproduct.aspx?ItemId=362548794&partner=openAPI&start=api
What Every Programmer Should Know about How CPUs Work • Matt Godbolt • GOTO 2024 https://lobste.rs/s/dbkvz5 #video #performance
https://www.youtube.com/watch?v=-HNpim5x-IE
![]() Jaeyeol Lee shared the below article:
Jaeyeol Lee shared the below article:
Ailrun (UTC-5/-4) @ailrun@hackers.pub
이 글은 함수형 언어의 핵심 개념을 람다 대수를 통해 소개하며, 함수형 언어의 평가 방식에 대한 깊이 있는 이해를 제공합니다. 람다 대수의 기본 요소인 변수, 함수, 함수 호출을 설명하고, 값에 의한 호출(CBV)과 이름에 의한 호출(CBN)의 차이점을 명확히 분석합니다. 특히, 폴 블레인 레비의 "값 밀기에 의한 호출(CBPV)"을 소개하며, 이 방식이 CBV와 CBN을 모두 포괄할 수 있는 강력한 도구임을 강조합니다. CBPV가 함수와 함수 호출을 스택 기반으로 어떻게 다르게 해석하는지, 그리고 이를 통해 람다 대수를 기계 수준으로 컴파일할 때 얻을 수 있는 이점을 설명합니다. 항수 분석과 같은 최적화 기법을 CBPV를 통해 어떻게 더 명확하게 표현할 수 있는지 보여주며, GHC 컴파일러의 중간 언어로서 CBPV의 중요성을 부각합니다. 이 글은 함수형 언어의 깊은 이론적 배경과 실제 컴파일러 구현 사이의 연결고리를 탐구하고자 하는 독자에게 유용한 통찰력을 제공합니다.
Read more →다른 분들이 여러 가지 말씀을 해 주셨습니다만 저도 첨언하자면,
"의업과 약업의 현실적 관계"도 한 가지 중대한 이유입니다. 제약회사 직원이 의사에게 굽실거리다 못해 예비군 훈련을 대신 가거나, 수술을 대신 한다는 기상천외한 뉴스 다들 한번쯤 보셨을 텐데요.
원론적으로는 의사가 약에도 빠삭해야 하지만, 현실적으로는 자기 전공분야도 너무 방대하고 약학도 너무 방대해서 그러기 어렵습니다. 마치 소프트웨어 엔지니어 중에 하드웨어 덕질까지 하는 경우는 소수이고 대부분은 그냥 맥북 사는 것과 비슷하게, 의사들의 약 지식도 한계가 있는 거죠. 어떤 약을 안 쓰는 게 무슨 이유가 있어서가 아니라 진짜로 그 약의 존재를 몰라서인 경우가 허다합니다. 그러니 약 성능 똑같아도 영업에 따라 억 단위가 왔다갔다 하고, 그러니 제약회사의 영업이 엽기뉴스의 영역으로 가는 것이죠.
이런 시장환경에서 의사들에게 약 이름과 성분 이름의 대조표를 매년 새로 외우라고 하면 망하겠죠? 그래서 어떻게든 이름만 보면 성분을 알게 하려고 발버둥치는 것입니다.
그러면 반대로 성분명과 전혀 무관한 약 이름은 어떻게 나오는지도 짐작이 되시죠? 그렇습니다. "처방전 필요없는" 약은 성분명 쿨하게 버리고 일반소비자에게 호소하는 작명을 하는 경향이 있습니다. 그리고, 처방전이 필요하더라도 동일성분의 약이 많거나 저네릭 경쟁이 벌어지는 경우에도 튀는 이름으로 차별화를 꾀하는 경향이 있죠.
RE: https://serafuku.moe/notes/a6lapo16c2
![]() @ailrunAilrun (UTC-5/-4)
@ailrunAilrun (UTC-5/-4) ![]() @kodingwarriorJaeyeol Lee
@kodingwarriorJaeyeol Lee ![]() @lionhairdino 아아 어떤 느낌인지 상상이 갑니다. 저는@parksb
님이 하신것처럼 맥주가 차있으면 좋겠다싶어 H 중간 막대를 위로 올렸습니다.
@lionhairdino 아아 어떤 느낌인지 상상이 갑니다. 저는@parksb
님이 하신것처럼 맥주가 차있으면 좋겠다싶어 H 중간 막대를 위로 올렸습니다.
H가 컵이고, P가 손잡이어야 하는데, H가 컵 모양이 잘 안나와서, 포기하고 그냥 맥주에 담가 버렸습니다. (근데 호스트분 아주 근거리에 디자이너분 계신 거 아닌가 모르겠습니다.) ![]() @ailrunAilrun (UTC-5/-4)
@ailrunAilrun (UTC-5/-4)

![]() @bglbgl gwyng
@bglbgl gwyng ![]() @kodingwarriorJaeyeol Lee
@kodingwarriorJaeyeol Lee ![]() @lionhairdino
제 심상이랑은 좀 다르네요. 저는 H의 중간 막대가 좀 아래로, H가 좌우로 살짝 벌어져있고 P가 좀 더 바짝 붙은 형태를 상상했습니다. Inkscape 켜서 직접 그리기에는 졸리네요 😅
@lionhairdino
제 심상이랑은 좀 다르네요. 저는 H의 중간 막대가 좀 아래로, H가 좌우로 살짝 벌어져있고 P가 좀 더 바짝 붙은 형태를 상상했습니다. Inkscape 켜서 직접 그리기에는 졸리네요 😅
![]() @ailrunAilrun (UTC-5/-4)
@ailrunAilrun (UTC-5/-4) ![]() @lionhairdino
@lionhairdino ![]() @kodingwarriorJaeyeol Lee
@kodingwarriorJaeyeol Lee ![]() @bglbgl gwyng 지나가다 보고 아이디어가 넘 좋아서 살포시...
@bglbgl gwyng 지나가다 보고 아이디어가 넘 좋아서 살포시...


왜 Fennel인가?
------------------------------
- Fennel 은 Lua 런타임에서 실행되는 프로그래밍 언어임
- Lua 는 간단하면서도 강력한 프로그래밍 언어로, 다른 프로그램에 쉽게 통합되어 사용자에게 재프로그래밍 가능성을 제공함
- Fennel 은 Lua의 단점을 보완하여, 보다 명확하고 오류를 줄이는 대안을 제공함
- Fennel 은 Lisp 계열의 문법을 사용하여…
------------------------------
https://news.hada.io/topic?id=20336&utm_source=googlechat&utm_medium=bot&utm_campaign=1834
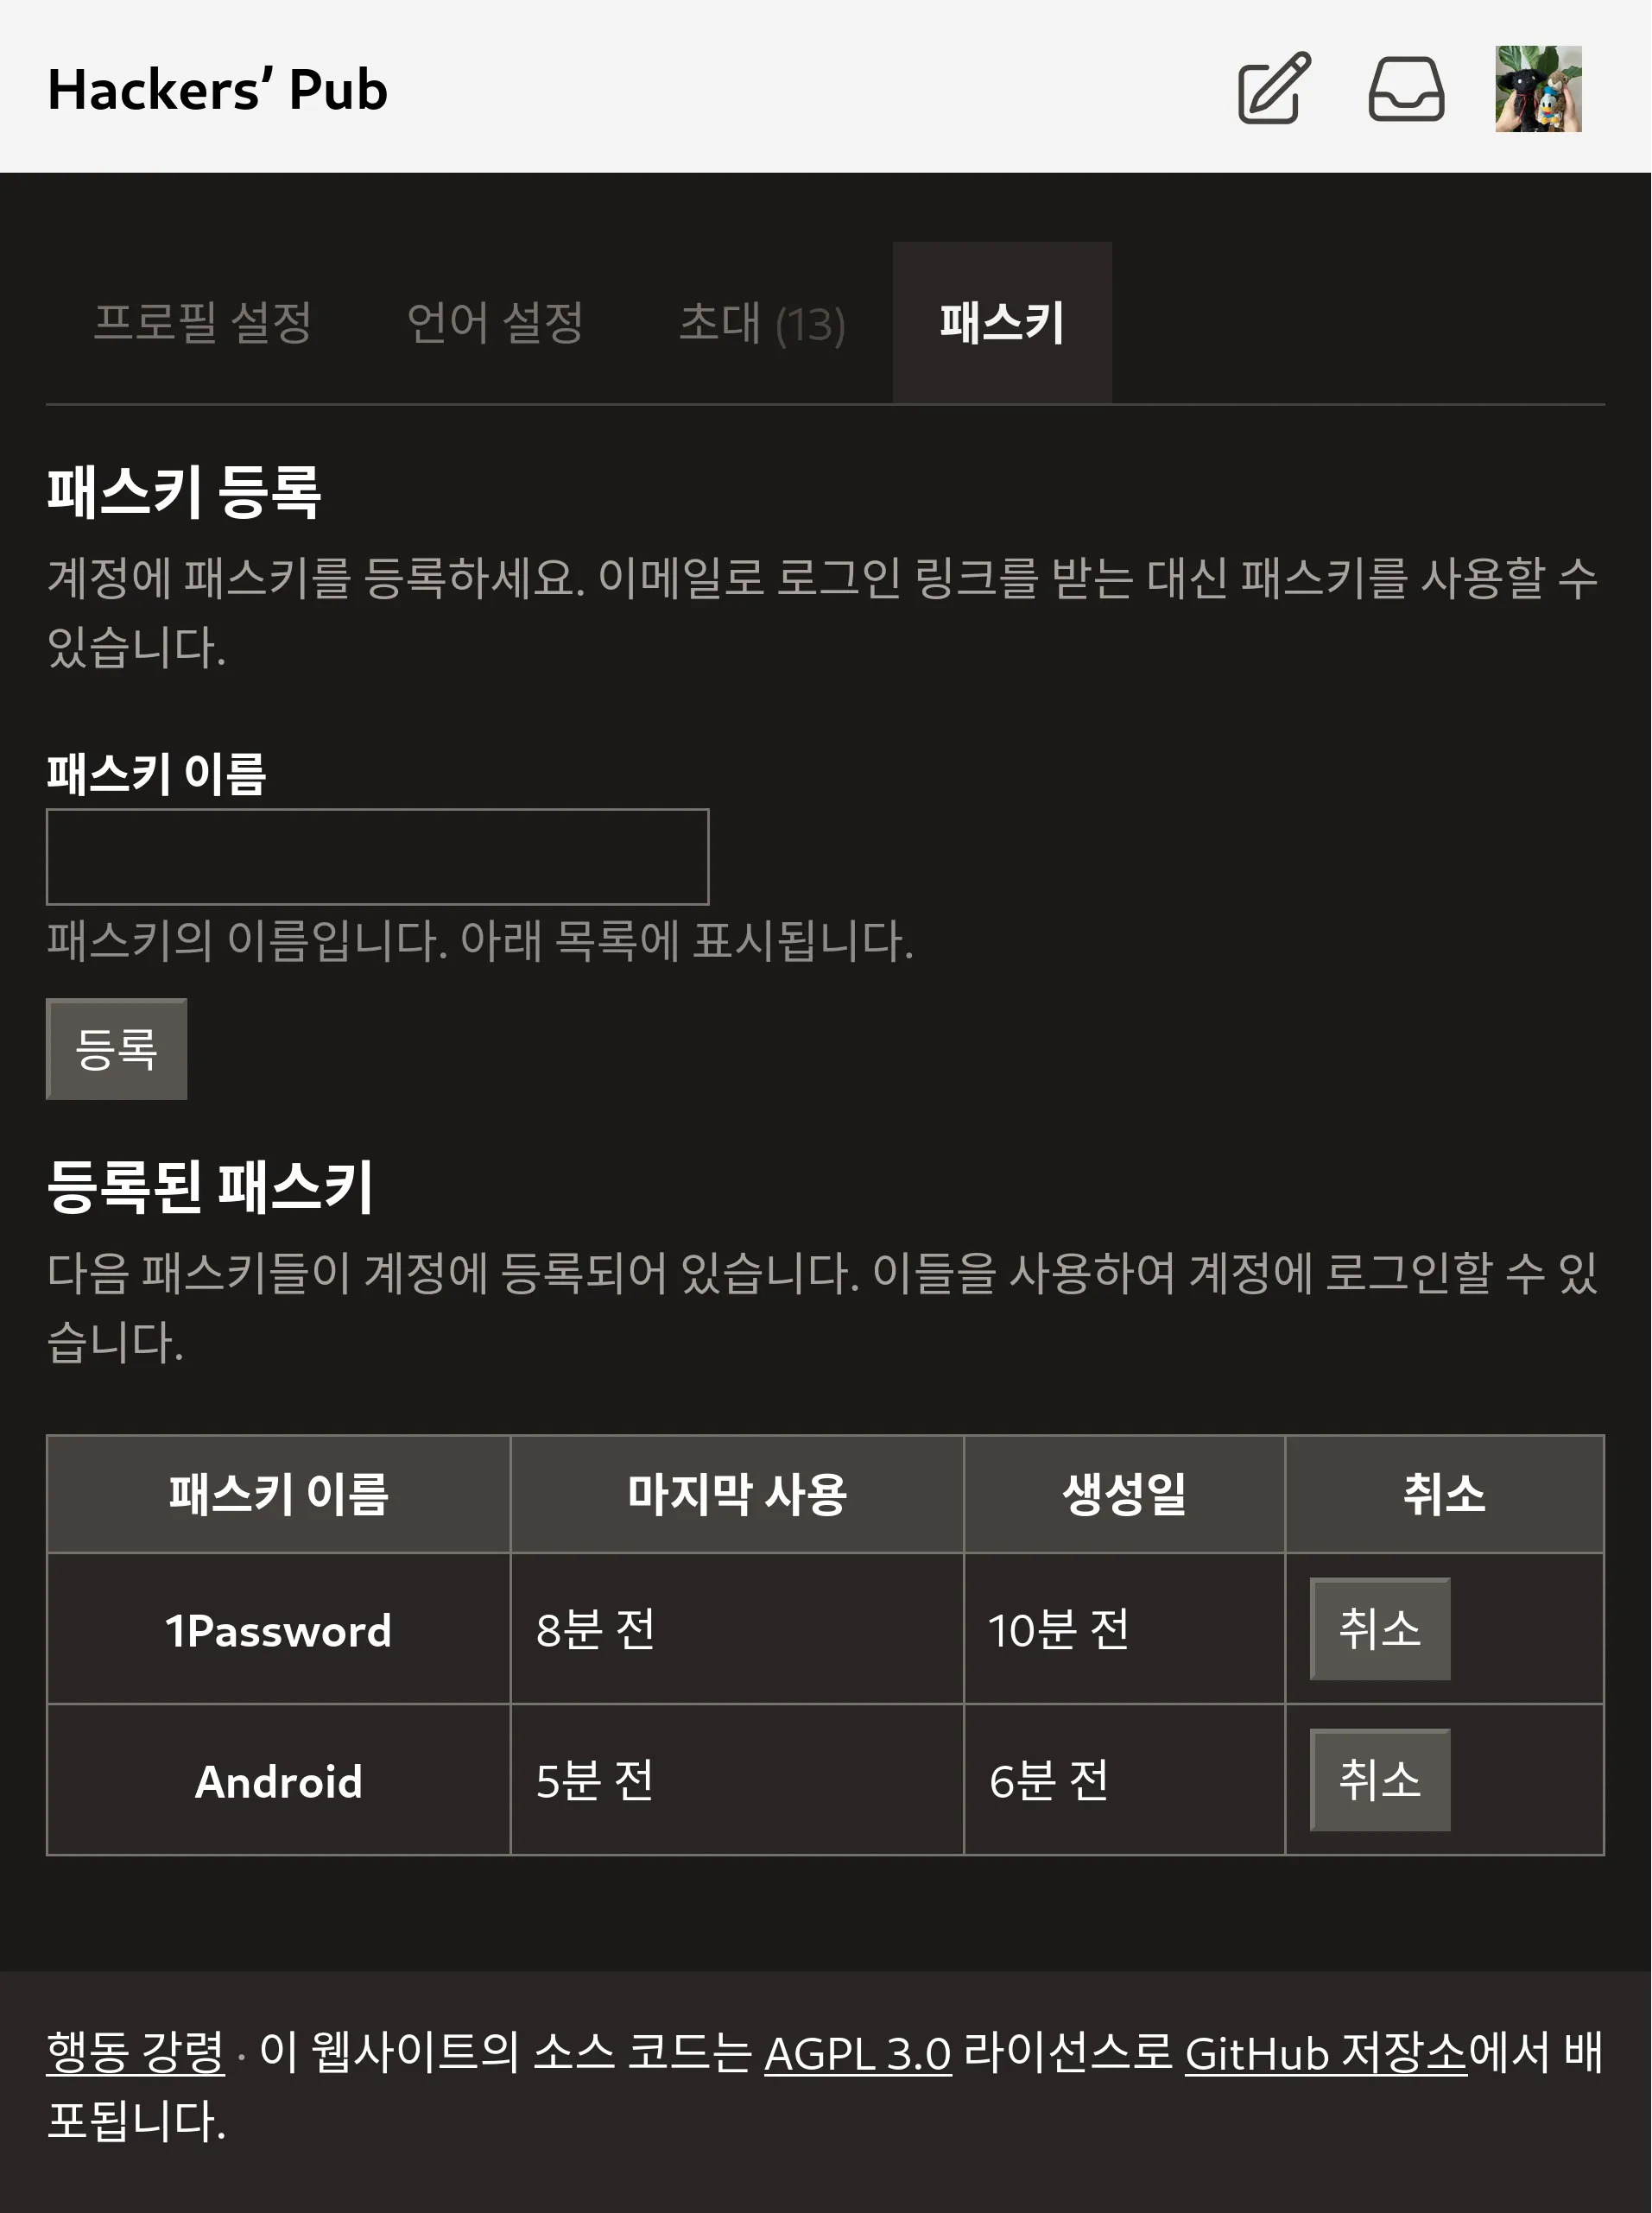
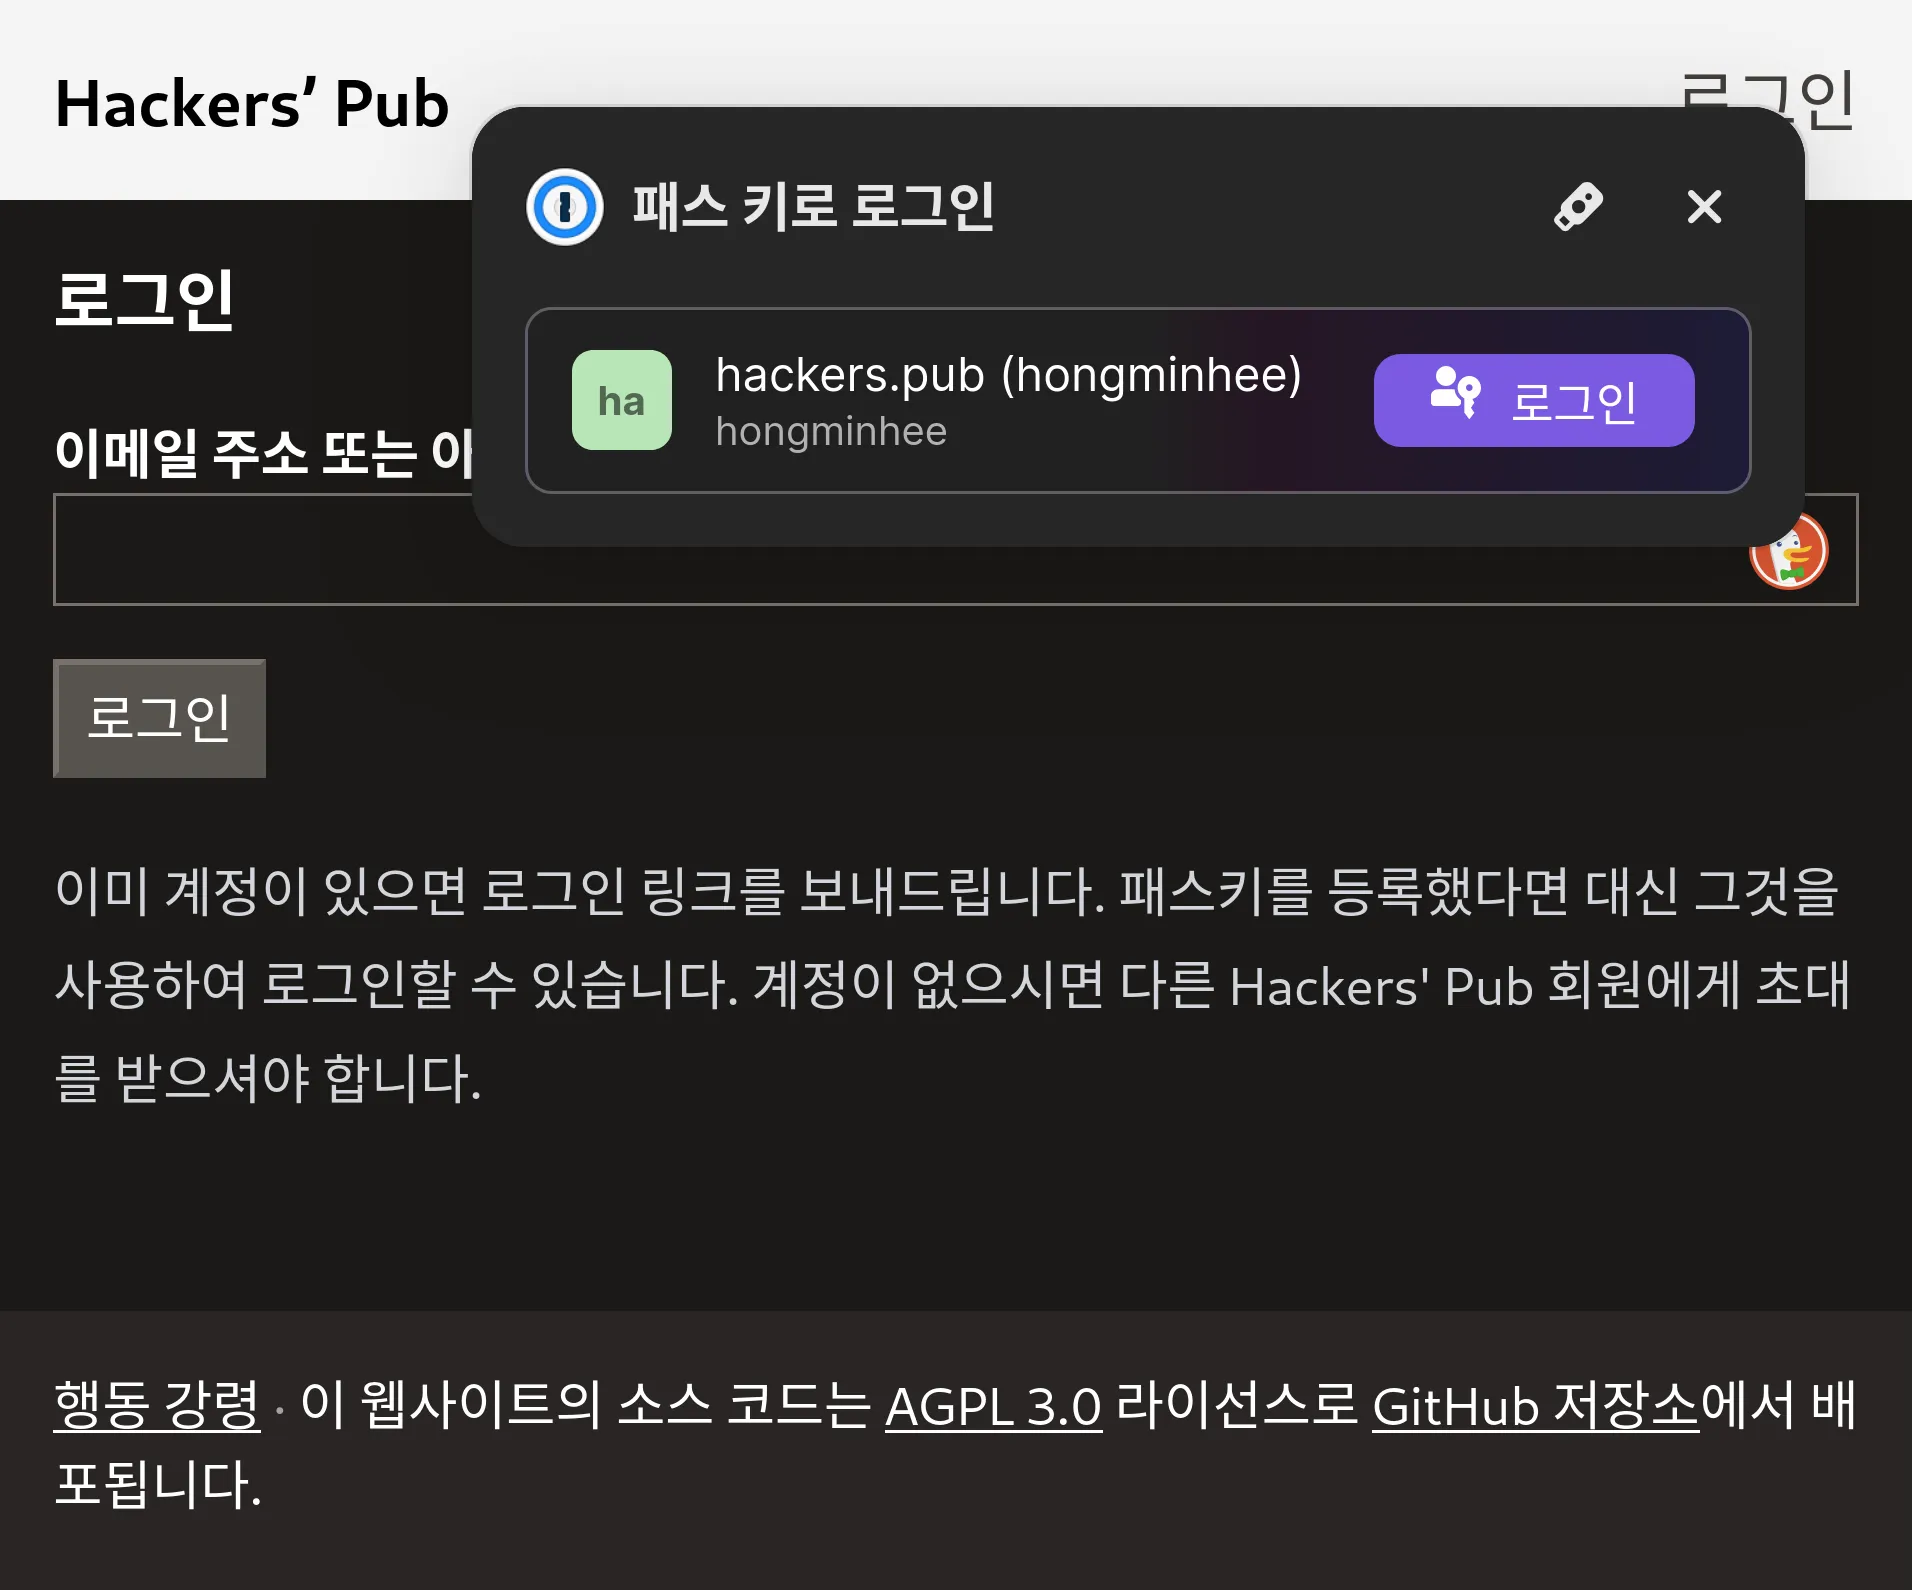
지금까지 Hackers' Pub은 반드시 이메일을 통해 로그인 링크를 수신하는 식으로만 로그인이 가능했는데, 사실은 많이 번거로웠죠?
이를 해결하기 위해 Hackers' Pub에 패스키 기능을 추가했습니다. 패스키 추가는 설정 → 패스키 페이지에서 할 수 있으며, 패스키가 등록된 기기 및 브라우저에서는 로그인 페이지에서 자동적으로 패스키를 사용할 것인지 묻는 창이 뜨게 됩니다.
Ditch the DIY Drama: Why Use Fedify Instead of Building ActivityPub from Scratch? https://lobste.rs/s/ebab2d #distributed #web
https://hackers.pub/@hongminhee/2025/why-use-fedify
![]() Jaeyeol Lee shared the below article:
Jaeyeol Lee shared the below article:
洪 民憙 (Hong Minhee) @hongminhee@hackers.pub
So, you're captivated by the fediverse—the decentralized social web powered by protocols like ActivityPub. Maybe you're dreaming of building the next great federated app, a unique space connected to Mastodon, Lemmy, Pixelfed, and more. The temptation to dive deep and implement ActivityPub yourself, from the ground up, is strong. Total control, right? Understanding every byte? Sounds cool!
But hold on a sec. Before you embark on that epic quest, let's talk reality. Implementing ActivityPub correctly isn't just one task; it's like juggling several complex standards while riding a unicycle… blindfolded. It’s hard.
That's where Fedify comes in. It's a TypeScript framework designed to handle the gnarliest parts of ActivityPub development, letting you focus on what makes your app special, not reinventing the federation wheel.
This post will break down the common headaches of DIY ActivityPub implementation and show how Fedify acts as the super-powered pain reliever, starting with the very foundation of how data is represented.
At its core, ActivityPub relies on the ActivityStreams 2.0 vocabulary to describe actions and objects, and it uses JSON-LD as the syntax to encode this vocabulary. While powerful, this combination introduces significant complexity right from the start.
First, understanding and correctly using the vast ActivityStreams vocabulary itself is a hurdle. You need to model everything—posts (Note, Article), profiles (Person, Organization), actions (Create, Follow, Like, Announce)—using the precise terms and properties defined in the specification. Manual JSON construction is tedious and prone to errors.
Second, JSON-LD, the encoding layer, has specific rules that make direct JSON manipulation surprisingly tricky:
Note objects mean the same thing regarding the name property:// No name property
{
"@context": "https://www.w3.org/ns/activitystreams",
"type": "Note",
"content": "…"
}// Equivalent to:
{
"@context": "https://www.w3.org/ns/activitystreams",
"type": "Note",
"name": [],
"content": "…"
}content property here:// Single value
{
"@context": "https://www.w3.org/ns/activitystreams",
"type": "Note",
"content": "Hello"
}// Equivalent to:
{
"@context": "https://www.w3.org/ns/activitystreams",
"type": "Note",
"content": ["Hello"]
}Announce activities are semantically equivalent (assuming the URIs resolve correctly):{
"@context": "https://www.w3.org/ns/activitystreams",
"type": "Announce",
// Embedded objects:
"actor": {
"type": "Person",
"id": "http://sally.example.org/",
"name": "Sally"
},
"object": {
"type": "Arrive",
"id": "https://sally.example.com/arrive",
/* ... */
}
}// Equivalent to:
{
"@context":
"https://www.w3.org/ns/activitystreams",
"type": "Announce",
// URI references:
"actor": "http://sally.example.org/",
"object": "https://sally.example.com/arrive"
}Attempting to manually handle all these vocabulary rules and JSON-LD variations consistently across your application inevitably leads to verbose, complex, and fragile code, ripe for subtle bugs that break federation.
Fedify tackles this entire data modeling challenge with its comprehensive, type-safe Activity Vocabulary API. It provides TypeScript classes for ActivityStreams types and common extensions, giving you autocompletion and compile-time safety. Crucially, these classes internally manage all the tricky JSON-LD nuances. Fedify's property accessors present a consistent interface—non-functional properties (like tags) always return arrays, functional properties (like content) always return single values or null. It handles object references versus embedded objects seamlessly through dereferencing accessors (like activity.getActor()) which automatically fetch remote objects via URI when needed—a feature known as property hydration. With Fedify, you work with a clean, predictable TypeScript API, letting the framework handle the messy details of AS vocabulary and JSON-LD encoding.
Once you can model data, you need to make your actors discoverable. This primarily involves the WebFinger protocol (RFC 7033). You'd need to build a server endpoint at /.well-known/webfinger capable of parsing resource queries (like acct: URIs), validating the requested domain against your server, and responding with a precisely formatted JSON Resource Descriptor (JRD). This JRD must include specific links, like a self link pointing to the actor's ActivityPub ID using the correct media type. Getting any part of this wrong can make your actors invisible.
Fedify simplifies this significantly. It automatically handles WebFinger requests based on the actor information you provide through its setActorDispatcher() method. Fedify generates the correct JRD response. If you need more advanced control, like mapping user-facing handles to internal identifiers, you can easily register mapHandle() or mapAlias() callbacks. You focus on defining your actors; Fedify handles making them discoverable.
// Example: Define how to find actors
federation.setActorDispatcher(
  "/users/{username}",
  async (ctx, username) => { /* ... */ }
);
// Now GET /.well-known/webfinger?resource=acct:username@your.domain just works!Serving actor profiles requires careful content negotiation. A request for an actor's ID needs JSON-LD for machine clients (Accept: application/activity+json) but HTML for browsers (Accept: text/html). Handling incoming activities at the inbox endpoint involves validating POST requests, verifying cryptographic signatures, parsing the payload, preventing duplicates (idempotency), and routing based on activity type. Implementing collections (outbox, followers, etc.) with correct pagination adds another layer.
Fedify streamlines all of this. Its core request handler (via Federation.fetch() or framework adapters like @fedify/express) manages content negotiation. You define actors with setActorDispatcher() and web pages with your framework (Hono, Express, SvelteKit, etc.)—Fedify routes appropriately. For the inbox, setInboxListeners() lets you define handlers per activity type (e.g., .on(Follow, ...)), while Fedify automatically handles validation, signature verification, parsing, and idempotency checks using its KV Store. Collection implementation is simplified via dispatchers (e.g., setFollowersDispatcher()); you provide logic to fetch a page of data, and Fedify constructs the correct Collection or CollectionPage with pagination.
// Define inbox handlers
federation.setInboxListeners("/inbox", "/users/{handle}/inbox")
  .on(Follow, async (ctx, follow) => { /* Handle follow */ })
  .on(Undo, async (ctx, undo) => { /* Handle undo */ });

// Define followers collection logic
federation.setFollowersDispatcher(
  "/users/{handle}/followers",
  async (ctx, handle, cursor) => { /* ... */ }
);Sending an activity requires more than a simple POST. Networks fail, servers go down. You need robust failure handling and retry logic (ideally with backoff). Processing incoming activities synchronously can block your server. Efficiently broadcasting to many followers (fan-out) requires background processing and using shared inboxes where possible.
Fedify addresses reliability and scalability using its MessageQueue abstraction. When configured (highly recommended), Context.sendActivity() enqueues delivery tasks. Background workers handle sending with automatic retries based on configurable policies (like outboxRetryPolicy). Fedify supports various queue backends (Deno KV, Redis, PostgreSQL, AMQP). For high-traffic fan-out, Fedify uses an optimized two-stage mechanism to distribute the load efficiently.
// Configure Fedify with a persistent queue (e.g., Deno KV)
const federation = createFederation({
  queue: new DenoKvMessageQueue(/* ... */),
  // ...
});
// Sending is now reliable and non-blocking
await ctx.sendActivity({ handle: "myUser" }, recipient, someActivity);Securing an ActivityPub server is critical. You need to implement HTTP Signatures (draft-cavage-http-signatures-12) for server-to-server authentication—a complex process. You might also need Linked Data Signatures (LDS) or Object Integrity Proofs (OIP) based on FEP-8b32 for data integrity and compatibility. Managing cryptographic keys securely is essential. Lastly, fetching remote resources risks Server-Side Request Forgery (SSRF) if not validated properly.
Fedify is designed with security in mind. It automatically handles the creation and verification of HTTP Signatures, LDS, and OIP, provided you supply keys via setKeyPairsDispatcher(). It includes key management utilities. Crucially, Fedify's default document loader includes built-in SSRF protection, blocking requests to private IPs unless explicitly allowed.
The fediverse is diverse. Different servers have quirks. Ensuring compatibility requires testing and adaptation. Standards evolve with new Federation Enhancement Proposals (FEPs). You also need protocols like NodeInfo to advertise server capabilities.
Fedify aims for broad interoperability and is actively maintained. It includes features like ActivityTransformers to smooth over implementation differences. NodeInfo support is built-in via setNodeInfoDispatcher().
Beyond the protocol, building any server involves setup, testing, and debugging. With federation, debugging becomes harder—was the message malformed? Was the signature wrong? Is the remote server down? Is it a compatibility quirk? Good tooling is essential.
Fedify enhances the developer experience significantly. Being built with TypeScript, it offers excellent type safety and editor auto-completion. The fedify CLI is a powerful companion designed to streamline common development tasks.
You can quickly scaffold a new project tailored to your chosen runtime and web framework using fedify init.
For debugging interactions and verifying data, fedify lookup is invaluable. It lets you inspect how any remote actor or object appears from the outside by performing WebFinger discovery and fetching the object's data. Fedify then displays the parsed object structure and properties directly in your terminal. For example, running:
$ fedify lookup @fedify-example@fedify-blog.deno.devWill first show progress messages and then output the structured representation of the actor, similar to this:
// Output of fedify lookup command (shows parsed object structure)
Person {
  id: URL "https://fedify-blog.deno.dev/users/fedify-example",
  name: "Fedify Example Blog",
  published: 2024-03-03T13:18:11.857Z, // Simplified timestamp
  summary: "This blog is powered by Fedify, a fediverse server framework.",
  url: URL "https://fedify-blog.deno.dev/",
  preferredUsername: "fedify-example",
  publicKey: CryptographicKey {
    id: URL "https://fedify-blog.deno.dev/users/fedify-example#main-key",
    owner: URL "https://fedify-blog.deno.dev/users/fedify-example",
    publicKey: CryptoKey { /* ... CryptoKey details ... */ }
  },
  // ... other properties like inbox, outbox, followers, endpoints ...
}
This allows you to easily check how data is structured or troubleshoot why an interaction might be failing by seeing the actual properties Fedify parsed.
Testing outgoing activities from your application during development is made much easier with fedify inbox. Running the command starts a temporary local server that acts as a publicly accessible inbox, displaying key information about the temporary actor it creates for receiving messages:
$ fedify inbox
✔ The ephemeral ActivityPub server is up and running: https://<unique_id>.lhr.life/
✔ Sent follow request to @<some_test_account>@activitypub.academy.
╭───────────────┬─────────────────────────────────────────╮
│ Actor handle: │ i@<unique_id>.lhr.life                  │
├───────────────┼─────────────────────────────────────────┤
│   Actor URI:  │ https://<unique_id>.lhr.life/i          │
├───────────────┼─────────────────────────────────────────┤
│  Actor inbox: │ https://<unique_id>.lhr.life/i/inbox    │
├───────────────┼─────────────────────────────────────────┤
│ Shared inbox: │ https://<unique_id>.lhr.life/inbox      │
╰───────────────┴─────────────────────────────────────────╯

Web interface available at: http://localhost:8000/
You then configure your developing application to send an activity to the Actor inbox or Shared inbox URI provided. When an activity arrives, fedify inbox only prints a summary table to your console indicating that a request was received:
╭────────────────┬─────────────────────────────────────╮
│     Request #: │ 2                                   │
├────────────────┼─────────────────────────────────────┤
│ Activity type: │ Follow                              │
├────────────────┼─────────────────────────────────────┤
│  HTTP request: │ POST /i/inbox                       │
├────────────────┼─────────────────────────────────────┤
│ HTTP response: │ 202                                 │
├────────────────┼─────────────────────────────────────┤
│       Details  │ https://<unique_id>.lhr.life/r/2    │
╰────────────────┴─────────────────────────────────────╯
Crucially, the detailed information about the received request—including the full headers (like Signature), the request body (the Activity JSON), and the signature verification status—is only available in the web interface provided by fedify inbox. This web UI allows you to thoroughly inspect incoming activities during development.

When you need to test interactions with the live fediverse from your local machine beyond just sending, fedify tunnel can securely expose your entire local development server temporarily. This suite of tools significantly eases the process of building and debugging federated applications.
Implementing the ActivityPub suite of protocols from scratch is an incredibly complex and time-consuming undertaking. It involves deep dives into multiple technical specifications, cryptographic signing, security hardening, and navigating the nuances of a diverse ecosystem. While educational, it dramatically slows down the process of building the actual, unique features of your federated application.
Fedify offers a well-architected, secure, and type-safe foundation, handling the intricacies of federation for you—data modeling, discovery, core mechanics, delivery, security, and interoperability. It lets you focus on your application's unique value and user experience. Stop wrestling with low-level protocol details and start building your vision for the fediverse faster and more reliably. Give Fedify a try!
Getting started is straightforward. First, install the Fedify CLI using your preferred method. Once installed, create a new project template by running fedify init your-project-name.
Check out the Fedify tutorials and Fedify manual to learn more. Happy federating!
작년에 진행하여 런칭한 프로젝트에서는 공공 데이터와 민간 플랫폼 데이터를 융합하고, 실시간 예측 모델과 시각화 대시보드, LLM 기반 질의응답 인터페이스까지 설계하며 데이터가 고객에게 실제로 활용 가능하도록 전달되는 구조를 고민했다. 데이터 PM으로서, 기술과 사용자 사이의 균형을 어떻게 만들고 복잡한 흐름을 어떻게 ‘보이게’ 만들 것인지에 집중했던 프로젝트 경험은 힘들지만 흥미로웠다. 그 때의 일을 간단히 글로 정리해보았습니다.
데이터가 서비스가 되려면, 또 다른 새로운 연결이 필요하다. 그리고 나는 데이터를 넘어, 더 넓은 맥락과 흐름을 설계하고 엮어내는 일의 재미와 의미를 알게 되었다. 그리고 이런 일도, 앞으로 더 많이, 잘 하게 될 일이라는 확신도 함께 얻었다.
개인적으로는 k8s쓰는 가장 큰 이유는 개발자 복지라고 생각한다. 적정기술만 쓰면 대부분의 사람들은 뭔가를 실 서비스에서 경험할 기회를 잃어버린다. 아니 이건 됐고…
온프레미스 클러스터 오퍼레이션 부담이나 EKS같은 서비스의 사용료 걱정만 없다면 쓰는게 무조건 낫다고 생각한다.
일단 k8s뿐만 아니라 컨테이너/머신 오케스트레이션의 세계에서 앱과 머신은 좀 더 잘 죽어도되는 존재가 된다. (물론 stateful한 호스트와 앱을 최대한 stateless하게 하거나, 상태를 분리하여 격리시켜야 하긴 한다)
그러면 docker-compose로 충분하지 않느냐 말할 사람도 있겠지만 처음에야 docker-compose 쓰는거나 k8s 쓰는거나 그게 그거지만(오히려 k8s가 성가실것이다) 마이그레이션의 때가 오면 난 그걸 감당할 자신이 없다.
물론 자신만의 가볍고 쏙 맘에드는 솔루션을 고집할 사람도 있을텐데… 난 남들이 다 쓰는거 쓰는게 편하다.
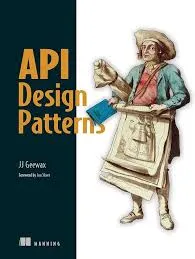
Manning 에서 올해 4번째로 구독한 책은 'API Design Patterns'
https://www.manning.com/books/api-design-patterns
API 설계의 원칙에 맞게 고려할 사항들을 패턴화, 일목요연하게 정리한 책. GoF 책처럼 Motivation, Overview, Implementation, Trade-off 로 구분지어 설명하는 구성이 너무 마음에 든다. 뛰어난 개발자/개발사가 작성한 API를 자주 경험하다보면 & 개발 경험이 어느 정도 쌓이면 API 설계에 대한 감이 적당히 생기는데 이 책은 '적당' 하거나 '감' 의 영역에 있던 불분명한 경계를 명확히 해준다는 장점이 있다.
드디어 @xtjuxtapose 님이 기다리시던 차단 기능이 구현되었습니다. 차단할 사용자의 프로필 페이지에 가서 팔로·언팔로 버튼 오른쪽에 보이는 말줄임표 아이콘에 마우스 커서를 갖다 대면 (모바일에서는 터치하면) 상세 메뉴가 나오는데, 그 안에 팔로워 삭제 버튼과 차단 버튼이 생겼습니다.
ActivityPub 프로토콜 수준에서는 차단은 Block 액티비티를 차단한 액터에게 보내며, 차단을 해제할 경우 Undo(Block) 액티비티를 보냅니다. 그러나, 그 액티비티를 받은 인스턴스의 구현이 차단한 사용자의 콘텐츠를 볼 수 없도록 막지 않을 수도 있습니다…만, 실질적으로는 모든 구현이 막고 있습니다. 아, 당연하지만 차단은 자동적으로 상호 언팔로를 수행합니다. 차단을 해제하더라도 풀렸던 팔로 관계는 자동적으로 회복되지 않습니다.

최근에 추천사를 썼던 책이 있는데요. 이 교재를 활용해서 LLM AI 에이전트를 개발해볼까합니다. 제가 자원봉사(?)를 하고 있는 곳에서 컨텐츠 팀을 담당하고 있는데, 거기서 하는 일 중 하나가 뉴스레터 발행입니다.
TLDR 뉴스레터처럼 링크들을 오마카세처럼 모아서 양질의 콘텐츠를 제공하는게 목표인데, 그런 데이터를 모으기 위해서 최대한 아티클들을 모아서 요약해주는 봇을 만들어야겠다는 판단이 들었습니다. 언어 LLM 관련된 리소스도 많은 파이썬을 쓰게 될 것 같고, 서버 프레임워크는 컨텐츠 관리(어드민페이지)의 수월함을 위해서 Django를 쓰게 될 것 같습니다.
https://product.kyobobook.co.kr/detail/S000216210672
RE: https://hackerspub-ask-bot.deno.dev/message/01962280-fc29-748e-9ba8-fad032795e0d
# Ask Hackers Pub : 이번 주말에 뭐 하시나요?
이번 주말에 뭘 하려고 계획 중인지 편하게 얘기해 보아요.
읽을 책, 가볼 곳, 해볼 것.. 어떤 것이든 좋습니다.
도움 요청이나 피드백 요청도 좋습니다.
물론! 아무것도 하지 않고 쉬는 것도 훌륭합니다.
* 지난 주말에 계획하셨던 일의 회고도 한 번 남겨보면 좋을 것 같아요.
해커즈 퍼브에서 "사용자"에 해당하는 부분에 스타일시트 적용 전후 비교

![]() Jaeyeol Lee shared the below article:
Jaeyeol Lee shared the below article:
정진명의 굳이 써서 남기는 생각 @jm@guji.jjme.me
지적 재산권에 대해서 이야기를 하려면 지적 재산권 제도를 통해서 이룩하려는 것이 무엇인지를 이야기해야 합니다. 저는 지적 재산권을 세 가지로 보는데, 기능을 실현하는 것에 관련된 것과(특허, 실용신안) 표현에 관한 것과(저작권) 공정한 시장을 위한 것(상표)으로 나눌 수 있을 것 같습니다. 상표는 조금 성격이 다르다고 생각해 따로 이야기하겠지만, 어쨌든 지적 재산권이란 어떤 이로운 것을 새롭게 생각해낸 주체의 권리를 보장해주기 위한 제도지요.
그런데 이 '생각해낼 수 있는 어떤 이로운 것'이란, 대다수가 저렴하게 복제가 되거나 복제된다고 해서 그 가치가 줄어들지 않는다는 특징이 있습니다. 기능을 실현하는 지식도, 표현된 이야기도, 가끔은 '이 로고가 붙은 제품은 좋다'는 믿음도 말이지요. 어떤 면에서 말하자면, '생각해낼 수 있는 이로운 것'이 제한없이 복제될 수 있는 상태가 편익의 합을 극대화할 수도 있을 것입니다.
하지만 이렇다면, 어떠한 노력을 들여서 복제될 수 있는 무언가를 만들어내는 행위가 경제적으로 보답받지 못하는 상태가 되리라고 생각할 수 있겠지요. 우리는 그런 행위가- 발명과 창작이 사회의 편익을 증가시킨다고 이해하고 있고, 그걸 위한 인센티브를 주고 싶다고 생각합니다. 지적 재산권은 제 생각에 그것을 보장하기 위한 도구입니다. 그러나 극단적인 경우를 생각해 봅시다. 지적 재산권이 개인에게 기한과 범위 없이 인정되고, 그것을 계속 물려줄 수 있는 거지요. 불을 쓰기 위해서 처음 불을 발견한 사람의 자손에게 사용료를 내고요. 누군가가 벽에 커다란 낙서를 해서 그것을 방송으로 보도하면, 그 낙서를 복제한 것이기 때문에 보도하기 위해서 저작권료를 지불해야 할 수도 있지요. 뭐, 그러면 안 되는 건 아닐 순 있지만, 사회의 편익이 그렇게 높을 것 같지는 않습니다.
제 주장은, 지적 재산권은 다음 두 상황의 균형을 맞추는 제도라는 것입니다.
대부분의 경우는 1번 상황이 문제가 됩니다. 2번 상황은 꽤 이론적인 것처럼 보이지만, 충분히 주의해서 관찰한다면 사회의 어떤 문제는 2번 상황에 해당한다는 걸 찾아보실 수도 있을 것입니다. 이미 우리의 지적 재산권은 만료, 공정 이용과 같은 방식으로 동의 없는 복제를 허용하고― 다시 말해 제작자의 권리를 무한정 인정하고 있지는 않습니다.
두 상황의 균형은 사회의 영향을 받기 때문에, 지적 재산권이 어디까지는 제작자의 권리를 보호하고 어디부터는 보호 없는 복제를 허용하게 두어야 하는지는 그 사회의 변화에 맞추어 적절하게 갱신되어야 한다고 생각합니다.