프로그래밍 언어 문법을 만들때, 비교 연산자에 <, <=, >, >= 등이 있는데, 어차피 좌우 순서만 바꾸면 되니까, >, >= 같은걸 그냥 압수하고 <, <=만 쓰게 한다음에 >, >= 요건 다른 용도로 쓰면 어떨까하는 생각이 듬.

洪 民憙 (Hong Minhee)
@hongminhee@hackers.pub · 1011 following · 720 followers
Hi, I'm who's behind Fedify, Hollo, BotKit, and this website, Hackers' Pub! My main account is at ![]() @hongminhee洪 民憙 (Hong Minhee)
@hongminhee洪 民憙 (Hong Minhee)  .
.
Fedify, Hollo, BotKit, 그리고 보고 계신 이 사이트 Hackers' Pub을 만들고 있습니다. 제 메인 계정은: ![]() @hongminhee洪 民憙 (Hong Minhee) .
@hongminhee洪 民憙 (Hong Minhee) .
Fedify、Hollo、BotKit、そしてこのサイト、Hackers' Pubを作っています。私のメインアカウントは「![]() @hongminhee洪 民憙 (Hong Minhee) 」に。
@hongminhee洪 民憙 (Hong Minhee) 」に。
 Website
- hongminhee.org
 GitHub
- @dahlia
 Hollo
Hollo- @hongminhee@hollo.social
 DEV
DEV- @hongminhee
 velog
velog- @hongminhee
 Qiita
Qiita- @hongminhee
 Zenn
Zenn- @hongminhee
 Matrix
- @hongminhee:matrix.org
 X
X- @hongminhee
![]() @hongminhee洪 民憙 (Hong Minhee) 해커즈 퍼브에서 "그냥" 댓글을 막을 수 있게 해 주셨으면 합니다.
@hongminhee洪 民憙 (Hong Minhee) 해커즈 퍼브에서 "그냥" 댓글을 막을 수 있게 해 주셨으면 합니다.
- 어떤 글에 대해서 댓글을 안 받고 싶다면, 안 받을 권리는 글쓴이에게 있어야 한다고 생각합니다.
- 댓글은 '내' 글을 남에게 보여줄 때 반드시 함께 노출되어 버리는데, '내'가 전혀 통제할 수 없습니다.
- 댓글 그 자체가 사실 별로 책임 있는 소통에 적합한 수단이 아니라고 감히 주장하겠습니다. 한국어 언어 생활만 봐도, '악플'은 있어도 '악글'이나 '악영상' 등은 없습니다. 유독 댓글에 대해서만 따로 '악플'이라는 조어가 등장할 만큼, 댓글 쪽이 가장 더럽다는 것을 언중도 인식하고 있는 것입니다. 이것은 댓글에 대해서만 '남의 집'이라는 인식이 적용되는 인간 심리 때문입니다. 실제로 네이버 뉴스의 헤비 악플러들을 보면, 자기 블로그를 만들어서 그 온갖 입에 담지 못할 모욕적인 말을 늘어놓는 사람은 사실상 없다시피 하고, 꼭 댓글에만 그 짓을 하고 다니죠. 자기 집 안방, 자기 집 대문, 자기 간판, 자기 얼굴에다 똥을 싸기는 싫은 거죠. 즉 이것은 댓글 그 자체의 매체적 특성에서 온다는 것입니다.
- 물론 모든 분들이 "댓글 그 자체가 나쁜 문명" 이라는 제 의견에 동의하실 필요는 없습니다만, 적어도 댓글 거부권은 개별적으로 존중되는 것이 맞다고 생각합니다. 그리고 많은 플랫폼이 이미 이것을 지원하고 있습니다(트위터, 유튜브, 네이버 블로그 등).
현재 액티비티퍼브 프로토콜에서 '댓글 안 받기' 관련 지원이 아직 부족한 것으로 보이기는 합니다. 하지만, 이 문제는 어차피 프로토콜에서 완벽한 해법을 도출할 수 없습니다. 예를 들어 악의적인 인스턴스가 내 글을 가져가서 악플을 주렁주렁 달며 조리돌림을 하려 한다 해도, 기술적으로 그걸 사전에 원천 차단할 방법은 없겠죠. 내가 '댓글 안 받기' 설정을 하든 말든, 저쪽 인스턴스에서 무시할 수 있습니다.
더 나아가 생각해 보면, 내 글을 연합우주도 아닌 그냥 다른 '사이트'에서 링크 가져간 뒤에, 자기들끼리 조롱하고 능욕하는 일도 얼마든지 있을 수 있는데, 그것도 글을 '공개'하는 이상 원천적으로 막는 것은 불가능할 것입니다.
다만 댓글이 '내' 글의 하단에 직접 박히는 것은 '내'가 거부할 수 있어야 한다고 생각합니다. 따라서 완벽한 해법을 기다릴 것이 아니라(어차피 불가능하므로), 그냥 지금 당장 '내' 글의 하단에 댓글이 달리는 것을 막는 간단한 구현부터 적용하는 것이, 맞는 접근이라고 생각합니다. 해커즈 퍼브에 이것을 구현해 주셨으면 합니다.
@xtjuxtapose 의견 감사합니다. 댓글 거부 기능의 필요성에 대해서는 저도 공감합니다. 말씀하신 대로 글쓴이가 자기 글 하단에 무엇이 노출될지 통제할 수 있어야 한다는 건 합리적인 주장이고, 실제로 많은 플랫폼이 이 기능을 제공하고 있기도 하고요.
다만 현실적인 상황을 말씀드리자면, Hackers' Pub은 제가 전업으로 개발하는 프로젝트가 아니다 보니, 지금 당장 이 기능을 최우선으로 구현하기가 어렵습니다. (실은 이 기능만 그런 게 아니라 Hackers' Pub 개발 전반에 제가 참여를 거의 못하고 있습니다—오히려 다른 분들께서 기여를 해주고 계세요.) 이 기능을 안 하겠다는 게 아니라, 바로 지금은 어렵다는 점 양해 부탁드립니다. GitHub 이슈로 남겨주시면 로드맵에 참고하겠습니다.
한편 Hackers' Pub은 오픈 소스 프로젝트이기도 해서, 혹시 직접 구현에 관심이 있으시다면 해당 PR은 최우선으로 리뷰하겠습니다. 코드베이스가 익숙하지 않으시더라도 어디서부터 손대면 좋을지, 어떤 식으로 구현하면 될지 등 제가 적극적으로 도와드릴 수 있으니 편하게 말씀해 주세요.
Using Nano Banana Pro, I composited an image to make it look like the cute dinosaur from the Fedify logo was standing in front of the ULB (Université libre de Bruxelles) building in Brussels, where FOSDEM is held.

This time, I tried writing a prompt to draw an illustration of the mascots from the Mastodon, Lemmy, Fedify, Misskey, and Akkoma projects all getting along together.

Using Nano Banana Pro, I composited an image to make it look like the cute dinosaur from the Fedify logo was standing in front of the ULB (Université libre de Bruxelles) building in Brussels, where FOSDEM is held.
미지의 영역을 프로토타이핑할때는 Sonnet으로 충분한듯... Opus 깊생하게 해봤자 토큰만 더먹는다
클로드 맥스 5x 월 16만원... 10만원만 됐어도 눈감고 지르는건데
![]() 洪 民憙 (Hong Minhee) shared the below article:
洪 民憙 (Hong Minhee) shared the below article:
도커로 구축한 랩에서 혼자 실습하며 배우는 네트워크 프로토콜 입문 #5-3 DHCP
자손킴 @jasonkim@hackers.pub
DHCP(Dynamic Host Configuration Protocol)
DHCP는 IP주소, 서브넷 마스크, 기본 게이트웨이와 DNS 서버의 IP 주소 등 네트워크에 접속하기 위해 필요한 설정을 배포하는 프로토콜이다. RFC2131 에서 표준화 되어 있으며, DHCP의 역할, 메시지 형식, 형식을 구성하는 필드의 의미와 처리 흐름등이 상세하게 정의 되어 있다.
책에서는 DHCP를 L7에서 다루고 있는데, 정리하다보니 이게 L7에 있는게 맞나 싶은 생각이 든다.
IP 할당 방식
IP 주소를 단말(NIC)에 할당하는 방법에는 크게 '정적 할당'과 '동적 할당' 두 가지가 있다.
정적 할당
단말에 대해 일일이 수동으로 IP 주소를 설정하는 방식이다. 시스템 관리자가 비어있는 IP 주소를 사용자에게 할당해 준다.
정적 할당은 단말과 IP 주소가 고유하게 매핑되기 때문에 IP 주소 관리가 용이하다. 특정 IP의 이상 징후가 발생하면 어떤 단말이 문제인지 즉시 파악 할 수 있다. 그러나 단말의 수가 많아 지거나 교체가 빈번하면 하나씩 관리하기 어렵다는 문제가 있다.
동적 할당
DHCP를 사용하여 단말에 자동으로 IP 주소를 설정하는 방법이다. 정적 할당은 사용자가 시스템 관리자에게 요청하여 빈 IP 주소를 지급받아 수동 설정 했다면, 동적 할당은 이 모든 과정을 DHCP가 자동으로 처리한다.
DHCP 메시지 형식
DHCP는 UDP/67로 캡슐화된 DHCP 메시지 부분에 설정 정보를 담는다. DHCP 메시지는 여러 가지 필드로 구성되는데, 다음 3가지가 특히 중요하다.
- 할당 클라이언트 IP 주소
- DHCP 서버에서 단말에 배포하는 IP 주소
- 클라이언트 MAC 주소
- 단말의 MAC 주소
- 옵션
- 네트워크 설정에 관한 다양한 정보
옵션은 옵션 코드에 의해 식별되는데, 대표적인 코드는 다음과 같다.
- (1) 서브넷 마스크
- (3) 기본 게이트웨이
- (6) DNS 서버 IP 주소
- (12) 호스트 이름
- (42) NTP 서버의 IP 주소
- (51) IP 주소 임대 시간
- (53) DHCP 메시지 유형
- (54) DHCP 서버 ID
DHCP 처리 흐름
DHCP는 서버와 클라이언트로 구성되어 있다. DHCP 클라이언트가 있는 단말은 초기에는 IP가 할당되지 않은 상태이기 때문에 브로트캐스트를 통해 정보를 주고 받는다.
- DHCP Discover: 클라이언트가 네트워크에 접속하면 DHCP 서버를 찾기 위해 브로드캐스트로 Discover 메시지를 전송한다. 이 시점에서 클라이언트는 아직 IP 주소가 없으므로 출발지 IP는 0.0.0.0으로 설정된다.
- DHCP Offer: DHCP 서버가 Discover 메시지를 수신하면 할당 가능한 IP 주소와 서브넷 마스크, 임대 시간 등의 설정 정보를 담아 Offer 메시지를 유니캐스트로 응답한다. 네트워크에 여러 DHCP 서버가 존재하는 경우 클라이언트는 복수의 Offer를 수신할 수 있다.
- DHCP Request: 클라이언트가 수신한 Offer 중 하나를 선택하여 해당 DHCP 서버에 IP 주소 할당을 정식으로 요청한다. 이 메시지도 브로드캐스트로 전송되며, 선택되지 않은 다른 DHCP 서버들에게 해당 Offer가 거절되었음을 알리는 역할도 한다.
- DHCP ACK: DHCP 서버가 Request를 승인하면 ACK 메시지를 전송하여 IP 주소 할당을 확정한다. 클라이언트는 이 메시지를 수신한 후 비로소 할당받은 IP 주소를 사용할 수 있게 된다. 만약 요청한 IP 주소를 할당할 수 없는 경우에는 DHCP NAK 메시지가 전송된다.
- DHCP Release: 클라이언트가 더 이상 IP 주소를 사용하지 않을 때 서버에 반환을 알리는 메시지이다. 이 메시지를 수신한 서버는 해당 IP 주소를 풀(Pool)에 반환하여 다른 클라이언트가 사용할 수 있도록 한다.
IP 주소 임대와 갱신
DHCP로 할당받은 IP 주소는 영구적인 것이 아니라 임대 시간(Lease Time)이 정해져 있다. 클라이언트는 임대 시간이 만료되기 전에 갱신을 요청해야 하는데, 일반적으로 임대 시간의 절반(50%)이 경과하면 DHCP Request 메시지를 서버에 유니캐스트로 전송하여 갱신을 시도한다. 이 갱신이 실패하면 임대 시간의 7/8(87.5%)가 경과한 시점에 다시 브로드캐스트로 갱신을 시도하며, 그래도 실패하면 임대 만료 시 IP 주소 사용을 중단하고 처음부터 Discover 과정을 다시 수행한다.
네트워크 인프라 자동화의 기반이 되는 DHCP
DHCP는 IP 주소 할당 외에도 옵션 필드를 활용하여 다양한 부가 기능을 제공할 수 있다. 그 중 대표적인 것이 네트워크 부팅(PXE) 지원이다.
- (66) TFTP 서버 이름
- 부트 파일을 제공하는 TFTP 서버의 IP 주소 또는 호스트명
- (67) 부트 파일 이름
- 클라이언트가 다운로드해야 할 네트워크 부트 프로그램의 경로
PXE 부팅
PXE(Preboot Execution Environment)는 로컬 저장 장치 없이 네트워크를 통해 운영체제를 부팅하는 기술이다. PXE를 사용하면 서버의 NIC가 네트워크에서 부팅 이미지를 받아와 자동으로 OS 설치를 진행할 수 있다.
PXE 부팅의 동작 흐름은 다음과 같다.
- 클라이언트가 전원을 켜면 NIC의 PXE 펌웨어가 DHCP Discover 메시지를 브로드캐스트한다.
- DHCP 서버는 IP 주소와 함께 옵션 66(TFTP 서버 주소)과 옵션 67(부트 파일 경로)을 응답한다.
- 클라이언트는 TFTP 프로토콜을 사용하여 지정된 서버에서 부트 파일(예: pxelinux.0, bootx64.efi)을 다운로드한다.
- 다운로드한 부트 로더가 실행되어 OS 설치 또는 부팅이 진행된다.
이처럼 DHCP의 옵션 필드를 활용하면 단순한 IP 할당을 넘어 네트워크 인프라 자동화의 기반을 구축할 수 있다.
![]() 洪 民憙 (Hong Minhee) shared the below article:
洪 民憙 (Hong Minhee) shared the below article:
도커로 구축한 랩에서 혼자 실습하며 배우는 네트워크 프로토콜 입문 #5-4 SSL 오프로드
자손킴 @jasonkim@hackers.pub
다음에 6장이 있지만 총정리를 하는 챕터이기 때문에 실질적인 내용은 여기까지가 끝이다. 책에서는 SSL 오프로드만 다루고 끝나지만 내부망 안에서의 보안도 짧게 정리했다.
TLS(SSL) 오프로드
TLS를 사용하면 보안이 강화되지만 TLS 핸드셰이크와 암복호화 작업에 CPU 자원을 많이 소모하게 된다. 이것을 전용 장비에 맡기면 웹서버는 효율적으로 애플리케이션 로직 처리에만 신경 쓰면 된다. 특히 로드밸런서에서 중앙집중식으로 TLS를 처리하면 웹서버의 부하가 크게 줄어들고 요청을 빠르게 처리할 수 있게 되어 시스템 전반적으로 부하 분산의 효과가 커진다. 특히 관리가 까다로운 공인 인증서를 로드밸런서에서 집중 관리할 수 있어 운영 부담이 크게 줄어든다.
TLS 오프로드 동작방식
-
클라이언트의 HTTPS 요청: 클라이언트가 웹 서비스에 접속하기 위해 HTTPS 요청을 보낸다. 이 시점에서 클라이언트는 TLS 핸드셰이크를 시작한다.
-
방화벽(fw1) 통과: 요청이 방화벽
fw1에 도달한다. 방화벽은 허용된 포트(443)로 들어오는 트래픽인지 확인하고, 패킷 필터링 규칙에 따라 트래픽을 통과시킨다. 이 단계에서 트래픽은 여전히 암호화된 상태이므로 일반적인 방화벽은 패킷의 내용을 검사할 수 없고 IP/포트 기반 필터링만 수행한다. (다만 SSL 인스펙션 기능이 있는 차세대 방화벽(NGFW)은 여기서 복호화 후 검사를 수행하기도 한다.) -
로드밸런서(lb1)에서 TLS 종료: 로드밸런서
lb1이 클라이언트와 TLS 핸드셰이크를 완료한다. 서버 인증서를 클라이언트에게 제시하고 세션 키를 협상한 뒤 암호화된 트래픽을 복호화한다. 이 과정을 SSL/TLS Termination이라고 부른다. -
평문 HTTP로 백엔드 전달: 로드밸런서는 복호화된 요청을 분석하여 라우팅 규칙에 따라 백엔드 서버
sv1또는sv2에 평문 HTTP로 전달한다. 이때 로드밸런서는X-Forwarded-For,X-Forwarded-Proto같은 헤더를 추가하여 원본 클라이언트 정보와 프로토콜 정보를 백엔드에 전달할 수 있다. -
백엔드 서버 처리: 웹서버
sv1또는sv2는 평문 HTTP 요청을 받아 애플리케이션 로직을 처리하고 응답을 생성한다. 암복호화 작업이 없으므로 CPU 자원을 온전히 비즈니스 로직에 사용할 수 있다. -
응답 암호화 및 전송: 백엔드 서버의 HTTP 응답이 로드밸런서
lb1로 돌아오면, 로드밸런서는 이를 TLS로 암호화하여 클라이언트에게 전송한다.
망분리는 만병통치약이 아니다.
TLS 오프로드를 하게 되면 로드밸런서를 통과한 패킷은 평문으로 내부망을 돌아다니게 된다. 책을 읽으며 처음에는 "어차피 방화벽 뒤에 있는 내부망이고 외부에서 접근이 차단되어 있으니 평문이어도 괜찮은 거겠군"이라고 생각을 했었다.
그러다 문득 망분리는 만병통치약이 아니라는 트윗이 기억이 났다.
https://x.com/simnalamburt/status/1823610803846517196?s=20
내부망이 안전하다는 가정은 내부자 위협, 자격 증명 탈취를 통한 침해, 그리고 한 시스템이 뚫린 후 내부망을 통해 다른 시스템으로 확산되는 횡적 이동 공격과 같은 위험이 도사리고 있다. 이른바 '침해 가정' 원칙에 따라, 공격자가 이미 망 내부에 들어와 있다는 전제로 보안 체계를 설계해야 한다.
Zero Trust 아키텍처
"결코 신뢰하지 말고 항상 검증하라(Never trust, always verify)"는 원칙에 따라 내부망과 외부망을 구분하지 않고 모든 접근에 대해 인증과 권한 검증을 수행한다. 마이크로 세그멘테이션을 통해 네트워크를 세분화하고 최소 권한 원칙을 적용한다.
mTLS
mTLS는 클라이언트와 서버가 서로의 인증서를 검증하여 양방향으로 신원을 확인하는 상호 인증 방식이다. 일반 TLS는 서버만 인증서를 제시하지만 mTLS에서는 클라이언트도 인증서를 제시해야 한다. Zero Trust 아키텍처에서 mTLS는 핵심 구성요소로 내부 서비스 간 통신에서도 모든 요청의 신원을 검증하여 "항상 검증하라"는 원칙을 기술적으로 구현한다.
그럼 굳이 TLS 오프로드 하지 말고 백엔드까지 암호화된 패킷을 전달하면 되는거 아닌가?
TLS 오프로드는 여전히 유효한 선택이다. L7 로드밸런서가 HTTP 헤더나 URL 경로, 쿠키를 분석해서 트래픽을 라우팅하려면 패킷 내용을 들여다볼 수 있어야 한다. WAF도 SQL 인젝션이나 XSS 같은 공격 패턴을 탐지하려면 평문 상태의 요청을 검사해야 한다. 암호화된 상태로는 이런 기능들이 불가능하다.
결국 L7 기능을 활용하려면 어디선가는 TLS를 종료해야 한다. 이때 공인 인증서 처리를 로드밸런서로 집중시키면 보안 정책 적용과 인증서 갱신이 훨씬 수월해진다.
만약 내부망 보안을 위해 재암호화가 필요한 TLS 브릿징(TLS Bridging) 방식을 사용하더라도 오프로드의 이점은 여전하다. 외부 노출용 공인 인증서는 로드밸런서가 전담하고, 내부 구간은 사설 CA나 자동화된 인증서 발급 체계(mTLS 등)를 이용해 백엔드 서버의 관리 부담을 최소화하면서도 보안과 가시성을 모두 챙길 수 있기 때문이다.
![]() @hongminhee洪 民憙 (Hong Minhee) I certainly like the focus on growth not punishment. It really aligns with the brief discussion in the " Alternative models of content moderation" sectino of Sarah Gilbert's Towards Intersectional Moderation: An Alternative Model of Moderation Built on Care and Power of justice-based models of moderation that "foster education, rehabilitation, and forgiveness" (as opposed to the more punitive and carceral models of moderation that are the norm in commercial social networks).
@hongminhee洪 民憙 (Hong Minhee) I certainly like the focus on growth not punishment. It really aligns with the brief discussion in the " Alternative models of content moderation" sectino of Sarah Gilbert's Towards Intersectional Moderation: An Alternative Model of Moderation Built on Care and Power of justice-based models of moderation that "foster education, rehabilitation, and forgiveness" (as opposed to the more punitive and carceral models of moderation that are the norm in commercial social networks).
My impression is that most fedi moderation teams don't actually notify the reporters about what actions are or aren't taken. Some of that is due to software limitations -- if the report is forwarded from another instance, I'm pretty sure you don't even know who the reporter is (and the Mastodon moderator UX doesn't as far as I know directly support two-way communications, instead you. have to DM the user from the moderator account; and) . Just as importantly, though, reporters sometimes get upset and escalate if action isn't taken. If the original report is malicious, as part of a harassment campaign against the target, this sometimes leads to the moderators getting harassed as well.
Of course it's very frustrating to report something and never hear back so I can certainly see the arguments in favor of doing this as well! But with malicious reporting, or if a team of attackers are reporting different posts to try to understand just what borderline content get through the moderators, there are arguments against it as well. One possibility is to treat reports from people who are part of the HackersPub community (differently on this front than reports from other instances.
While I like the idea of not requiring the reporter to cite the specific clause(s) of the guidelines that are violated, I'm personally skeptical about using LLMs to address the problem. Even assuming the datasets used to train the LLMs were gathered with consent (which isn't typically the case) they're likely to have racial, gender, and cultural biases. Don't get me wrong, the idea of using a tool to help the moderators and report recipient understand just what's been violated is a good one, I'm just not sure this is the right technology. Timnit Gebru and others at DAIR have been thinkiing about approaches to content moderations, so might have some ideas here.
In terms of cross-instance reports, it's really important to leave it up to the reporter whether or not to forward to another instance -- sometimes the admins of the other instance are hostile! And like the discussion of malicious reporting above, this highlights the importance of threat modeling.
Anyhow those are my quick initial thoughts. Looking forward to seeing how the functionality evolves! As you're moving forward with this, it might be interesting to talk to some of the academic researchers who have looked at moderation on the Fediverse -- Sohyeon Hwang, Owen Xingjian Zhang, Tolulope Oshinowo and others at Princeton have done some excellent work and talked to a lot of people here in the process. If it's useful, I can see if they're interested in connecting with you.
![]() @jdp23Jon Thank you so much for this thoughtful feedback and for the paper reference! I'll definitely read Sarah Gilbert's work.
@jdp23Jon Thank you so much for this thoughtful feedback and for the paper reference! I'll definitely read Sarah Gilbert's work.
You raise excellent points I hadn't fully considered:
-
On notifying reporters: The malicious reporting scenario is a real concern. I like your suggestion of treating reports from within the community differently from forwarded reports. We should think more carefully about what information to share and with whom.
-
On LLM usage: That's a fair criticism. The bias issue is something we need to take seriously. Perhaps the LLM should only assist moderators as a reference tool, not be exposed to reporters or reported users directly. I'll look into DAIR's work on this.
-
On cross-instance forwarding: Absolutely agreed; this should be opt-in by the reporter, not automatic. I'll update the spec to make that explicit.
I'd love to connect with the Princeton researchers if they're open to it. And thank you for taking the time to share your experience: this is exactly the kind of input we were hoping for.
Hi #fediverse! I'm working on Hackers' Pub, a small #ActivityPub-powered social platform for developers and tech folks.
We're currently drafting a content #moderation (#flag/#report) system and would really appreciate any feedback from those who have experience with federated moderation—we're still learning.
Some ideas we're exploring:
- Protecting reporter anonymity while giving reported users enough context to understand and improve
- Graduated responses (warning → content removal → suspension) rather than jumping to bans
- Using LLM to help match reports to code of conduct provisions
- Supporting ActivityPub
Flagactivity for cross-instance reports
Our guiding principle is that moderation should be about growth, not punishment. Expulsion is the last resort.
Here's the full draft if you're curious: https://github.com/hackers-pub/hackerspub/issues/192.
If you've dealt with moderation in federated contexts, what challenges did you run into? What worked well? We'd love to hear your thoughts.
![]() 洪 民憙 (Hong Minhee) shared the below article:
洪 民憙 (Hong Minhee) shared the below article:
Hackers' Pub 신고(flag) 기능 기획서
洪 民憙 (Hong Minhee) @hongminhee@hackers.pub
개요
목적
신고 기능은 Hackers' Pub 커뮤니티의 행동 강령(code of conduct)을 위반하는 콘텐츠나 사용자를 식별하고, 관리자가 적절한 조치를 취할 수 있도록 돕는 시스템입니다.
핵심 철학
신고 기능의 궁극적인 목적은 계도와 성장입니다. 무균실처럼 완벽한 사용자만을 남기려는 것이 아니라, 신고를 통해 각자의 행동을 돌아보고 더 나은 커뮤니티 구성원으로 성장할 수 있는 기회를 제공하는 데 있습니다.
추방은 최후의 수단이며, 시스템은 다음과 같은 단계적 접근을 권장합니다:
- 인지 — 피신고자가 자신의 행동이 문제가 될 수 있음을 알게 됩니다
- 성찰 — 왜 그 행동이 문제인지 이해할 기회를 갖습니다
- 개선 — 행동을 수정하고 커뮤니티와 조화롭게 참여합니다
- 제재 — 개선 의지가 없거나 심각한 위반의 경우에만 적용됩니다
분산형 네트워크 고려
Hackers' Pub은 ActivityPub 프로토콜 기반의 분산형 소셜 네트워크입니다. 따라서 신고 기능도 다음을 고려하여 설계되었습니다:
- 다른 서버(인스턴스)에 호스팅된 콘텐츠도 신고 가능
- Mastodon 등 주요 ActivityPub 플랫폼과의 호환성
- 연합(federation) 환경에서의 조치 전파
설계 원칙
신고자 보호
- 원칙
- 신고자의 신원은 철저히 비공개로 유지됩니다.
- 근거
- 신고자가 보복을 두려워하면 신고를 주저하게 되고, 이는 커뮤니티 건강성을 해칠 수 있습니다. 익명성이 보장되어야 신고 시스템이 효과적으로 작동합니다.
- 구현
-
- 피신고자에게는 신고 사실과 사유만 전달되며, 신고자 정보는 공개되지 않습니다
- 관리자만 신고자 정보에 접근할 수 있습니다
- 데이터베이스 수준에서도 접근 제어가 적용됩니다
피신고자의 알 권리
- 원칙
- 피신고자는 자신이 왜 신고되었는지 알 권리가 있습니다.
- 근거
- 무엇이 문제인지 알지 못하면 개선할 수 없습니다. 계도라는 목적을 달성하려면 피신고자가 자신의 행동을 돌아볼 수 있는 충분한 정보를 제공해야 합니다.
- 구현
-
- 신고 사유(행동 강령 위반 내용)가 피신고자에게 전달됩니다
- 어떤 콘텐츠가 문제가 되었는지 명시됩니다
- 단, 신고자가 누구인지는 알 수 없습니다
행동 강령의 유연한 참조
- 원칙
- 행동 강령은 살아있는 문서이며, 시간이 지남에 따라 발전하고 변화할 수 있습니다.
- 근거
- 커뮤니티가 성장하고 사회적 맥락이 변화함에 따라 행동 강령도 함께 진화해야 합니다. 신고 시스템은 이러한 변화에 유연하게 대응할 수 있어야 합니다.
- 구현
-
- 신고 사유를 특정 조항 번호에 하드코딩하지 않습니다
- 신고 시점의 행동 강령 버전을 기록하여 맥락을 보존합니다
- LLM 매칭 시 현재 행동 강령 전문을 참조하여 동적으로 분석합니다
- 신고자가 작성한 원본 사유는 항상 보존됩니다
투명한 처리 과정
- 원칙
- 신고의 처리 과정과 결과는 관련 당사자에게 투명하게 공유됩니다.
- 근거
- 신고자는 자신의 신고가 어떻게 처리되었는지 알 권리가 있으며, 피신고자도 어떤 조치가 취해졌는지 알아야 합니다.
- 구현
-
- 신고자에게 처리 진행 상황과 최종 결과가 통보됩니다
- 피신고자에게 조치 내용과 사유가 전달됩니다
- 관리자의 판단 근거가 기록됩니다
단계적 제재
- 원칙
- 제재는 위반의 심각성과 빈도에 비례하여 단계적으로 적용됩니다.
- 근거
- 경미한 위반에 과도한 제재를 가하면 커뮤니티 참여를 위축시키고, 심각한 위반에 가벼운 제재를 가하면 커뮤니티 안전을 해칩니다.
- 구현
-
- 경고 → 콘텐츠 검열 → 일시 정지 → 영구 정지의 단계적 체계
- 위반 이력이 누적되어 다음 제재 수준에 반영됩니다
- 심각한 위반은 단계를 건너뛰고 즉각적인 강력한 조치 가능
용어 정의
| 용어 | 정의 |
|---|---|
| 신고(flag/report) | 행동 강령 위반으로 의심되는 콘텐츠나 사용자를 관리자에게 알리는 행위 |
| 신고자(reporter) | 신고를 제출하는 사용자 |
| 피신고자(reported) | 신고의 대상이 되는 사용자 |
| 신고 대상(target) | 신고된 콘텐츠(게시글, 단문) 또는 사용자 |
| 관리자(moderator) | 신고를 검토하고 조치를 취할 권한이 있는 사용자 |
| 조치(action) | 관리자가 신고에 대해 취하는 결정 (기각, 경고, 검열, 정지 등) |
| 이의 제기(appeal) | 피신고자가 조치에 대해 재검토를 요청하는 행위 |
| 로컬 사용자 | Hackers' Pub에 계정이 있는 사용자 |
| 원격 사용자 | 다른 ActivityPub 인스턴스의 사용자 |
신고 대상
콘텐츠 신고
사용자는 다음 유형의 콘텐츠를 개별적으로 신고할 수 있습니다:
게시글(article) 신고
- 대상
- 장문의 블로그 형식 게시글
- 표시 위치
- 게시글 하단 또는 더보기 메뉴에 “신고하기” 옵션
- 신고 시 수집 정보
-
- 게시글 ID 및 영구 링크
- 게시글 작성자 정보
- 신고 시점의 게시글 내용 스냅샷 (증거 보존)
- 신고자가 작성한 사유
단문(note) 신고
- 대상
- 짧은 마이크로블로그 형식 글
- 표시 위치
- 단문의 더보기 메뉴에 “신고하기” 옵션
- 신고 시 수집 정보
- 게시글과 동일
사용자 신고
특정 사용자의 전반적인 행동 패턴이 문제가 되는 경우, 개별 콘텐츠가 아닌 사용자 자체를 신고할 수 있습니다.
- 사용 시나리오
-
- 여러 콘텐츠에 걸쳐 지속적으로 문제 행동을 보이는 경우
- 개별 콘텐츠는 경계선상에 있지만, 전체적인 패턴이 문제인 경우
- 프로필 자체(이름, 약력, 프로필 사진 등)가 행동 강령을 위반하는 경우
- 표시 위치
- 사용자 프로필 페이지의 더보기 메뉴에 “사용자 신고하기” 옵션
- 신고 시 수집 정보
-
- 사용자 ID 및 프로필 링크
- 신고 시점의 프로필 정보 스냅샷
- 신고자가 작성한 사유
- (선택) 관련 콘텐츠 링크 첨부 가능
원격 콘텐츠 및 사용자
다른 ActivityPub 인스턴스의 콘텐츠와 사용자도 동일하게 신고할 수 있습니다.
- 근거
- 연합 타임라인에 표시되는 모든 콘텐츠는 Hackers' Pub 사용자에게 영향을 미치므로, 원격 콘텐츠도 신고 대상이 되어야 합니다.
- 처리 방식
-
- Hackers' Pub 내에서의 표시/연합 여부에 대한 조치
- 원격 인스턴스로 ActivityPub
Flag액티비티 전송 (선택적)
신고 프로세스
신고 흐름도
flag_process start 사용자가 콘텐츠/사용자 신고 클릭 form 신고 양식 표시 start->form reason 사유 작성 (자유 형식) form->reason submit 신고 제출 reason->submit llm LLM이 사유를 분석 submit->llm coc 행동 강령 조항 매칭 llm->coc save 신고 저장 (대기 상태) llm->save notify_mod 관리자에게 알림 발송 save->notify_mod notify_reporter 신고자에게 접수 확인 notify_mod->notify_reporter신고 양식
신고 양식은 간결하면서도 필요한 정보를 수집할 수 있도록 설계됩니다.
필수 입력 항목
신고 사유 (자유 형식 텍스트)
이 콘텐츠/사용자를 신고하는 이유를 설명해 주세요.
구체적인 행동 강령 조항을 알지 못해도 괜찮습니다.
어떤 점이 불편하거나 문제가 된다고 느꼈는지
자유롭게 작성해 주세요.

[                                        ]
[                                        ]
[                                        ]

최소 10자 이상 작성해 주세요.
근거:
- 사용자가 행동 강령의 모든 조항을 숙지하고 있다고 가정하지 않습니다
- 자유 형식으로 작성하면 더 풍부한 맥락을 수집할 수 있습니다
- LLM이 사유를 분석하여 관련 조항을 자동으로 매칭합니다
선택 입력 항목
추가 콘텐츠 링크 (사용자 신고 시)
관련된 다른 콘텐츠가 있다면 링크를 추가해 주세요. (선택)

[링크 추가 +]
근거: 사용자 신고의 경우, 문제 행동의 패턴을 보여주는 여러 콘텐츠를 함께 제출하면 관리자가 더 정확한 판단을 내릴 수 있습니다.
LLM 기반 행동 강령 매칭
신고가 제출되면 LLM이 신고 사유를 분석하여 관련된 행동 강령 조항을 식별합니다.
매칭 프로세스
-
입력 구성
- 신고자가 작성한 사유 텍스트
- 현재 버전의 행동 강령 전문
- 신고된 콘텐츠 내용 (있는 경우)
-
LLM 분석
- 신고 사유와 행동 강령 조항 간의 관련성 분석
- 관련 조항 식별 및 신뢰도 점수 산출
- 분석 요약 생성
-
결과 저장
- 매칭된 조항 목록 (신뢰도 점수 포함)
- LLM 분석 요약
- 신고 시점의 행동 강령 버전 식별자
행동 강령 버전 관리
- 근거
- 행동 강령이 변경되면 과거 신고의 맥락이 불명확해질 수 있습니다. 따라서 신고 시점의 행동 강령 버전을 기록하여 맥락을 보존합니다.
- 구현 방식
-
- 행동 강령 파일의 Git 커밋 해시를 버전 식별자로 사용
- 신고 기록에 버전 식별자 저장
- 관리자가 신고를 검토할 때 해당 버전의 행동 강령 참조 가능
매칭 결과 활용
- 관리자 검토
- 매칭 결과는 관리자의 참고 자료로 활용됩니다
- 최종 판단
- 관리자가 매칭 결과를 수정하거나 무시할 수 있습니다
- 피신고자 통보
- 최종 확정된 위반 조항이 피신고자에게 전달됩니다
중복 신고 처리
같은 콘텐츠나 사용자에 대해 여러 신고가 접수될 수 있습니다.
- 처리 방식
-
- 동일 대상에 대한 신고는 하나의 “신고 케이스”로 그룹화됩니다
- 각 신고의 사유는 개별적으로 보존됩니다
- 관리자에게는 신고 건수와 함께 표시됩니다
- 신고 건수가 많을수록 우선순위가 높아집니다
- 근거
-
- 여러 사람이 독립적으로 같은 문제를 발견했다면 더 심각한 문제일 가능성이 높습니다
- 다양한 관점의 신고 사유를 종합하면 더 정확한 판단이 가능합니다
신고 내역 조회
신고자는 자신이 제출한 신고의 상태를 확인할 수 있습니다.
- 확인 가능한 정보
-
- 신고 대상 (콘텐츠/사용자)
- 신고 일시
- 자신이 작성한 신고 사유
- 처리 상태 (대기 중 / 검토 중 / 처리 완료)
- 처리 결과 (조치됨 / 기각됨)
- 확인 불가능한 정보
-
- 다른 신고자의 존재 여부
- 구체적인 제재 내용 (프라이버시 보호)
- 피신고자의 이의 제기 내용
관리자 처리 프로세스
신고 검토 흐름도
moderation_process cluster_review 콘텐츠/사용자 검토 pending 신고 접수 (대기 상태) check 관리자가 신고 확인 pending->check reviewing 검토 시작 (검토 중) check->reviewing review1 신고된 콘텐츠 확인 review2 신고 사유 검토 review3 LLM 매칭 결과 참고 review4 사용자 이력 확인 review5 맥락 파악 decision 판단 결정 review5->decision dismiss 기각 decision->dismiss warn 경고 decision->warn action 제재 decision->action notify 조치 기록 및 알림 - 신고자에게 결과 통보 - 피신고자에게 조치 통보 - (필요시) 원격 서버 통보 dismiss->notify warn->notify action->notify신고 상태
| 상태 | 설명 |
|---|---|
pending |
신고가 접수되어 검토 대기 중 |
reviewing |
관리자가 검토 중 |
resolved |
처리 완료 (조치됨) |
dismissed |
기각됨 (위반 아님) |
검토 시 확인 사항
관리자는 다음 정보를 종합적으로 검토합니다:
신고 정보
- 신고자가 작성한 사유
- LLM이 매칭한 행동 강령 조항
- 신고 건수 (중복 신고의 경우)
- 각 신고자의 사유 (중복 신고의 경우)
콘텐츠 정보
- 신고된 콘텐츠 원문
- 콘텐츠의 맥락 (댓글 스레드 등)
- 신고 시점의 스냅샷 (수정/삭제된 경우)
사용자 정보
- 피신고자의 이전 위반 이력
- 이전 경고/제재 기록
- 계정 생성일 및 활동 기간
- 로컬/원격 사용자 여부
조치 옵션
관리자는 다음 조치 중 하나를 선택합니다:
| 조치 | 설명 | 적용 기준 |
|---|---|---|
| 기각 | 위반이 아니라고 판단 | 행동 강령 위반 사실이 없는 경우 |
| 경고 | 경고 메시지 발송 | 경미한 위반, 초범인 경우 |
| 콘텐츠 검열 | 해당 콘텐츠 숨김 처리 | 콘텐츠 자체가 문제인 경우 |
| 일시 정지 | 일정 기간 계정 정지 | 반복 위반 또는 중간 수준의 위반 |
| 영구 정지 | 계정 영구 정지 | 심각한 위반 또는 지속적 악의적 행동 |
조치 시 필수 입력 사항
관리자가 조치를 취할 때 다음을 기록해야 합니다:
위반 조항 (최종 확정):
[행동 강령 내 관련 조항 선택/입력]

조치 사유:
[관리자의 판단 근거를 상세히 기술]

피신고자에게 전달할 메시지:
[피신고자가 받을 통보 내용]

(일시 정지의 경우) 정지 기간:
[시작일] – [종료일]
근거:
- 조치의 투명성을 확보합니다
- 이의 제기 시 검토 자료로 활용됩니다
- 일관된 판단 기준을 유지하는 데 도움이 됩니다
피신고자 프로세스
신고 통보
피신고자는 자신이 신고되었다는 사실과 사유를 알림으로 받습니다.
통보 시점
즉시 통보하지 않는 경우:
- 신고 접수 직후에는 피신고자에게 통보하지 않습니다
- 무분별한 신고로 인한 불필요한 스트레스 방지
통보하는 경우:
- 관리자가 신고를 검토하고 조치를 결정한 후 통보합니다
- 기각된 경우에도 교육적 목적으로 통보할 수 있습니다 (관리자 재량)
통보 내용
경고/제재 시:
귀하의 [콘텐츠/계정]에 대해 신고가 접수되어 검토한 결과,
행동 강령 위반으로 판단되어 다음과 같은 조치가 취해졌습니다.

위반 내용:
[행동 강령의 관련 조항]

대상 콘텐츠:
[해당되는 경우 콘텐츠 링크]

조치:
[경고 / 콘텐츠 검열 / N일 정지 / 영구 정지]

관리자 메시지:
[관리자가 작성한 설명]

이 조치에 대해 이의가 있으시면 아래 버튼을 통해
이의 제기를 하실 수 있습니다.

[이의 제기하기]
기각 통보 시 (선택적):
귀하의 [콘텐츠/계정]에 대해 신고가 접수되었으나,
검토 결과 행동 강령 위반에 해당하지 않는다고 판단되었습니다.

다만, 일부 커뮤니티 구성원이 불편함을 느꼈을 수 있으므로
참고해 주시면 감사하겠습니다.

관련 내용:
[간략한 설명]
피신고자가 확인할 수 있는 정보
| 정보 | 확인 가능 여부 |
|---|---|
| 신고된 사실 | 가능 |
| 위반으로 지적된 행동 강령 조항 | 가능 |
| 대상 콘텐츠 | 가능 |
| 조치 내용 및 기간 | 가능 |
| 관리자의 판단 사유 | 가능 |
| 신고자가 누구인지 | 불가능 |
| 신고자가 작성한 원본 사유 | 불가능 |
| 신고 건수 | 불가능 |
근거: 피신고자에게 개선에 필요한 정보는 모두 제공하되, 신고자를 특정할 수 있는 정보는 철저히 보호합니다.
제재 중 제한 사항
콘텐츠 검열
- 해당 콘텐츠가 타임라인과 검색에서 숨겨집니다
- 직접 링크(퍼머링크)로는 접근 가능하지만, 검열 안내가 표시됩니다
- 작성자 본인은 콘텐츠를 볼 수 있습니다
일시 정지
- 새로운 콘텐츠 작성 불가
- 댓글 작성 불가
- 반응 불가
- 팔로/언팔로 불가
- 기존 콘텐츠 열람은 가능
- DM 수신은 가능하나 발신 불가
영구 정지
- 계정 접근 불가
- 모든 기능 사용 불가
- 기존 콘텐츠는 숨김 처리됨
이의 제기 프로세스
이의 제기 자격
- 조치를 받은 피신고자만 이의 제기 가능
- 하나의 조치에 대해 1회의 이의 제기 가능
- 이의 제기 기한: 조치 통보 후 14일 이내
이의 제기 흐름도
appeal_process start 피신고자가 이의 제기 write 이의 내용 작성 start->write submit 이의 제출 write->submit review 관리자 검토 (다른 관리자 권장) submit->review decision 판단 review->decision reject 기각 decision->reject uphold 조치 유지 decision->uphold modify 조치 변경 decision->modify notify 결과 통보 (피신고자, 원신고자) reject->notify uphold->notify modify->notify이의 제기 양식
이의 제기 사유:
[왜 이 조치가 부당하다고 생각하시는지 설명해 주세요]

추가 맥락 또는 증거:
[조치 결정 시 고려되지 않았다고 생각되는
맥락이나 정보가 있다면 제공해 주세요]

[제출]
이의 제기 검토
- 검토 원칙
-
- 가능하면 원래 조치를 결정한 관리자가 아닌 다른 관리자가 검토합니다
- 원 신고 내용, 조치 사유, 이의 제기 내용을 종합적으로 검토합니다
- 새로운 정보나 맥락이 있는지 확인합니다
- 결정 옵션
-
- 이의 기각: 원 조치 유지
- 조치 완화: 더 가벼운 조치로 변경 (예: 정지 → 경고)
- 조치 철회: 조치 취소 및 기록 정정
- 조치 강화: 드문 경우, 이의 제기 과정에서 더 심각한 위반이 발견된 경우
결과 통보
피신고자에게:
귀하의 이의 제기를 검토한 결과를 알려드립니다.

결정: [이의 기각 / 조치 완화 / 조치 철회]

판단 사유:
[관리자의 검토 결과 설명]

(해당 시) 변경된 조치:
[새로운 조치 내용]
원 신고자에게:
귀하가 신고하신 건에 대해 피신고자로부터
이의 제기가 있어 재검토가 진행되었습니다.

재검토 결과: [원 조치 유지 / 조치 변경]

(조치가 변경된 경우)
변경 사유에 대한 간략한 설명:
[설명]
패널티 체계
패널티 종류 및 기준
경고 (warning)
- 설명
- 위반 사실을 알리고 재발 방지를 요청하는 가장 가벼운 조치입니다.
- 적용 기준
-
- 경미한 행동 강령 위반
- 초범이며 악의가 없어 보이는 경우
- 실수나 무지로 인한 위반으로 판단되는 경우
- 효과
-
- 경고 메시지가 발송됩니다
- 경고 이력이 기록되어 향후 판단에 참고됩니다
- 일정 기간(예: 1년) 경과 후 이력에서 제외될 수 있습니다
- 경고 누적
-
- 경고 3회 누적 시 자동으로 더 강한 조치 검토 대상이 됩니다
- 단, 자동 제재는 없으며 관리자의 판단이 필요합니다
콘텐츠 검열 (content censorship)
- 설명
- 특정 콘텐츠를 공개 영역에서 숨기는 조치입니다.
- 적용 기준
-
- 콘텐츠 자체가 행동 강령을 위반하는 경우
- 사용자의 전반적 행동보다 특정 콘텐츠가 문제인 경우
- 효과
-
- 해당 콘텐츠가 타임라인, 검색, 추천에서 제외됩니다
- 퍼머링크는 유지되나, 접근 시 검열 안내가 표시됩니다
- 연합(federation)으로 다른 서버에
Delete액티비티가 전송될 수 있습니다
검열 콘텐츠 표시
이 콘텐츠는 행동 강령 위반으로 검열되었습니다.
[원문 보기] (클릭 시 경고와 함께 표시)
일시 정지 (temporary suspension)
- 설명
- 일정 기간 동안 계정 활동을 제한하는 조치입니다.
- 적용 기준
-
- 경고에도 불구하고 위반이 반복되는 경우
- 중간 수준의 심각한 위반인 경우
- 즉각적인 활동 중단이 필요하지만 영구 정지까지는 아닌 경우
- 정지 기간
-
- 최소 1일 – 최대 90일
- 관리자가 위반 정도에 따라 결정
- 권장 기준:
- 경미한 반복 위반: 1–7일
- 중간 수준 위반: 7–30일
- 심각한 위반 (초범): 30–90일
- 효과
-
- 새 콘텐츠 작성 불가
- 상호작용(반응, 댓글 등) 불가
- 기존 콘텐츠 열람은 가능
- 정지 해제 시 완전한 기능 복구
- 원격 사용자의 경우
-
- Hackers' Pub 내에서 해당 기간 동안 연합 차단
- 원격 서버 관리자에게 ActivityPub
Flag액티비티로 통보
영구 정지 (permanent suspension)
- 설명
- 계정을 영구적으로 비활성화하는 가장 강력한 조치입니다.
- 적용 기준
-
- 매우 심각한 행동 강령 위반 (혐오 발언, 불법 콘텐츠 등)
- 일시 정지 후에도 동일한 위반이 반복되는 경우
- 명백한 악의를 가지고 커뮤니티를 해치려는 의도가 확인된 경우
- 효과
-
- 계정 로그인 불가
- 모든 기능 사용 불가
- 공개 콘텐츠 숨김 처리
- 프로필 페이지에 정지 안내 표시
- 원격 사용자의 경우
-
- Hackers' Pub과의 영구적 연합 차단
- 원격 서버 관리자에게 ActivityPub
Flag액티비티로 통보
- 복구
-
- 원칙적으로 영구 정지는 복구되지 않습니다
- 극히 예외적인 경우, 충분한 시간 경과 후 재심 요청 가능
패널티 이력 관리
| 패널티 | 이력 보존 기간 | 비고 |
|---|---|---|
| 경고 | 1년 | 1년간 추가 위반 없으면 이력에서 제외 |
| 콘텐츠 검열 | 무기한 | 콘텐츠 존재하는 한 유지 |
| 일시 정지 | 무기한 | 기록은 유지, 판단 시 경과 시간 고려 |
| 영구 정지 | 무기한 | - |
ActivityPub 연합 처리
개요
Hackers' Pub은 ActivityPub 프로토콜을 사용하는 분산형 네트워크의 일부입니다. 신고 기능도 이 환경에서 원활히 작동해야 합니다.
Flag 액티비티
ActivityPub 명세에는 Flag 액티비티가 정의되어 있으며, 이를 통해 신고를
연합 네트워크에 전파할 수 있습니다.
Flag 액티비티 구조:
{
  "@context": "https://www.w3.org/ns/activitystreams",
  "type": "Flag",
  "actor": "https://hackerspub.example/users/moderator",
  "object": [
    "https://remote.example/users/reported_user",
    "https://remote.example/posts/problematic_post"
  ],
  "content": "Violation of Code of Conduct: harassment"
}
원격 콘텐츠 신고 처리
신고 접수
- 로컬 사용자가 원격 콘텐츠/사용자를 신고합니다
- 신고는 Hackers' Pub 데이터베이스에 저장됩니다
- 관리자가 일반 신고와 동일하게 검토합니다
조치 적용
-
Hackers' Pub 내 조치:
- 해당 콘텐츠의 로컬 캐시 숨김/삭제
- 해당 사용자와의 연합 차단 (일시/영구)
-
원격 서버 통보 (선택적):
Flag액티비티를 원격 서버에 전송- 원격 서버의 조치 여부는 해당 서버의 재량
외부에서 받은 Flag 처리
다른 서버에서 Hackers' Pub으로 Flag 액티비티가 전송된 경우:
Flag액티비티 수신 및 파싱- 신고 대상이 로컬 사용자/콘텐츠인지 확인
- 관리자에게 외부 신고로 표시하여 알림
- 관리자가 검토 후 자체 판단에 따라 조치
외부 신고 표시:
[외부 신고] remote.example에서 접수됨

대상: @localuser의 콘텐츠
사유: "Violation of our community guidelines"

* 이 신고는 외부 서버에서 접수되었습니다.
  자체 행동 강령에 따라 판단해 주세요.
Mastodon 호환성
Mastodon은 가장 널리 사용되는 ActivityPub 구현체입니다. Mastodon과의 호환성을 위해 다음을 고려합니다:
- Mastodon의
Flag액티비티 형식 지원 - Mastodon 관리자 API와의 연동 고려 (향후)
- Mastodon에서 보내는 신고 수신 및 처리
알림 체계
알림 유형
| 알림 유형 | 수신자 | 내용 |
|---|---|---|
flag_received |
관리자 | 새 신고 접수됨 |
flag_resolved |
신고자 | 신고 처리 완료됨 |
action_taken |
피신고자 | 조치가 취해짐 |
appeal_received |
관리자 | 이의 제기 접수됨 |
appeal_resolved |
피신고자 | 이의 제기 처리 완료됨 |
appeal_result |
신고자 | 이의 제기로 인한 변경 알림 |
suspension_ending |
피신고자 | 정지 해제 임박 알림 |
알림 채널
- 인앱 알림
- 기본 알림 방식
- 이메일
- 중요 알림 (조치, 정지 등)
- ActivityPub
- 원격 사용자의 경우 해당 서버로 전송
프라이버시 및 보안
신고자 익명성 보호
- 원칙
- 신고자의 신원은 피신고자에게 절대 공개되지 않습니다.
- 기술적 조치
-
- API 응답에서 신고자 정보 필터링
- 관리자 UI에서만 신고자 정보 표시
- 로그에서 신고자 정보 마스킹 (필요시)
데이터 접근 제어
| 역할 | 접근 가능 정보 |
|---|---|
| 일반 사용자 | 자신의 신고 내역만 |
| 피신고자 | 자신에 대한 조치 및 사유 (신고자 정보 제외) |
| 관리자 | 모든 신고 정보 (신고자 정보 포함) |
콘텐츠 스냅샷
신고 시점의 콘텐츠를 스냅샷으로 저장하는 이유:
- 피신고자가 콘텐츠를 수정/삭제해도 원본 증거 보존
- 공정한 판단을 위한 기록 유지
- 이의 제기 시 참고 자료로 활용
- 보존 기간
-
- 케이스 종료 후 최소 1년간 보존
- 법적 요구사항이 있는 경우 더 오래 보존
악용 방지
- 허위 신고 방지
-
- 동일 사용자의 동일 대상 반복 신고 제한
- 허위 신고 시 신고자에 대한 제재 가능
- 신고 패턴 모니터링
- 신고 폭주 방지
-
- 단시간 다수 신고 시 속도 제한
- 관리자에게 이상 패턴 경고
관리자 대시보드
대시보드 개요
관리자 대시보드는 신고 관리의 중심 허브입니다.
- 주요 화면
-
- 대기 중인 신고 목록
- 신고 상세 및 처리 화면
- 이의 제기 목록
- 통계 및 분석
- 제재 중인 사용자 목록
신고 목록 화면
┌─────────────────────────────────────────────────────────┐
│  신고 관리                                    [통계 보기] │
├─────────────────────────────────────────────────────────┤
│  필터: [전체 ▼] [대기 중 ▼] [최신순 ▼]      검색: [____]│
├─────────────────────────────────────────────────────────┤
│                                                         │
│  ⚠️ 높은 우선순위 (신고 5건 이상)                        │
│  ┌─────────────────────────────────────────────────┐   │
│  │ 🔴 @user123의 콘텐츠 (신고 7건)                 │   │
│  │    "혐오 발언", "차별적 표현" 외 5건             │   │
│  │    최초 신고: 2시간 전                          │   │
│  └─────────────────────────────────────────────────┘   │
│                                                         │
│  일반 신고                                              │
│  ┌─────────────────────────────────────────────────┐   │
│  │ 🟡 @remote@other.server 사용자 (신고 2건)       │   │
│  │    "스팸 행위"                                  │   │
│  │    최초 신고: 5시간 전                          │   │
│  └─────────────────────────────────────────────────┘   │
│  ┌─────────────────────────────────────────────────┐   │
│  │ 🟢 @newuser의 댓글 (신고 1건)                   │   │
│  │    "부적절한 언어 사용"                         │   │
│  │    신고: 1일 전                                 │   │
│  └─────────────────────────────────────────────────┘   │
│                                                         │
└─────────────────────────────────────────────────────────┘
신고 상세 화면
┌─────────────────────────────────────────────────────────┐
│  신고 상세 - 케이스 #12345                    [← 목록]  │
├─────────────────────────────────────────────────────────┤
│                                                         │
│  📋 기본 정보                                           │
│  ────────────────────────────────────────               │
│  대상: @user123의 콘텐츠                                │
│  유형: 단문 (note)                                      │
│  신고 건수: 7건                                         │
│  상태: 대기 중                                          │
│                                                         │
│  📝 신고된 콘텐츠                                       │
│  ────────────────────────────────────────               │
│  ┌─────────────────────────────────────────────────┐   │
│  │ [콘텐츠 원문 표시]                              │   │
│  │ 작성일: 2024-12-01 14:30                        │   │
│  └─────────────────────────────────────────────────┘   │
│                                                         │
│  🔍 신고 사유 (7건)                                     │
│  ────────────────────────────────────────               │
│  1. "명백한 혐오 발언입니다" - 신고자A, 2시간 전        │
│  2. "특정 집단을 비하하는 표현" - 신고자B, 3시간 전     │
│  3. "불쾌한 차별적 언어" - 신고자C, 4시간 전            │
│  ... (더 보기)                                          │
│                                                         │
│  🤖 LLM 분석 결과                                       │
│  ────────────────────────────────────────               │
│  관련 행동 강령 조항:                                   │
│  - 차별 금지 (신뢰도: 95%)                              │
│  - 존중하는 언어 사용 (신뢰도: 88%)                     │
│                                                         │
│  📊 피신고자 이력                                       │
│  ────────────────────────────────────────               │
│  - 가입일: 2024-06-15                                   │
│  - 이전 경고: 1회 (2024-09-20)                          │
│  - 이전 정지: 없음                                      │
│                                                         │
│  ⚡ 조치                                                │
│  ────────────────────────────────────────               │
│  [기각] [경고] [콘텐츠 검열] [일시 정지] [영구 정지]    │
│                                                         │
└─────────────────────────────────────────────────────────┘
통계 화면
기간 선택 드롭다운으로 조회 범위를 설정합니다 (예: 최근 30일).
요약
| 항목 | 값 |
|---|---|
| 총 신고 건수 | 127건 |
| 처리 완료 | 98건 (77%) |
| 평균 처리 시간 | 4.2시간 |
조치 분포
| 조치 | 건수 | 비율 |
|---|---|---|
| 기각 | 45건 | 46% |
| 경고 | 38건 | 39% |
| 콘텐츠 검열 | 10건 | 10% |
| 일시 정지 | 4건 | 4% |
| 영구 정지 | 1건 | 1% |
위반 유형 (상위 5개)
| 순위 | 유형 | 건수 |
|---|---|---|
| 1 | 스팸/광고 | 32건 |
| 2 | 혐오 발언 | 24건 |
| 3 | 괴롭힘 | 18건 |
| 4 | 부적절한 콘텐츠 | 12건 |
| 5 | 허위 정보 | 8건 |
향후 고려사항
자동화 기능 (향후 도입 검토)
- 자동 숨김: 특정 임계값 이상의 신고가 접수되면 관리자 검토 전 임시 숨김
- AI 기반 사전 필터링: 명백한 위반 콘텐츠 자동 감지
- 스팸 자동 처리: 명백한 스팸에 대한 자동 조치
주의
자동화 기능은 오탐의 위험이 있으므로 신중하게 도입해야 합니다.
커뮤니티 참여
- 신뢰할 수 있는 신고자: 정확한 신고 이력을 가진 사용자의 신고에 높은 가중치
- 커뮤니티 중재자: 관리자 부담 분산을 위한 커뮤니티 중재자 제도 검토
다국어 지원
- 신고 사유 자동 번역 (관리자가 다른 언어 사용 시)
- 행동 강령 다국어 버전과의 연동
- 조치 통보 메시지 다국어 템플릿
법적 요구사항 대응
- 법적 요청에 따른 데이터 보존/제공 절차
- 저작권 침해 신고 (DMCA 등) 별도 처리 절차
- 사법기관 협조 절차
부록: 용어 대조표
| 한국어 | 영어 | 설명 |
|---|---|---|
| 신고 | flag/report | 위반 의심 콘텐츠/사용자를 알림 |
| 행동 강령 | code of conduct | 커뮤니티 규칙 |
| 관리자 | moderator | 신고 처리 권한자 |
| 검열 | censorship | 콘텐츠 숨김 처리 |
| 정지 | suspension | 계정 활동 제한 |
| 이의 제기 | appeal | 조치에 대한 재검토 요청 |
| 연합 | federation | 분산 네트워크 간 연결 |
| 콘텐츠 | post | 게시글과 단문을 통칭 |
| 게시글 | article | 장문의 블로그 형식 글 |
| 단문 | note | 짧은 마이크로블로그 형식 글 |
| 타임라인 | timeline | 콘텐츠 피드 |
| 팔로 | follow | 다른 사용자 구독 |
| 팔로워 | follower | 나를 구독하는 사용자 |
| 차단 | block | 특정 사용자 접근 제한 |
| 반응 | react | 콘텐츠에 이모지로 반응 |
| 연합우주 | fediverse | ActivityPub 기반 분산 소셜 네트워크 |
| 인스턴스 | instance | 연합우주의 개별 서버 |
이 문서는 Hackers' Pub 커뮤니티의 의견을 수렴하여 지속적으로 개선됩니다.
GLM-4.7의 성능이 그렇게나 좋다고 들어서 요금제를 보니 상당히 파격적인 가격이라 조금 시도해 봤다. 우선 LogTape에 있던 이슈 하나를 수행하게 했고, 혹시 몰라서 Claude Code에서 Claude 4.5 Opus로 PLAN.md 계획 파일을 꽤 꼼꼼하게 만들게 한 뒤, 그걸 참고하게 했다. 그럼에도 불구하고:
- 모든
export되는 API에 대해서는 JSDoc 주석을 써야 한다는 당연한 절차를 수행하지 않음 (코드베이스의 다른 코드는 다 그렇게 되어 있는데도 눈치가 없음) - JSDoc 주석을 쓰랬더니 Python docstring 스타일로 정의부 “안쪽”에 주석을 씀…
Deno.env같은 특정 런타임에 의존적인 API를 씀 (코드베이스의 다른 코드는 그런 API 안 쓰고 있음)- 아주 기본적인 JavaScript 구문 오류를 냄 (예를 들면 세미콜론 빼먹는 식의) → 이것 때문에 상당히 토큰 소모를 많이 함
- 한국어가 살짝 귀여움 (“나옵니다”가 아니라 “나옴니다”라고 쓰는 식)
- 결국에는 JavaScript 구문 오류를 못 고쳐서 테스트 스위트도 아예 못 돌리는데 전체 작업이 완료되었다고 스스로 결론 내림
소문난 잔치에 먹을 게 없다더니, 역시나 벤치마크만 보고 모델을 골라서는 안 되겠다는 교훈만 재확인 한 것 같다.
오늘은 OpenCode에서 공짜로 제공하길래 MiniMax M2.1로 코딩을 좀 해봤다. 몇 시간 정도 해본 느낌으로는 GLM-4.7보다는 훨씬 나았고, 체감상으로는 대충 Claude Sonnet 4와 비슷한 정도로 말귀를 잘 알아듣는 느낌이었다. 컨텍스트 윈도가 긴 것도 장점이었다. 다만, 컨텍스트가 좀 길어지니까 끝도 없이 삽질을 반복하게 되어서, 그 쯤에서 모델을 GPT-5.1 Codex Max로 바꿔서 진행했다. GPT-5.1 Codex Max로 삽질 구간 벗어난 뒤에 금방 다시 MiniMax M2.1로 돌아와서 계속 코딩을 했고, 전반적으로 싼 값을 감안하면 굉장히 좋다고 느꼈다.
요즘에는 평소에 Claude Opus 4.5를 주력으로 사용하니까, 아무래도 비교가 될 수밖에 없었는데:
- 역시나 눈치라고 해야 하나, 센스는 떨어진다. Claude Sonnet 4.5보다도 떨어지는 듯. 이를테면 Markdown 문서를 수정하도록 지시하면 기존의 일관성 있게 잘 짜여 있던 문서 서식이 금방 무너지는 게 느껴진다.
- AGENTS.md의 세세한 지시를 좀 뭉개는 느낌이 있다. 예를 들면 TypeScript 코딩할 때
any타입을 쓰지 말라고 했음에도 무시하고 사용한다든가. Claude 계열 모델들에서는 이런 건 잘 못 겪는다. - 작업의 맥락보다 이미 학습되어 있는 자신의 지식을 더 따르는 느낌이 있다. 이를테면 일부러 여러 JavaScript 런타임에서 두루 돌아가게 하려고 Deno API를 안 쓰고 Node.js API를 써서 짜 둔 코드베이스에서 갑자기 Deno API를 꺼내서 쓰기 시작하는 식이다. 이것도 눈치 문제로 볼 수도 있을 듯.
- 그렇게 중요하진 않지만 자연어 응답에 언어가 조금 섞인다. 특히 국한문혼용체가 종종 나온다. 나로서는 오히려 좋다(?). 그런데 자세히 보면 대륙에서 쓰는 간화자가 아니라서, 중국어가 섞이는 건 아닌 것 같다. 아마도 일본어 아니면 대만/홍콩의 중국어가 섞이는 것 같다. 아니면 정말로 국한문혼용체일지도? 그리고 아랍어도 한 번 섞이는 걸 봤다.
- 속도는 그냥저냥 쓸만하지만 딱히 빠른 것도 아닌데, 이건 OpenCode에서 공짜로 제공하는 걸 써서 그럴 수도 있다. Claude Opus 4.5보다는 약간 느리다고 느꼈지만, 이것도 그냥 체감이라 정확하진 않다. 삽질하는 걸 더 많이 봐서 느리다고 착각한 걸 수도 있고.
일단은 OpenCode에서 공짜로 제공하는 동안은 좀 더 써 볼 생각이다. 돈 내고 쓸 생각이 있냐 하면, 그건 좀 고민이 된다. 코딩 요금제를 보면 5시간에 300 프롬프트짜리가 월 20불 정도 된다. 지금은 Claude Max 요금제를 쓰고 있는데, 아무래도 부담이 좀 되긴 해서, Claude Pro로 내리고 MiniMax를 섞어서 쓰면 어떨까 생각만 해보고 있다.

![]() 洪 民憙 (Hong Minhee) shared the below article:
洪 民憙 (Hong Minhee) shared the below article:
도커로 구축한 랩에서 혼자 실습하며 배우는 네트워크 프로토콜 입문 #5-2 DNS
자손킴 @jasonkim@hackers.pub
이번 섹션은 DNS에 대해서 알아본다. 책의 내용을 기반으로 패킷 분석은 생략하고 DNS의 발전과정, 존파일의 구체적인 예시와 보안 관련 내용을 짧게 추가하여 정리했다.
1장에서는 L2의 MAC 주소에 대해서 이야기했고, 2장에서는 L3의 IP주소에 대해서 이야기했다. IP 주소를 MAC 주소로 변환하기 위해서 ARP(Address Resolution Protocol)를 사용한다.
인터넷에서 다른 단말기에 접속하기 위해서는 IP 주소를 알아야 한다. 그러나 IP 주소는 숫자의 나열이기 때문에 서로 다른 단말기의 IP 주소를 외우고 있는 것은 힘들 뿐더러 IP 주소가 바뀔 경우 다시 외워야 한다는 번거로움이 크다.
DNS는 이러한 불편함을 해결하기 위해 만들어졌다.
DNS(Domain Name System)
인터넷의 전신인 아파넷(ARPANET)에서는 모든 컴퓨터의 이름과 지금의 IP 주소격인 Host Number를 HOSTS.TXT라는 파일에 기록하여 관리했다. 이 파일은 스탠포드 연구소(SRI)의 네트워크 정보 센터(NIC)에서 관리했고, 네트워크 관리자들이 주기적으로 FTP를 통해 이 파일을 다운로드하여 자신의 시스템에 복사했다.
1980년대 초에 네트워크가 급성장하면서 중앙집중식으로 관리되는 HOSTS.TXT는 확장성의 한계에 직면하게 되고 Paul Mockapetris가 RFC 882와 RFC 883을 통해 DNS를 제안한다. 이후 개정을 통해 RFC1034, RFC1035로 표준화 되었다.
DNS는 사람이 읽을 수 있는 도메인 이름을 컴퓨터가 통신에 사용하는 IP 주소로 변환해주는 분산 데이터베이스 시스템이다. 흔히 인터넷의 전화번호부에 비유되며 전 세계에 분산된 수많은 DNS 서버들이 협력하여 도메인 이름에 대한 질의에 응답한다.
도메인 이름
도메인은 계층 구조로 이루어져 있다. 가장 상위에는 루트 도메인이 있고 그 아래로 최상위 도메인(TLD, Top-Level Domain), 2레벨 도메인(2LD, 2nd Level Domain), 3레벨 도메인 순으로 내려간다. 예를 들어 www.example.com이라는 도메인이 있을 때 루트 도메인은 맨 끝의 점(.)으로 표현되며 보통 생략된다.
도메인 이름에서 점(.)으로 구분되는 각각의 부분을 라벨(label)이라고 부른다. www.example.com에서 www, example, com이 각각 하나의 라벨이다. 루트 도메인까지 포함하여 완전하게 표기된 도메인 이름을 FQDN(Fully Qualified Domain Name)이라고 한다.
도메인 이름은 일반적으로 호스트 부분과 도메인 부분으로 나눌 수 있다. www.example.com에서 www는 호스트 부분으로 특정 서버나 서비스를 가리키고, example.com은 도메인 부분으로 해당 조직이나 서비스의 영역을 나타낸다.
최상위 도메인(TLD)은 크게 일반 최상위 도메인(gTLD, Generic Top-Level Domain)과 국가 코드 최상위 도메인(ccTLD, Country Code Top-Level Domain)으로 구분된다. 일반 최상위 도메인은 특정 국가에 속하지 않고 용도나 분야에 따라 구분되는 도메인이다. 국가 코드 최상위 도메인은 ISO 3166-1 alpha-2 표준에 기반한 두 글자 코드로 각 국가나 지역을 나타내며 각 국가의 도메인 등록 기관이 해당 ccTLD의 정책을 독자적으로 관리한다.
DNS의 도메인 체계는 트리 형태의 계층 구조를 이룬다. 맨 꼭대기에는 루트 도메인이 위치하며 이 루트로부터 각 TLD가 가지처럼 뻗어나가고 각 TLD 아래에는 다시 수많은 2단계 도메인이, 그 아래에는 3단계 도메인이 연결되는 식이다. 이 구조에서 각 노드는 자신의 하위 도메인에 대한 정보를 관리하는 권한을 갖는다.
이름 풀이
IP 주소와 도메인 이름을 서로 변환하는 과정이다. 이름 풀이에는 hosts파일이나 DNS를 사용하며 /etc/nsswitch.conf 등에 의해 우선순위가 정해진다.
hosts 파일을 이용한 이름 풀이
hosts 파일은 IP 주소와 호스트 이름의 매핑을 한 줄에 하나씩 기록하는 단순한 텍스트 파일로, 127.0.0.1 localhost처럼 IP 주소 뒤에 공백을 두고 호스트 이름을 적는 형식이다. hosts 파일은 네트워크 연결 없이도 동작하고 설정에 따라서는 DNS보다 우선 적용된다.
운영체제는 이름 풀이 요청이 들어오면 먼저 이 파일을 확인하고 일치하는 항목이 있으면 DNS 질의 없이 바로 해당 IP 주소를 반환한다.
DNS를 이용한 이름 풀이
DNS를 이용한 이름 풀이는 여러 구성요소의 협력으로 이루어진다. 먼저 DNS 클라이언트(일명: 스터브 리졸버(Stub Resolver))는 사용자 컴퓨터의 운영체제에 내장된 DNS 클라이언트로 애플리케이션의 이름 풀이 요청을 받아 DNS 서버에 질의를 보내는 역할을 한다. 스터브 리졸버는 단순히 질의를 전달하고 응답을 받아오는 역할만 한다.
재귀 리졸버(Recursive Resolver) 또는 캐싱 네임서버는 DNS 클라이언트의 재귀 쿼리를 받아 인터넷에 있는 권한이 있는 네임서버에 이름 풀이 요청(반복 쿼리)를 보낸다.
권한이 있는 네임서버(Authoritative Name Server)는 특정 도메인에 대한 공식적인 DNS 레코드를 보유한 서버로 해당 도메인에 대한 질의에 최종적인 답변을 제공한다. 권한이 있는 네임서버는 존 파일(Zone File)이라는 텍스트 파일에 도메인 정보를 저장하며, 이 존 파일에는 리소스 레코드(Resource Record)라고 불리는 개별 항목들이 포함된다. A 레코드는 도메인 이름을 IPv4 주소로 매핑하고 AAAA 레코드는 IPv6 주소로 매핑한다. CNAME 레코드는 별칭을 정의하며 MX 레코드는 메일 서버, NS 레코드는 해당 도메인의 네임서버를 지정한다.
루트 네임서버는 DNS 계층의 최상위에서 TLD 네임서버의 위치를 알려주고 TLD 네임서버는 각 최상위 도메인에 등록된 도메인들의 권한이 있는 네임서버 위치를 안내한다.
DNS의 동작 방식
사용자가 웹 브라우저에 www.example.com을 입력하면 DNS를 통한 이름 풀이 과정이 시작된다. 먼저 운영체제의 스터브 리졸버가 설정된 재귀 리졸버에게 해당 도메인의 IP 주소를 요청한다. 재귀 리졸버는 자신의 캐시를 확인하여 이전에 조회한 적이 있는 도메인이라면 캐시된 결과를 즉시 반환한다.
캐시에 없는 경우 재귀 리졸버는 루트 네임서버에 질의를 보낸다. 루트 네임서버는 www.example.com의 IP 주소를 직접 알지 못하지만 com TLD를 담당하는 네임서버의 주소를 알려준다. 재귀 리졸버는 이어서 com TLD 네임서버에 질의하고 TLD 네임서버는 example.com 도메인의 권한이 있는 네임서버 주소를 응답한다. 마지막으로 재귀 리졸버가 해당 권한이 있는 네임서버에 질의하면 이 서버가 www.example.com의 실제 IP 주소를 담은 최종 답변을 반환한다.
재귀 리졸버는 이 결과를 캐시에 저장한 뒤 클라이언트에게 전달하여 전체 이름 풀이 과정이 완료된다. 캐시에 저장된 레코드는 TTL(Time To Live)이라는 유효 시간 동안 유지되며 TTL이 만료되면 다시 질의를 수행해야 한다.
재귀 쿼리와 반복 쿼리
DNS 질의는 재귀 쿼리(Recursive Query)와 반복 쿼리(Iterative Query)로 구분되며 이름 풀이 과정의 각 단계에서 서로 다른 방식이 사용된다.
재귀 쿼리는 클라이언트가 리졸버에게 최종 답변을 요구하는 질의 방식이다. 스터브 리졸버가 재귀 리졸버에게 질의를 보낼 때 이 방식을 사용한다. 재귀 쿼리를 받은 리졸버는 어떤 방법을 쓰든 완전한 답변을 돌려주거나 찾을 수 없다는 오류를 반환해야 하는 의무를 지게 된다. 클라이언트 입장에서는 한 번의 질의로 최종 결과를 받을 수 있으므로 구현이 단순해지고 복잡한 이름 풀이 로직은 전적으로 재귀 리졸버가 처리하게 된다.
반복 쿼리는 재귀 쿼리와 달리 상대 서버에게 최선의 답변만을 요청하는 방식이다. 재귀 리졸버가 루트 네임서버, TLD 네임서버, 권한이 있는 네임서버에 질의할 때 이 방식을 사용한다. 반복 쿼리를 받은 서버는 자신이 알고 있는 범위 내에서 답을 주거나 더 잘 알 것 같은 다른 서버의 주소를 알려주는 참조 응답(Referral)을 반환한다. 재귀 리졸버는 이 참조 응답을 따라가며 여러 서버에 순차적으로 질의하여 최종 답변을 찾아낸다.
정리하면, 일반적인 DNS 이름 풀이 과정에서 스터브 리졸버와 재귀 리졸버 사이에는 재귀 쿼리가 사용되고 재귀 리졸버와 각종 네임서버들 사이에는 반복 쿼리가 사용된다. 루트 네임서버, TLD 네임서버, 권한이 있는 네임서버와 같은 서버들은 모두 반복 쿼리만을 처리하며 다른 서버를 대신해서 질의를 수행하지 않는다.
A 레코드와 CNAME
리소스 레코드에는 여러 레코드 타입이 있지만 가장 기본이 되는 것은 A 레코드와 CNAME 레코드다.
A 레코드(Address Record)는 도메인 이름을 IPv4 주소에 직접 매핑한다. 사용자가 도메인에 접속할 때 최종적으로 필요한 것이 바로 이 A 레코드에 담긴 IP 주소다. 하나의 도메인에 여러 개의 A 레코드를 설정하여 트래픽을 분산시킬 수도 있다.
CNAME 레코드(Canonical Name Record)는 도메인 이름을 다른 도메인 이름으로 매핑하는 별칭 레코드다. CNAME은 IP 주소를 직접 가리키지 않고 다른 도메인을 가리킨다. 리졸버가 CNAME 레코드를 만나면 해당 별칭이 가리키는 도메인에 대해 다시 질의를 수행하여 최종적으로 A 레코드를 찾아낸다. CNAME은 여러 서브도메인이 같은 서버를 가리켜야 할 때 유용하다. 서버의 IP 주소가 변경되더라도 A 레코드 하나만 수정하면 해당 도메인을 가리키는 모든 CNAME이 자동으로 새 IP를 따라가게 된다.
다음은 example.com 도메인의 존 파일 예시다.
$TTL 3600
@       IN  SOA   ns1.example.com. admin.example.com. (
                  2024010101  ; Serial
                  7200        ; Refresh
                  3600        ; Retry
                  1209600     ; Expire
                  3600 )      ; Minimum TTL

@       IN  NS    ns1.example.com.
@       IN  NS    ns2.example.com.

@       IN  A     93.184.216.34
www     IN  CNAME example.com.
blog    IN  CNAME example.com.
api     IN  A     93.184.216.50

; 외부 서비스 연동
cdn     IN  CNAME d1234abcd.cloudfront.net.
app     IN  CNAME my-app.vercel.app.
storage IN  CNAME my-bucket.s3.amazonaws.com.

ns1     IN  A     93.184.216.10
ns2     IN  A     93.184.216.11
이 존 파일에서 @는 현재 도메인인 example.com을 의미한다. example.com은 A 레코드를 통해 93.184.216.34라는 IP 주소에 직접 매핑되어 있다. www.example.com과 blog.example.com은 CNAME 레코드로 example.com을 가리키므로, 결과적으로 같은 IP 주소로 연결된다. 반면 api.example.com은 별도의 A 레코드를 가지고 있어 다른 IP 주소를 사용한다.
CNAME은 같은 도메인 내의 다른 이름뿐 아니라 완전히 다른 도메인을 가리킬 수도 있다. 위 예시에서 cdn, app, storage 서브도메인은 각각 외부 서비스 제공자의 도메인을 가리킨다. 이 방식의 장점은 외부 서비스의 실제 IP 주소를 알 필요가 없다는 것이다. 서비스 제공자가 내부적으로 서버를 이전하거나 IP를 변경하더라도 사용자의 DNS 설정은 그대로 유지된다. 서비스 제공자의 네임서버가 항상 현재 유효한 IP 주소를 응답하기 때문이다.
DNS와 보안
DoT와 DoH
전통적인 DNS 질의는 암호화되지 않은 평문으로 전송된다. 이는 네트워크 경로 상의 누군가가 사용자가 어떤 도메인에 접속하려는지 엿볼 수 있고 응답을 조작할 수도 있다는 의미다.
DoT(DNS over TLS)와 DoH(DNS over HTTPS)는 이 문제를 해결하기 위해 DNS 질의를 암호화한다. DoT는 853번 포트를 사용하여 TLS로 DNS 트래픽을 감싸고 DoH는 일반 HTTPS 트래픽과 동일한 443번 포트를 사용한다. DoH는 일반 웹 트래픽과 구분이 어려워 차단하기 힘들다는 특징이 있다.
SNI와 ECH
DNS 질의를 암호화하더라도 여전히 접속하려는 도메인이 노출되는 지점이 있다. HTTPS 연결을 시작할 때 클라이언트는 SNI(Server Name Indication)라는 필드에 접속하려는 도메인 이름을 평문으로 보낸다. 하나의 IP 주소에서 여러 도메인을 호스팅하는 서버가 어떤 인증서를 제시할지 알아야 하기 때문이다.
ECH(Encrypted Client Hello)는 SNI를 포함한 ClientHello 메시지 전체를 암호화하여 이 문제를 해결한다. ECH를 사용하면 네트워크 관찰자는 사용자가 어떤 도메인에 접속하는지 알 수 없게 된다.
![]() @hongminhee洪 民憙 (Hong Minhee) 是的,Ruby 是我最熟悉的编程语言,自制编程语言过程充满挑战和乐趣。多年以前,我还是编程新手时,也尝试了解 Lisphp 的实现方式,但由于能力所限,未能做到;有一段时间使用过 CoffeeScript,得知作者起初也是以 Ruby 作为实现语言,我想对于现在的我,Ruby 是最适合的选择。感谢您为编程爱好者提供这样的交流平台,祝新的一年万事如意!
@hongminhee洪 民憙 (Hong Minhee) 是的,Ruby 是我最熟悉的编程语言,自制编程语言过程充满挑战和乐趣。多年以前,我还是编程新手时,也尝试了解 Lisphp 的实现方式,但由于能力所限,未能做到;有一段时间使用过 CoffeeScript,得知作者起初也是以 Ruby 作为实现语言,我想对于现在的我,Ruby 是最适合的选择。感谢您为编程爱好者提供这样的交流平台,祝新的一年万事如意!
@neo 哦,沒想到還有人記得 Lisphp!有點不好意思。那只是我十多年前隨便玩著做的東西。😅
@neo 是在用 Ruby 實作新的程式語言嗎?我以前也曾用 Ruby 寫過一個簡單的 Lisp 直譯器,過程真的很有趣。祝您新年快樂!
![]() @hongminhee洪 民憙 (Hong Minhee) 是的,Ruby 是我最熟悉的编程语言,自制编程语言过程充满挑战和乐趣。多年以前,我还是编程新手时,也尝试了解 Lisphp 的实现方式,但由于能力所限,未能做到;有一段时间使用过 CoffeeScript,得知作者起初也是以 Ruby 作为实现语言,我想对于现在的我,Ruby 是最适合的选择。感谢您为编程爱好者提供这样的交流平台,祝新的一年万事如意!
@hongminhee洪 民憙 (Hong Minhee) 是的,Ruby 是我最熟悉的编程语言,自制编程语言过程充满挑战和乐趣。多年以前,我还是编程新手时,也尝试了解 Lisphp 的实现方式,但由于能力所限,未能做到;有一段时间使用过 CoffeeScript,得知作者起初也是以 Ruby 作为实现语言,我想对于现在的我,Ruby 是最适合的选择。感谢您为编程爱好者提供这样的交流平台,祝新的一年万事如意!
인터페이스가 구린 라이브러리를 쓸때는 반!드!시! 심호흡을 하고 멀쩡한 인터페이스의 wrapper를 만든후에! 기능 개발을 합시다. 절대 대충 꾸역꾸역 만들어보자고 덤비면 안됩니다. 결국 후회합니다.
- V모사의 AI 라이브러리를 쓰다가
Designing type-safe sync/async mode support in TypeScript https://lobste.rs/s/844jrt #api #javascript #plt
https://hackers.pub/@hongminhee/2026/typescript-sync-async-type-safety
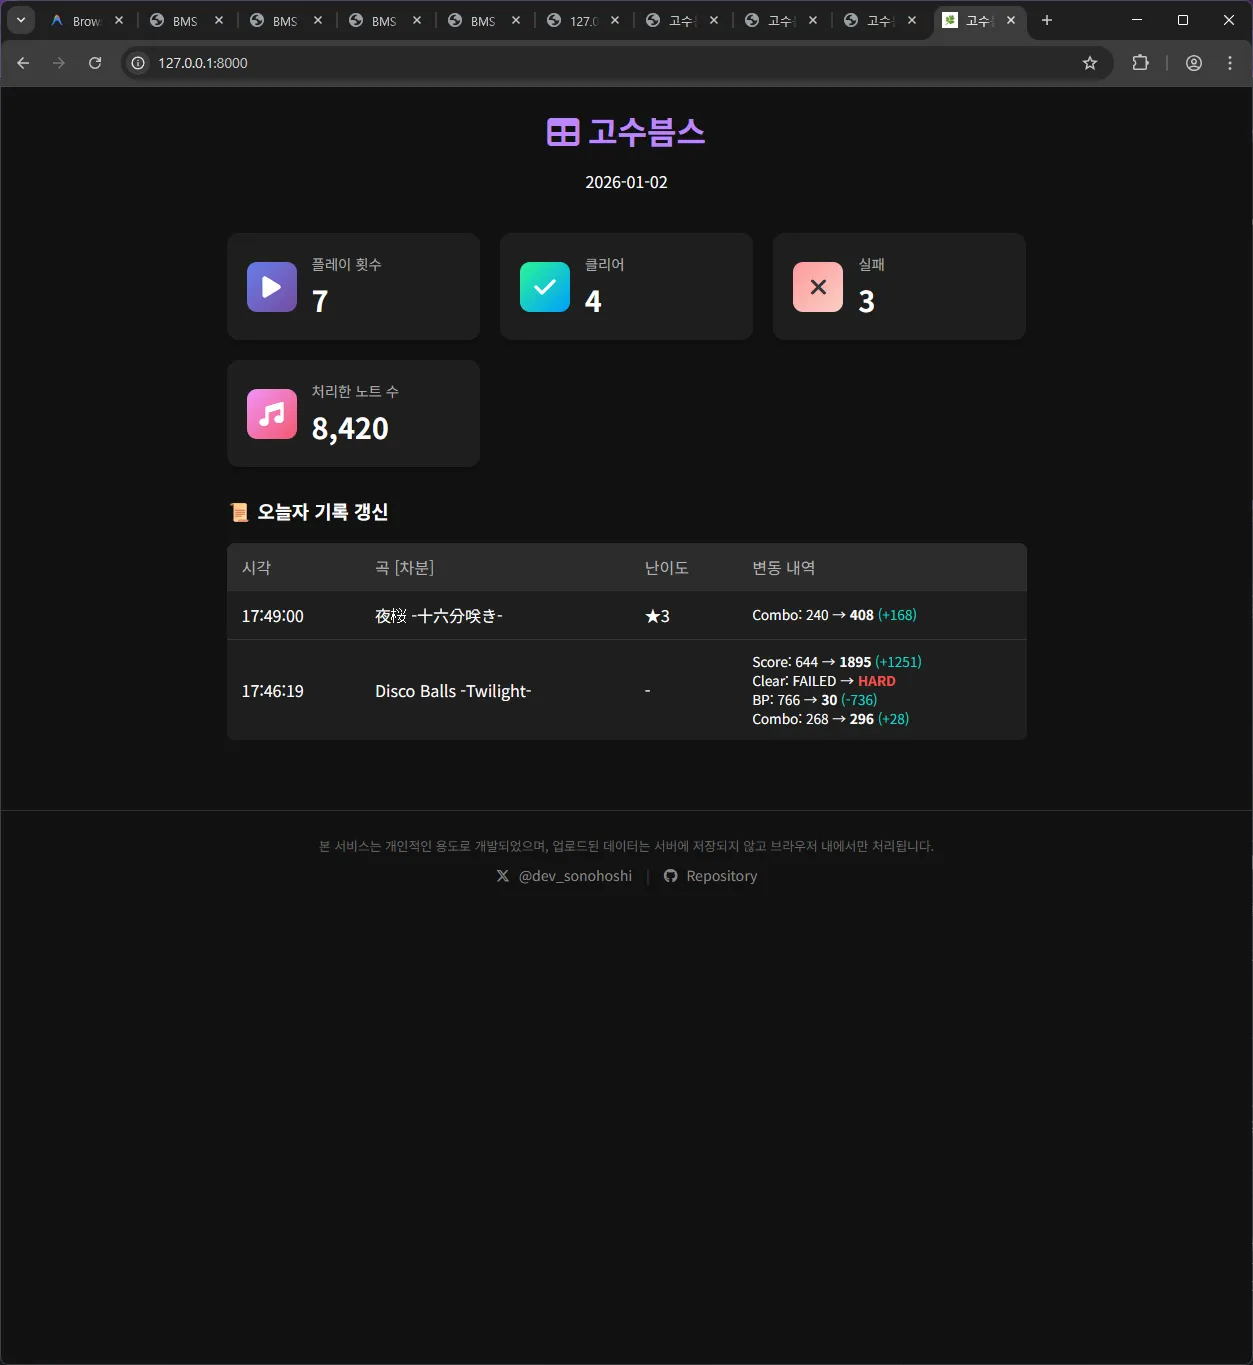
바이브코딩이 취미가 되어가는 것일까요? 그새 또 뭔가 하나를 뚝딱여왔습니다... be-music-script라는 동인 리듬게임 에뮬레이터 비슷한 친구의 플레이 로그를 정리해주는 서비스를 만들어봤어요. 많은 리듬게임 유저들은 자기가 얼마나 잘했는지 자랑하고 싶어하는데, db 파일을 읽은 뒤 당일의 멋진 성과들을 정리해주는 서비스입니다. 제가 쓰려고 만든건데 이것도 결국 엔지니어링? 결과물인걸까? 싶어 올려봅니다.
요즘 AI의 도움 덕분에 아이디어를 구현하는게 두렵지 않아졌다는 기분이 드네요. https://sonohoshi.github.io/gosubms/
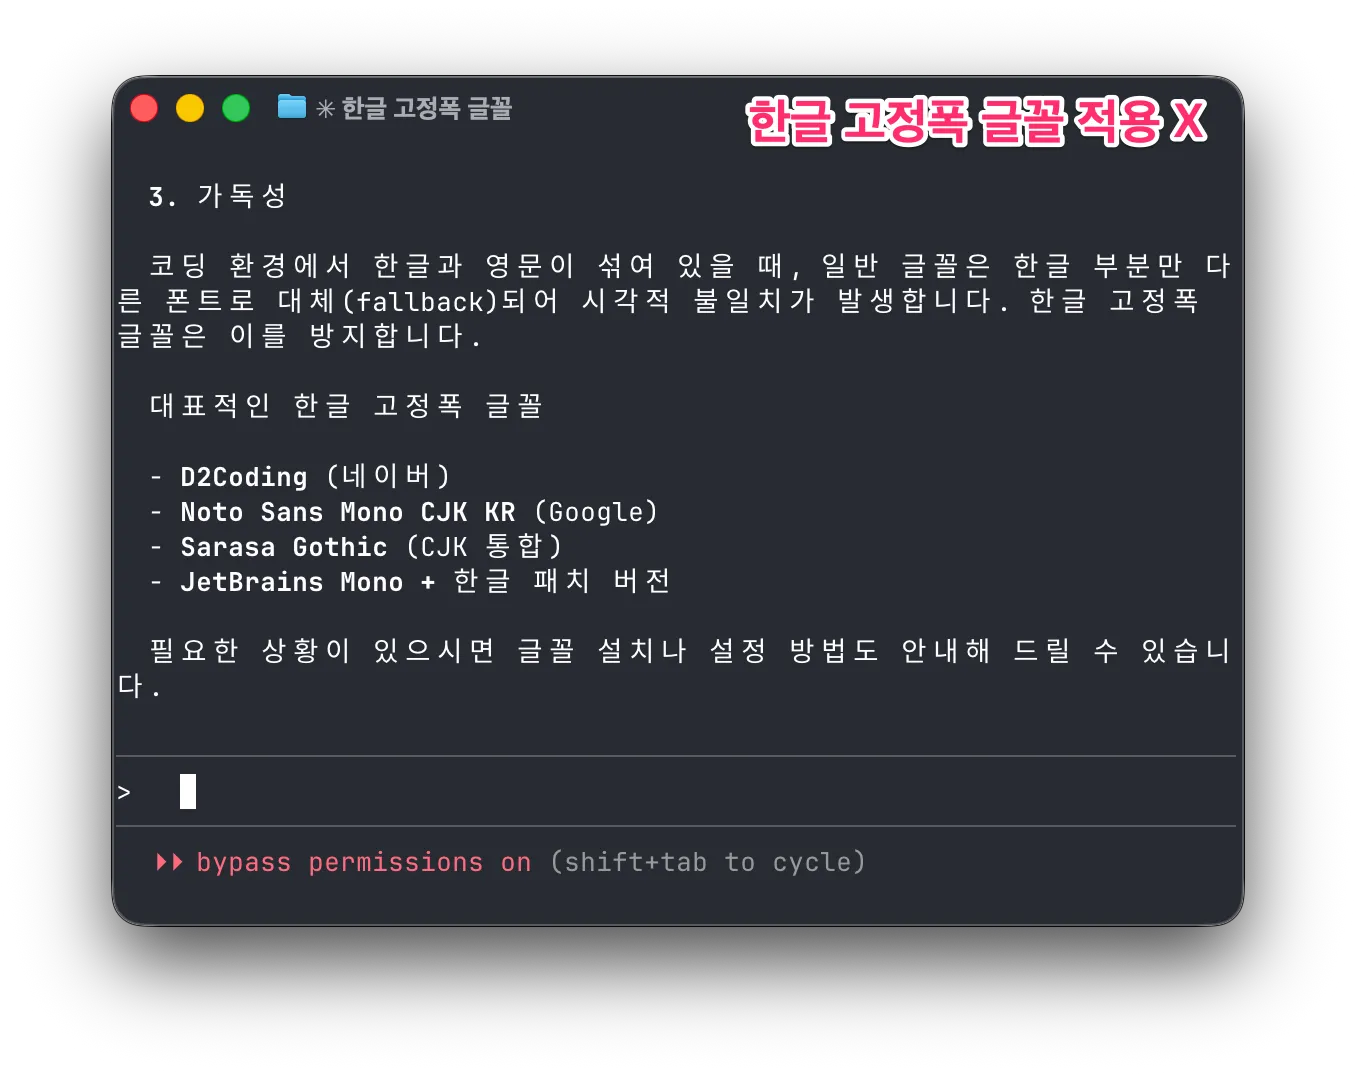
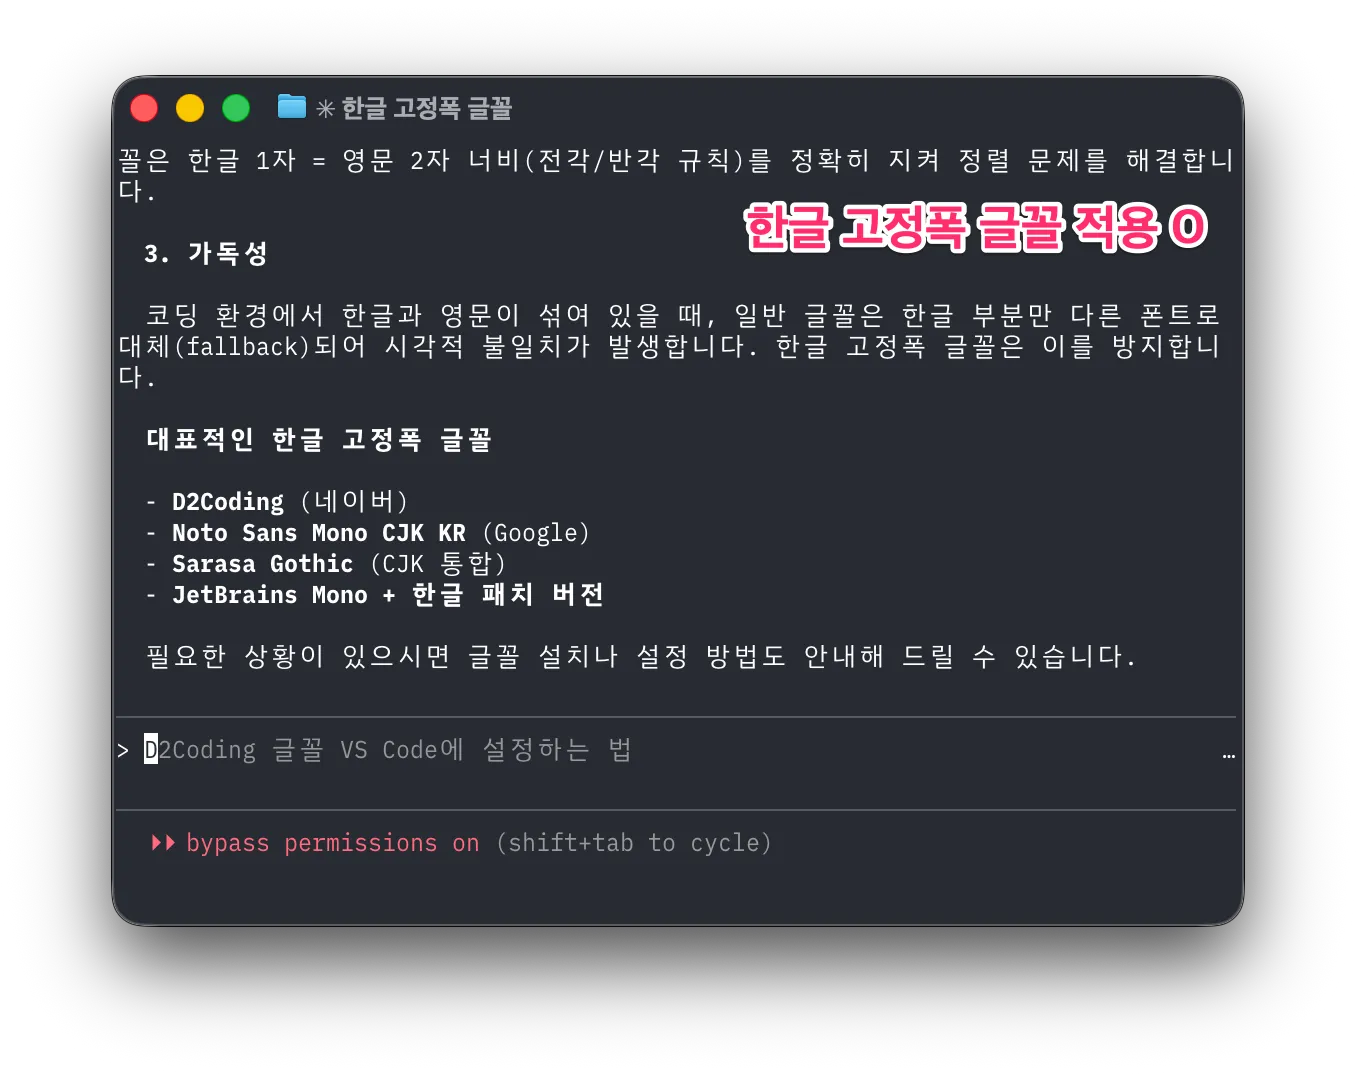
Claude Code의 인기와 함께 터미널에서 한글을 쓰는 모습을 자주 볼 수 있습니다. 하지만 터미널에서 쓰이는 한글은 글자간의 간격이 넓어 보기 좋지 않은 경우가 많습니다. 왜 이런 걸까요?
흔하게 쓰는 코드용 글꼴은 로마자, 숫자, 특수기호만을 다룰 뿐 한글은 다루지 않습니다. 그래서 터미널은 한글 표시를 하기 위해 대체 글꼴을 사용합니다. 대체 글꼴은 보통 OS의 기본 글꼴일 것입니다. 가변폭 글꼴이겠죠. 터미널은 이를 일부러 고정폭으로 만들기 위해 한글 한 자에 로마자 2자 폭을 할당하는데 이 과정에서 여백이 추가되면서 자간이 넓은 어색한 한글을 보게 되는 것입니다.
해결책은 한글 고정폭 글꼴을 사용하는 것입니다. 한글 고정폭 글꼴은 한글 1자를 로마자 2자 폭에 맞춰 만들었으므로 터미널이 더 이상 여백을 만들지 않습니다. 이러한 한글 고정폭 글꼴이 많진 않습니다. 10종이 안 되는 것 같네요. 저는 그중 Monoplex를 사용하고 있습니다. ![]() @hongminhee洪 民憙 (Hong Minhee) 님은 Sarasa Gothic을 사용하신다고 하네요. 적은 수의 글꼴이지만 맘에 드시는 걸 찾으셔서 예쁜 한글 출력을 보시면 좋겠습니다.
@hongminhee洪 民憙 (Hong Minhee) 님은 Sarasa Gothic을 사용하신다고 하네요. 적은 수의 글꼴이지만 맘에 드시는 걸 찾으셔서 예쁜 한글 출력을 보시면 좋겠습니다.
처음에는 Optique에 비동기 모드 추가하는 것에 거부감이 있었는데, 막상 구현하고 보니까 이런 저런 아이디어들이 떠오르는 듯? 그래서 이런 이슈도 하나 만들었다.
갠적으로 커밋 메시지나 PR 제목 앞에, feat:, fix:, chore: 붙이는 컨벤션은 뭘붙일지 애매한 경우가 너무 많아서 별로라고 본다.
![]() @bglbgl gwyng Conventional Commits라고 부르더라고요. 저도 개인적으로 가뜩이나 50자 제한이 빠듯한데 접두사까지 붙이면 더 좁은 느낌이라 안 쓰고 있습니다. 일부 LLM들이 자꾸 Conventional Commits 쓰려고 굴어서 아예 AGENTS.md에서도 막아놨어요. ㅋㅋㅋㅋ
@bglbgl gwyng Conventional Commits라고 부르더라고요. 저도 개인적으로 가뜩이나 50자 제한이 빠듯한데 접두사까지 붙이면 더 좁은 느낌이라 안 쓰고 있습니다. 일부 LLM들이 자꾸 Conventional Commits 쓰려고 굴어서 아예 AGENTS.md에서도 막아놨어요. ㅋㅋㅋㅋ
갠적으로 커밋 메시지나 PR 제목 앞에, feat:, fix:, chore: 붙이는 컨벤션은 뭘붙일지 애매한 경우가 너무 많아서 별로라고 본다.
Designing type-safe sync/async mode support in TypeScript
洪 民憙 (Hong Minhee) @hongminhee@hackers.pub
I recently added sync/async mode support to Optique, a type-safe CLI parser
for TypeScript. It turned out to be one of the trickier features I've
implemented—the object() combinator alone needed to compute a combined mode
from all its child parsers, and TypeScript's inference kept hitting edge cases.
What is Optique?
Optique is a type-safe, combinatorial CLI parser for TypeScript, inspired by Haskell's optparse-applicative. Instead of decorators or builder patterns, you compose small parsers into larger ones using combinators, and TypeScript infers the result types.
Here's a quick taste:
import { object } from "@optique/core/constructs";
import { argument, option } from "@optique/core/primitives";
import { string, integer } from "@optique/core/valueparser";
import { run } from "@optique/run";

const cli = object({
  name: argument(string()),
  count: option("-n", "--count", integer()),
});

// TypeScript infers: { name: string; count: number | undefined }
const result = run(cli);  // sync by default
The type inference works through arbitrarily deep compositions—in most cases, you don't need explicit type annotations.
How it started
Lucas Garron (@lgarron) opened an issue requesting
async support for shell completions. He wanted to provide
Tab-completion suggestions by running shell commands like
git for-each-ref to list branches and tags.
// Lucas's example: fetching Git branches and tags in parallel
const [branches, tags] = await Promise.all([
  $`git for-each-ref --format='%(refname:short)' refs/heads/`.text(),
  $`git for-each-ref --format='%(refname:short)' refs/tags/`.text(),
]);
At first, I didn't like the idea. Optique's entire API was synchronous, which made it simpler to reason about and avoided the “async infection” problem where one async function forces everything upstream to become async. I argued that shell completion should be near-instantaneous, and if you need async data, you should cache it at startup.
But Lucas pushed back. The filesystem is a database, and many useful completions inherently require async work—Git refs change constantly, and pre-caching everything at startup doesn't scale for large repos. Fair point.
What I needed to solve
So, how do you support both sync and async execution modes in a composable parser library while maintaining type safety?
The key requirements were:
parse()returnsTorPromise<T>complete()returnsTorPromise<T>suggest()returnsIterable<T>orAsyncIterable<T>- When combining parsers, if any parser is async, the combined result must be async
- Existing sync code should continue to work unchanged
The fourth requirement is the tricky one. Consider this:
const syncParser = flag("--verbose");
const asyncParser = option("--branch", asyncValueParser);

// What's the type of this?
const combined = object({ verbose: syncParser, branch: asyncParser });
The combined parser should be async because one of its fields is async. This means we need type-level logic to compute the combined mode.
Five design options
I explored five different approaches, each with its own trade-offs.
Option A: conditional types with mode parameter
Add a mode type parameter to Parser and use conditional types:
type Mode = "sync" | "async";

type ModeValue<M extends Mode, T> = M extends "async" ? Promise<T> : T;

interface Parser<M extends Mode, TValue, TState> {
  parse(context: ParserContext<TState>): ModeValue<M, ParserResult<TState>>;
  // ...
}
The challenge is computing combined modes:
type CombineModes<T extends Record<string, Parser<any, any, any>>> =
  T[keyof T] extends Parser<infer M, any, any>
    ? M extends "async" ? "async" : "sync"
    : never;
Option B: mode parameter with default value
A variant of Option A, but place the mode parameter first with a default
of "sync":
interface Parser<M extends Mode = "sync", TValue, TState> {
  readonly $mode: M;
  // ...
}
The default value maintains backward compatibility—existing user code keeps working without changes.
Option C: separate interfaces
Define completely separate Parser and AsyncParser interfaces with
explicit conversion:
interface Parser<TValue, TState> { /* sync methods */ }
interface AsyncParser<TValue, TState> { /* async methods */ }

function toAsync<T, S>(parser: Parser<T, S>): AsyncParser<T, S>;
Simpler to understand, but requires code duplication and explicit conversions.
Option D: union return types for suggest() only
The minimal approach. Only allow suggest() to be async:
interface Parser<TValue, TState> {
  parse(context: ParserContext<TState>): ParserResult<TState>;  // always sync
  suggest(context: ParserContext<TState>, prefix: string):
    Iterable<Suggestion> | AsyncIterable<Suggestion>;  // can be either
}
This addresses the original use case but doesn't help if async parse() is
ever needed.
Option E: fp-ts style HKT simulation
Use the technique from fp-ts to simulate Higher-Kinded Types:
interface URItoKind<A> {
  Identity: A;
  Promise: Promise<A>;
}

type Kind<F extends keyof URItoKind<any>, A> = URItoKind<A>[F];

interface Parser<F extends keyof URItoKind<any>, TValue, TState> {
  parse(context: ParserContext<TState>): Kind<F, ParserResult<TState>>;
}
The most flexible approach, but with a steep learning curve.
Testing the idea
Rather than commit to an approach based on theoretical analysis, I created a prototype to test how well TypeScript handles the type inference in practice. I published my findings in the GitHub issue:
Both approaches correctly handle the “any async → all async” rule at the type level. (…) Complex conditional types like
ModeValue<CombineParserModes<T>, ParserResult<TState>>sometimes require explicit type casting in the implementation. This only affects library internals. The user-facing API remains clean.
The prototype validated that Option B (explicit mode parameter with default) would work. I chose it for these reasons:
- Backward compatible: The default
"sync"keeps existing code working - Explicit: The mode is visible in both types and runtime (via a
$modeproperty) - Debuggable: Easy to inspect the current mode at runtime
- Better IDE support: Type information is more predictable
How CombineModes works
The CombineModes type computes whether a combined parser should be sync or
async:
type CombineModes<T extends readonly Mode[]> = "async" extends T[number]
  ? "async"
  : "sync";
This type checks if "async" is present anywhere in the tuple of modes.
If so, the result is "async"; otherwise, it's "sync".
For combinators like object(), I needed to extract modes from parser
objects and combine them:
// Extract the mode from a single parser
type ParserMode<T> = T extends Parser<infer M, unknown, unknown> ? M : never;

// Combine modes from all values in a record of parsers
type CombineObjectModes<T extends Record<string, Parser<Mode, unknown, unknown>>> =
  CombineModes<{ [K in keyof T]: ParserMode<T[K]> }[keyof T][]>;
Runtime implementation
The type system handles compile-time safety, but the implementation also needs
runtime logic. Each parser has a $mode property that indicates its execution
mode:
const syncParser = option("-n", "--name", string());
console.log(syncParser.$mode);  // "sync"

const asyncParser = option("-b", "--branch", asyncValueParser);
console.log(asyncParser.$mode);  // "async"
Combinators compute their mode at construction time:
function object<T extends Record<string, Parser<Mode, unknown, unknown>>>(
  parsers: T
): Parser<CombineObjectModes<T>, ObjectValue<T>, ObjectState<T>> {
  const parserKeys = Reflect.ownKeys(parsers);
  const combinedMode: Mode = parserKeys.some(
    (k) => parsers[k as keyof T].$mode === "async"
  ) ? "async" : "sync";

  // ... implementation
}
Refining the API
Lucas suggested an important refinement during our
discussion. Instead of having run() automatically choose between sync and
async based on the parser mode, he proposed separate functions:
Perhaps
run(…)could be automatic, andrunSync(…)andrunAsync(…)could enforce that the inferred type matches what is expected.
So we ended up with:
run(): automatic based on parser moderunSync(): enforces sync mode at compile timerunAsync(): enforces async mode at compile time
// Automatic: returns T for sync parsers, Promise<T> for async
const result1 = run(syncParser);  // string
const result2 = run(asyncParser);  // Promise<string>

// Explicit: compile-time enforcement
const result3 = runSync(syncParser);  // string
const result4 = runAsync(asyncParser);  // Promise<string>

// Compile error: can't use runSync with async parser
const result5 = runSync(asyncParser);  // Type error!
I applied the same pattern to parse()/parseSync()/parseAsync() and
suggest()/suggestSync()/suggestAsync() in the facade functions.
Creating async value parsers
With the new API, creating an async value parser for Git branches looks like this:
import type { Suggestion } from "@optique/core/parser";
import type { ValueParser, ValueParserResult } from "@optique/core/valueparser";

function gitRef(): ValueParser<"async", string> {
  return {
    $mode: "async",
    metavar: "REF",
    parse(input: string): Promise<ValueParserResult<string>> {
      return Promise.resolve({ success: true, value: input });
    },
    format(value: string): string {
      return value;
    },
    async *suggest(prefix: string): AsyncIterable<Suggestion> {
      const { $ } = await import("bun");
      const [branches, tags] = await Promise.all([
        $`git for-each-ref --format='%(refname:short)' refs/heads/`.text(),
        $`git for-each-ref --format='%(refname:short)' refs/tags/`.text(),
      ]);
      for (const ref of [...branches.split("\n"), ...tags.split("\n")]) {
        const trimmed = ref.trim();
        if (trimmed && trimmed.startsWith(prefix)) {
          yield { kind: "literal", text: trimmed };
        }
      }
    },
  };
}
Notice that parse() returns Promise.resolve() even though it's synchronous.
This is because the ValueParser<"async", T> type requires all methods to use
async signatures. Lucas pointed out this is a minor ergonomic issue. If only
suggest() needs to be async, you still have to wrap parse() in a Promise.
I considered per-method mode granularity (e.g., ValueParser<ParseMode, SuggestMode, T>), but the implementation complexity would multiply
substantially. For now, the workaround is simple enough:
// Option 1: Use Promise.resolve()
parse(input) {
  return Promise.resolve({ success: true, value: input });
}

// Option 2: Mark as async and suppress the linter
// biome-ignore lint/suspicious/useAwait: sync implementation in async ValueParser
async parse(input) {
  return { success: true, value: input };
}
What it cost
Supporting dual modes added significant complexity to Optique's internals. Every combinator needed updates:
- Type signatures grew more complex with mode parameters
- Mode propagation logic had to be added to every combinator
- Dual implementations were needed for sync and async code paths
- Type casts were sometimes necessary in the implementation to satisfy TypeScript
For example, the object() combinator went from around 100 lines to around
250 lines. The internal implementation uses conditional logic based on the
combined mode:
if (combinedMode === "async") {
  return {
    $mode: "async" as M,
    // ... async implementation with Promise chains
    async parse(context) {
      // ... await each field's parse result
    },
  };
} else {
  return {
    $mode: "sync" as M,
    // ... sync implementation
    parse(context) {
      // ... directly call each field's parse
    },
  };
}
This duplication is the cost of supporting both modes without runtime overhead for sync-only use cases.
Lessons learned
Listen to users, but validate with prototypes
My initial instinct was to resist async support. Lucas's persistence and concrete examples changed my mind, but I validated the approach with a prototype before committing. The prototype revealed practical issues (like TypeScript inference limits) that pure design analysis would have missed.
Backward compatibility is worth the complexity
Making "sync" the default mode meant existing code continued to work
unchanged. This was a deliberate choice. Breaking changes should require
user action, not break silently.
Unified mode vs per-method granularity
I chose unified mode (all methods share the same sync/async mode) over
per-method granularity. This means users occasionally write
Promise.resolve() for methods that don't actually need async, but the
alternative was multiplicative complexity in the type system.
Designing in public
The entire design process happened in a public GitHub issue. Lucas, Giuseppe,
and others contributed ideas that shaped the final API. The
runSync()/runAsync() distinction came directly from Lucas's feedback.
Conclusion
This was one of the more challenging features I've implemented in Optique. TypeScript's type system is powerful enough to encode the “any async means all async” rule at compile time, but getting there required careful design work and prototyping.
What made it work: conditional types like ModeValue<M, T> can bridge the gap
between sync and async worlds. You pay for it with implementation complexity,
but the user-facing API stays clean and type-safe.
Optique 0.9.0 with async support is currently in pre-release testing. If you'd like to try it, check out PR #70 or install the pre-release:
npm  add       @optique/core@0.9.0-dev.212 @optique/run@0.9.0-dev.212
deno add --jsr @optique/core@0.9.0-dev.212 @optique/run@0.9.0-dev.212
Feedback is welcome!
Optique 0.9.0 pre-release is ready for testing!
The big new feature: sync/async mode support. You can now build CLI parsers with async value parsing and suggestions—perfect for shell completions that need to run commands (like listing Git branches/tags).
The API automatically propagates async mode through combinators, so you only decide sync vs async at the leaf level.
Try it:
npm  add       @optique/core@0.9.0-dev.212 @optique/run@0.9.0-dev.212
deno add --jsr @optique/core@0.9.0-dev.212 @optique/run@0.9.0-dev.212
I'd love feedback before merging! Especially interested in:
- API ergonomics
- Edge cases I might have missed
- TypeScript inference issues
Docs:
Optique 0.9.0 프리릴리스 테스트 중입니다!
이번 주요 기능은 동기/비동기 모드 지원입니다. 이제 비동기 값 파싱과 자동완성을 지원하는 CLI 파서를 만들 수 있습니다. Git 브랜치/태그 목록처럼 셸 명령 실행이 필요한 자동완성에 딱이에요.
컴비네이터를 통해 async 모드가 자동으로 전파되기 때문에, 개발자는 말단 파서에서만 동기/비동기를 결정하면 됩니다.
설치:
npm  add       @optique/core@0.9.0-dev.212 @optique/run@0.9.0-dev.212
deno add --jsr @optique/core@0.9.0-dev.212 @optique/run@0.9.0-dev.212
머지 전에 피드백 주시면 정말 감사하겠습니다! 특히 이런 부분이 궁금해요:
- API 사용성
- 에지 케이스
- TypeScript 타입 추론 문제
문서:
TCP/IP is a social construct
Modern optimizing compilers are truly amazing. Rust / LLVM just broke my brain by turning what I was SURE would be poorly optimized code due to indirection into a tight result with zero perceptible overhead.
Modern CPUs also probably help.
WinGet도 요즈음은 Microsoft Store와 비슷한 정책을 적용하기 시작해서, 자동화된 검사 과정에서 식탁보 새 버전 매니페스트 등록이 막혔었는데, Moderator께서 정확한 판단을 내려주신 덕분에 무사히 새 버전이 게시되었습니다.
안타깝게도 Microsoft Store에는 식탁보를 등록하는 것이 계속 어려울 것으로 보입니다만, 대신 WinGet에 등록이 가능할테니 UniGetUI 등의 수단을 이용해서 커맨드라인 없이 식탁보를 쉽게 설치할 수 있는 방법을 조만간 공식 가이드로 내도록 하겠습니다.
Apple will allow alternative browser engines for iPhone and iPad users (iOS/iPadOS) in Japan.
https://developer.apple.com/support/alternative-browser-engines-jp/
Apple should allow alt engine for the rest of the world too. No point holding it back.
Logging in Node.js (or Deno or Bun or edge functions) in 2026
洪 民憙 (Hong Minhee) @hongminhee@hackers.pub
It's 2 AM. Something is wrong in production. Users are complaining, but you're not sure what's happening—your only clues are a handful of console.log statements you sprinkled around during development. Half of them say things like “here” or “this works.” The other half dump entire objects that scroll off the screen. Good luck.
We've all been there. And yet, setting up “proper” logging often feels like overkill. Traditional logging libraries like winston or Pino come with their own learning curves, configuration formats, and assumptions about how you'll deploy your app. If you're working with edge functions or trying to keep your bundle small, adding a logging library can feel like bringing a sledgehammer to hang a picture frame.
I'm a fan of the “just enough” approach—more than raw console.log, but without the weight of a full-blown logging framework. We'll start from console.log(), understand its real limitations (not the exaggerated ones), and work toward a setup that's actually useful. I'll be using LogTape for the examples—it's a zero-dependency logging library that works across Node.js, Deno, Bun, and edge functions, and stays out of your way when you don't need it.
Starting with console methods—and where they fall short
The console object is JavaScript's great equalizer. It's built-in, it works everywhere, and it requires zero setup. You even get basic severity levels: console.debug(), console.info(), console.warn(), and console.error(). In browser DevTools and some terminal environments, these show up with different colors or icons.
console.debug("Connecting to database...");
console.info("Server started on port 3000");
console.warn("Cache miss for user 123");
console.error("Failed to process payment");
For small scripts or quick debugging, this is perfectly fine. But once your application grows beyond a few files, the cracks start to show:
No filtering without code changes. Want to hide debug messages in production? You'll need to wrap every console.debug() call in a conditional, or find-and-replace them all. There's no way to say “show me only warnings and above” at runtime.
Everything goes to the console. What if you want to write logs to a file? Send errors to Sentry? Stream logs to CloudWatch? You'd have to replace every console.* call with something else—and hope you didn't miss any.
No context about where logs come from. When your app has dozens of modules, a log message like “Connection failed” doesn't tell you much. Was it the database? The cache? A third-party API? You end up prefixing every message manually: console.error("[database] Connection failed").
No structured data. Modern log analysis tools work best with structured data (JSON). But console.log("User logged in", { userId: 123 }) just prints User logged in { userId: 123 } as a string—not very useful for querying later.
Libraries pollute your logs. If you're using a library that logs with console.*, those messages show up whether you want them or not. And if you're writing a library, your users might not appreciate unsolicited log messages.
What you actually need from a logging system
Before diving into code, let's think about what would actually solve the problems above. Not a wish list of features, but the practical stuff that makes a difference when you're debugging at 2 AM or trying to understand why requests are slow.
Log levels with filtering
A logging system should let you categorize messages by severity—trace, debug, info, warning, error, fatal—and then filter them based on what you need. During development, you want to see everything. In production, maybe just warnings and above. The key is being able to change this without touching your code.
Categories
When your app grows beyond a single file, you need to know where logs are coming from. A good logging system lets you tag logs with categories like ["my-app", "database"] or ["my-app", "auth", "oauth"]. Even better, it lets you set different log levels for different categories—maybe you want debug logs from the database module but only warnings from everything else.
Sinks (multiple output destinations)
“Sink” is just a fancy word for “where logs go.” You might want logs to go to the console during development, to files in production, and to an external service like Sentry or CloudWatch for errors. A good logging system lets you configure multiple sinks and route different logs to different destinations.
Structured logging
Instead of logging strings, you log objects with properties. This makes logs machine-readable and queryable:
// Instead of this:
logger.info("User 123 logged in from 192.168.1.1");

// You do this:
logger.info("User logged in", { userId: 123, ip: "192.168.1.1" });
Now you can search for all logs where userId === 123 or filter by IP address.
Context for request tracing
In a web server, you often want all logs from a single request to share a common identifier (like a request ID). This makes it possible to trace a request's journey through your entire system.
Getting started with LogTape
There are plenty of logging libraries out there. winston has been around forever and has a plugin for everything. Pino is fast and outputs JSON. bunyan, log4js, signale—the list goes on.
So why LogTape? A few reasons stood out to me:
Zero dependencies. Not “few dependencies”—actually zero. In an era where a single npm install can pull in hundreds of packages, this matters for security, bundle size, and not having to wonder why your lockfile just changed.
Works everywhere. The same code runs on Node.js, Deno, Bun, browsers, and edge functions like Cloudflare Workers. No polyfills, no conditional imports, no “this feature only works on Node.”
Doesn't force itself on users. If you're writing a library, you can add logging without your users ever knowing—unless they want to see the logs. This is a surprisingly rare feature.
Let's set it up:
npm add @logtape/logtape       # npm
pnpm add @logtape/logtape      # pnpm
yarn add @logtape/logtape      # Yarn
deno add jsr:@logtape/logtape  # Deno
bun add @logtape/logtape       # Bun
Configuration happens once, at your application's entry point:
import { configure, getConsoleSink, getLogger } from "@logtape/logtape";

await configure({
  sinks: {
    console: getConsoleSink(),  // Where logs go
  },
  loggers: [
    { category: ["my-app"], lowestLevel: "debug", sinks: ["console"] },  // What to log
  ],
});

// Now you can log from anywhere in your app:
const logger = getLogger(["my-app", "server"]);
logger.info`Server started on port 3000`;
logger.debug`Request received: ${{ method: "GET", path: "/api/users" }}`;
Notice a few things:
- Configuration is explicit. You decide where logs go (
sinks) and which logs to show (lowestLevel). - Categories are hierarchical. The logger
["my-app", "server"]inherits settings from["my-app"]. - Template literals work. You can use backticks for a natural logging syntax.
Categories and filtering: Controlling log verbosity
Here's a scenario: you're debugging a database issue. You want to see every query, every connection attempt, every retry. But you don't want to wade through thousands of HTTP request logs to find them.
Categories let you solve this. Instead of one global log level, you can set different verbosity for different parts of your application.
await configure({
  sinks: {
    console: getConsoleSink(),
  },
  loggers: [
    { category: ["my-app"], lowestLevel: "info", sinks: ["console"] },  // Default: info and above
    { category: ["my-app", "database"], lowestLevel: "debug", sinks: ["console"] },  // DB module: show debug too
  ],
});
Now when you log from different parts of your app:
// In your database module:
const dbLogger = getLogger(["my-app", "database"]);
dbLogger.debug`Executing query: ${sql}`;  // This shows up

// In your HTTP module:
const httpLogger = getLogger(["my-app", "http"]);
httpLogger.debug`Received request`;  // This is filtered out (below "info")
httpLogger.info`GET /api/users 200`;  // This shows up
Controlling third-party library logs
If you're using libraries that also use LogTape, you can control their logs separately:
await configure({
  sinks: { console: getConsoleSink() },
  loggers: [
    { category: ["my-app"], lowestLevel: "debug", sinks: ["console"] },
    // Only show warnings and above from some-library
    { category: ["some-library"], lowestLevel: "warning", sinks: ["console"] },
  ],
});
The root logger
Sometimes you want a catch-all configuration. The root logger (empty category []) catches everything:
await configure({
  sinks: { console: getConsoleSink() },
  loggers: [
    // Catch all logs at info level
    { category: [], lowestLevel: "info", sinks: ["console"] },
    // But show debug for your app
    { category: ["my-app"], lowestLevel: "debug", sinks: ["console"] },
  ],
});
Log levels and when to use them
LogTape has six log levels. Choosing the right one isn't just about severity—it's about who needs to see the message and when.
| Level | When to use it |
|---|---|
trace |
Very detailed diagnostic info. Loop iterations, function entry/exit. Usually only enabled when hunting a specific bug. |
debug |
Information useful during development. Variable values, state changes, flow control decisions. |
info |
Normal operational messages. “Server started,” “User logged in,” “Job completed.” |
warning |
Something unexpected happened, but the app can continue. Deprecated API usage, retry attempts, missing optional config. |
error |
Something failed. An operation couldn't complete, but the app is still running. |
fatal |
The app is about to crash or is in an unrecoverable state. |
const logger = getLogger(["my-app"]);

logger.trace`Entering processUser function`;
logger.debug`Processing user ${{ userId: 123 }}`;
logger.info`User successfully created`;
logger.warn`Rate limit approaching: ${980}/1000 requests`;
logger.error`Failed to save user: ${error.message}`;
logger.fatal`Database connection lost, shutting down`;
A good rule of thumb: in production, you typically run at info or warning level. During development or when debugging, you drop down to debug or trace.
Structured logging: Beyond plain text
At some point, you'll want to search your logs. “Show me all errors from the payment service in the last hour.” “Find all requests from user 12345.” “What's the average response time for the /api/users endpoint?”
If your logs are plain text strings, these queries are painful. You end up writing regexes, hoping the log format is consistent, and cursing past-you for not thinking ahead.
Structured logging means attaching data to your logs as key-value pairs, not just embedding them in strings. This makes logs machine-readable and queryable.
LogTape supports two syntaxes for this:
Template literals (great for simple messages)
const userId = 123;
const action = "login";
logger.info`User ${userId} performed ${action}`;
Message templates with properties (great for structured data)
logger.info("User performed action", {
  userId: 123,
  action: "login",
  ip: "192.168.1.1",
  timestamp: new Date().toISOString(),
});
You can reference properties in your message using placeholders:
logger.info("User {userId} logged in from {ip}", {
  userId: 123,
  ip: "192.168.1.1",
});
// Output: User 123 logged in from 192.168.1.1
Nested property access
LogTape supports dot notation and array indexing in placeholders:
logger.info("Order {order.id} placed by {order.customer.name}", {
  order: {
    id: "ORD-001",
    customer: { name: "Alice", email: "alice@example.com" },
  },
});

logger.info("First item: {items[0].name}", {
  items: [{ name: "Widget", price: 9.99 }],
});
Machine-readable output with JSON Lines
For production, you often want logs as JSON (one object per line). LogTape has a built-in formatter for this:
import { configure, getConsoleSink, jsonLinesFormatter } from "@logtape/logtape";

await configure({
  sinks: {
    console: getConsoleSink({ formatter: jsonLinesFormatter }),
  },
  loggers: [
    { category: [], lowestLevel: "info", sinks: ["console"] },
  ],
});
Output:
{"@timestamp":"2026-01-15T10:30:00.000Z","level":"INFO","message":"User logged in","logger":"my-app","properties":{"userId":123}}Sending logs to different destinations (sinks)
So far we've been sending everything to the console. That's fine for development, but in production you'll likely want logs to go elsewhere—or to multiple places at once.
Think about it: console output disappears when the process restarts. If your server crashes at 3 AM, you want those logs to be somewhere persistent. And when an error occurs, you might want it to show up in your error tracking service immediately, not just sit in a log file waiting for someone to grep through it.
This is where sinks come in. A sink is just a function that receives log records and does something with them. LogTape comes with several built-in sinks, and creating your own is trivial.
Console sink
The simplest sink—outputs to the console:
import { getConsoleSink } from "@logtape/logtape";

const consoleSink = getConsoleSink();
File sink
For writing logs to files, install the @logtape/file package:
npm add @logtape/fileimport { getFileSink, getRotatingFileSink } from "@logtape/file";
// Simple file sink
const fileSink = getFileSink("app.log");
// Rotating file sink (rotates when file reaches 10MB, keeps 5 old files)
const rotatingFileSink = getRotatingFileSink("app.log", {
maxSize: 10 * 1024 * 1024, // 10MB
maxFiles: 5,
});Why rotating files? Without rotation, your log file grows indefinitely until it fills up the disk. With rotation, old logs are automatically archived and eventually deleted, keeping disk usage under control. This is especially important for long-running servers.
External services
For production systems, you often want logs to go to specialized services that provide search, alerting, and visualization. LogTape has packages for popular services:
// OpenTelemetry (for observability platforms like Jaeger, Honeycomb, Datadog)
import { getOpenTelemetrySink } from "@logtape/otel";

// Sentry (for error tracking with stack traces and context)
import { getSentrySink } from "@logtape/sentry";

// AWS CloudWatch Logs (for AWS-native log aggregation)
import { getCloudWatchLogsSink } from "@logtape/cloudwatch-logs";
The OpenTelemetry sink is particularly useful if you're already using OpenTelemetry for tracing—your logs will automatically correlate with your traces, making debugging distributed systems much easier.
Multiple sinks
Here's where things get interesting. You can send different logs to different destinations based on their level or category:
await configure({
  sinks: {
    console: getConsoleSink(),
    file: getFileSink("app.log"),
    errors: getSentrySink(),
  },
  loggers: [
    { category: [], lowestLevel: "info", sinks: ["console", "file"] },  // Everything to console + file
    { category: [], lowestLevel: "error", sinks: ["errors"] },  // Errors also go to Sentry
  ],
});
Notice that a log record can go to multiple sinks. An error log in this configuration goes to the console, the file, and Sentry. This lets you have comprehensive local logs while also getting immediate alerts for critical issues.
Custom sinks
Sometimes you need to send logs somewhere that doesn't have a pre-built sink. Maybe you have an internal logging service, or you want to send logs to a Slack channel, or store them in a database.
A sink is just a function that takes a LogRecord. That's it:
import type { Sink } from "@logtape/logtape";

const slackSink: Sink = (record) => {
  // Only send errors and fatals to Slack
  if (record.level === "error" || record.level === "fatal") {
    fetch("https://hooks.slack.com/services/YOUR/WEBHOOK/URL", {
      method: "POST",
      headers: { "Content-Type": "application/json" },
      body: JSON.stringify({
        text: `[${record.level.toUpperCase()}] ${record.message.join("")}`,
      }),
    });
  }
};
The simplicity of sink functions means you can integrate LogTape with virtually any logging backend in just a few lines of code.
Request tracing with contexts
Here's a scenario you've probably encountered: a user reports an error, you check the logs, and you find a sea of interleaved messages from dozens of concurrent requests. Which log lines belong to the user's request? Good luck figuring that out.
This is where request tracing comes in. The idea is simple: assign a unique identifier to each request, and include that identifier in every log message produced while handling that request. Now you can filter your logs by request ID and see exactly what happened, in order, for that specific request.
LogTape supports this through contexts—a way to attach properties to log messages without passing them around explicitly.
Explicit context
The simplest approach is to create a logger with attached properties using .with():
function handleRequest(req: Request) {
  const requestId = crypto.randomUUID();
  const logger = getLogger(["my-app", "http"]).with({ requestId });

  logger.info`Request received`;  // Includes requestId automatically
  processRequest(req, logger);
  logger.info`Request completed`;  // Also includes requestId
}
This works well when you're passing the logger around explicitly. But what about code that's deeper in your call stack? What about code in libraries that don't know about your logger instance?
Implicit context
This is where implicit contexts shine. Using withContext(), you can set properties that automatically appear in all log messages within a callback—even in nested function calls, async operations, and third-party libraries (as long as they use LogTape).
First, enable implicit contexts in your configuration:
import { configure, getConsoleSink } from "@logtape/logtape";
import { AsyncLocalStorage } from "node:async_hooks";

await configure({
  sinks: { console: getConsoleSink() },
  loggers: [
    { category: ["my-app"], lowestLevel: "debug", sinks: ["console"] },
  ],
  contextLocalStorage: new AsyncLocalStorage(),
});
Then use withContext() in your request handler:
import { withContext, getLogger } from "@logtape/logtape";

function handleRequest(req: Request) {
  const requestId = crypto.randomUUID();

  return withContext({ requestId }, async () => {
    // Every log message in this callback includes requestId—automatically
    const logger = getLogger(["my-app"]);
    logger.info`Processing request`;

    await validateInput(req);   // Logs here include requestId
    await processBusinessLogic(req);  // Logs here too
    await saveToDatabase(req);  // And here

    logger.info`Request complete`;
  });
}
The magic is that validateInput, processBusinessLogic, and saveToDatabase don't need to know anything about the request ID. They just call getLogger() and log normally, and the request ID appears in their logs automatically. This works even across async boundaries—the context follows the execution flow, not the call stack.
This is incredibly powerful for debugging. When something goes wrong, you can search for the request ID and see every log message from every module that was involved in handling that request.
Framework integrations
Setting up request tracing manually can be tedious. LogTape has dedicated packages for popular frameworks that handle this automatically:
// Express
import { expressLogger } from "@logtape/express";
app.use(expressLogger());

// Fastify
import { getLogTapeFastifyLogger } from "@logtape/fastify";
const app = Fastify({ loggerInstance: getLogTapeFastifyLogger() });

// Hono
import { honoLogger } from "@logtape/hono";
app.use(honoLogger());

// Koa
import { koaLogger } from "@logtape/koa";
app.use(koaLogger());
These middlewares automatically generate request IDs, set up implicit contexts, and log request/response information. You get comprehensive request logging with a single line of code.
Using LogTape in libraries vs applications
If you've ever used a library that spams your console with unwanted log messages, you know how annoying it can be. And if you've ever tried to add logging to your own library, you've faced a dilemma: should you use console.log() and annoy your users? Require them to install and configure a specific logging library? Or just... not log anything?
LogTape solves this with its library-first design. Libraries can add as much logging as they want, and it costs their users nothing unless they explicitly opt in.
If you're writing a library
The rule is simple: use getLogger() to log, but never call configure(). Configuration is the application's responsibility, not the library's.
// my-library/src/database.ts
import { getLogger } from "@logtape/logtape";

const logger = getLogger(["my-library", "database"]);

export function connect(url: string) {
  logger.debug`Connecting to ${url}`;
  // ... connection logic ...
  logger.info`Connected successfully`;
}
What happens when someone uses your library?
If they haven't configured LogTape, nothing happens. The log calls are essentially no-ops—no output, no errors, no performance impact. Your library works exactly as if the logging code wasn't there.
If they have configured LogTape, they get full control. They can see your library's debug logs if they're troubleshooting an issue, or silence them entirely if they're not interested. They decide, not you.
This is fundamentally different from using console.log() in a library. With console.log(), your users have no choice—they see your logs whether they want to or not. With LogTape, you give them the power to decide.
If you're writing an application
You configure LogTape once in your entry point. This single configuration controls logging for your entire application, including any libraries that use LogTape:
await configure({
  sinks: { console: getConsoleSink() },
  loggers: [
    { category: ["my-app"], lowestLevel: "debug", sinks: ["console"] },  // Your app: verbose
    { category: ["my-library"], lowestLevel: "warning", sinks: ["console"] },  // Library: quiet
    { category: ["noisy-library"], lowestLevel: "fatal", sinks: [] },  // That one library: silent
  ],
});
This separation of concerns—libraries log, applications configure—makes for a much healthier ecosystem. Library authors can add detailed logging for debugging without worrying about annoying their users. Application developers can tune logging to their needs without digging through library code.
Migrating from another logger?
If your application already uses winston, Pino, or another logging library, you don't have to migrate everything at once. LogTape provides adapters that route LogTape logs to your existing logging setup:
import { install } from "@logtape/adaptor-winston";
import winston from "winston";

install(winston.createLogger({ /* your existing config */ }));
This is particularly useful when you want to use a library that uses LogTape, but you're not ready to switch your whole application over. The library's logs will flow through your existing winston (or Pino) configuration, and you can migrate gradually if you choose to.
Production considerations
Development and production have different needs. During development, you want verbose logs, pretty formatting, and immediate feedback. In production, you care about performance, reliability, and not leaking sensitive data. Here are some things to keep in mind.
Non-blocking mode
By default, logging is synchronous—when you call logger.info(), the message is written to the sink before the function returns. This is fine for development, but in a high-throughput production environment, the I/O overhead of writing every log message can add up.
Non-blocking mode buffers log messages and writes them in the background:
const consoleSink = getConsoleSink({ nonBlocking: true });
const fileSink = getFileSink("app.log", { nonBlocking: true });
The tradeoff is that logs might be slightly delayed, and if your process crashes, some buffered logs might be lost. But for most production workloads, the performance benefit is worth it.
Sensitive data redaction
Logs have a way of ending up in unexpected places—log aggregation services, debugging sessions, support tickets. If you're logging request data, user information, or API responses, you might accidentally expose sensitive information like passwords, API keys, or personal data.
LogTape's @logtape/redaction package helps you catch these before they become a problem:
import {
  redactByPattern,
  EMAIL_ADDRESS_PATTERN,
  CREDIT_CARD_NUMBER_PATTERN,
  type RedactionPattern,
} from "@logtape/redaction";
import { defaultConsoleFormatter, configure, getConsoleSink } from "@logtape/logtape";

const BEARER_TOKEN_PATTERN: RedactionPattern = {
  pattern: /Bearer [A-Za-z0-9\-._~+\/]+=*/g,
  replacement: "[REDACTED]",
};

const formatter = redactByPattern(defaultConsoleFormatter, [
  EMAIL_ADDRESS_PATTERN,
  CREDIT_CARD_NUMBER_PATTERN,
  BEARER_TOKEN_PATTERN,
]);

await configure({
  sinks: {
    console: getConsoleSink({ formatter }),
  },
  // ...
});
With this configuration, email addresses, credit card numbers, and bearer tokens are automatically replaced with [REDACTED] in your log output. The @logtape/redaction package comes with built-in patterns for common sensitive data types, and you can define custom patterns for anything else. It's not foolproof—you should still be mindful of what you log—but it provides a safety net.
See the redaction documentation for more patterns and field-based redaction.
Edge functions and serverless
Edge functions (Cloudflare Workers, Vercel Edge Functions, etc.) have a unique constraint: they can be terminated immediately after returning a response. If you have buffered logs that haven't been flushed yet, they'll be lost.
The solution is to explicitly flush logs before returning:
import { configure, dispose } from "@logtape/logtape";

export default {
  async fetch(request, env, ctx) {
    await configure({ /* ... */ });

    // ... handle request ...

    ctx.waitUntil(dispose());  // Flush logs before worker terminates

    return new Response("OK");
  },
};
The dispose() function flushes all buffered logs and cleans up resources. By passing it to ctx.waitUntil(), you ensure the worker stays alive long enough to finish writing logs, even after the response has been sent.
Wrapping up
Logging isn't glamorous, but it's one of those things that makes a huge difference when something goes wrong. The setup I've described here—categories for organization, structured data for queryability, contexts for request tracing—isn't complicated, but it's a significant step up from scattered console.log statements.
LogTape isn't the only way to achieve this, but I've found it hits a nice sweet spot: powerful enough for production use, simple enough that you're not fighting the framework, and light enough that you don't feel guilty adding it to a library.
If you want to dig deeper, the LogTape documentation covers advanced topics like custom filters, the “fingers crossed” pattern for buffering debug logs until an error occurs, and more sink options. The GitHub repository is also a good place to report issues or see what's coming next.
Now go add some proper logging to that side project you've been meaning to clean up. Your future 2 AM self will thank you.
대한수학회 수학달력 2026년을 하루에 하나씩 짧게 설명해보는 타래

![]() 洪 民憙 (Hong Minhee) replied to the below article:
洪 民憙 (Hong Minhee) replied to the below article:
Hello, 2026!
neo @neo@hackers.pub
新年首推,自制编程语言。
def look_up(name, expr)
  if distance = @locals[expr]
    @environ.get_at(distance, name)
  else
    @globals[name]
  end
end

def truthy?(object)
  return false if object.nil?
  return false if object.is_a?(FalseClass)
  true
end

def interpret(statements)
@neo 是在用 Ruby 實作新的程式語言嗎?我以前也曾用 Ruby 寫過一個簡單的 Lisp 直譯器,過程真的很有趣。祝您新年快樂!
"Crafting Interpreters" 真的想教会我写自己的编程语言。
![]() 洪 民憙 (Hong Minhee) shared the below article:
洪 民憙 (Hong Minhee) shared the below article:
Hello, 2026!
neo @neo@hackers.pub
新年首推,自制编程语言。
def look_up(name, expr)
  if distance = @locals[expr]
    @environ.get_at(distance, name)
  else
    @globals[name]
  end
end

def truthy?(object)
  return false if object.nil?
  return false if object.is_a?(FalseClass)
  true
end

def interpret(statements)
![]() 洪 民憙 (Hong Minhee) shared the below article:
洪 民憙 (Hong Minhee) shared the below article:
`X-Frame-Options` 의 악몽에서 깨어나세요, 프록시 서버 개발기
소피아 @async3619@hackers.pub
X-Frame-Options 의 악몽에서 깨어나세요, 프록시 서버 개발기
X-Frame-Options? 그게 뭔가요?
우리가 아는 몇몇 대형 웹 서비스들(유튜브 등)은 보통의 경우 다른 웹 사이트에서 iframe 요소를 통해 임베딩 되는 것을 거부하지 않습니다. 다만, 몇몇 웹 서비스는 다른 웹 페이지에서 iframe 요소를 통해 표시되길 거부합니다. 제품 정책 및 보안상의 이유로 표시를 거부하는 목적이 있겠습니다.
이러한 니즈를 충족시킬 수 있는 HTTP 헤더가 X-Frame-Options 입니다. 이 헤더의 값을 SAMEORIGIN 내지는 DENY로 설정하면, 직관적인 값에 따라 알맞게 프레임 내 임베딩 가능 여부를 결정할 수 있습니다.

위 이미지에서 볼 수 있듯, 네이버는 X-Frame-Options 헤더를 명시함으로써 그 어떠한 출처에서도 프레임 내에 임베딩 되는 것을 거부한 상황입니다. #
왜 이걸 우회하나요?

웹 페이지 내에 다른 웹 페이지가 임베딩 되어 '미리보기' 처럼 제공되는 경험을 보신 적이 있으신가요? Omakase AI는 자사 프로덕트의 데모를 위와 같이 제공하고 있습니다. 캡쳐하여 실시간으로 전송되는 영상의 화면 위에, 자사 컨텐츠를 올려두어 실제 적용 시에 어떤 네러티브를 제공할지 데모 형식으로 보여줍니다.
문제는 이 모든 경험이 영상을 통해 진행 된다는 점 입니다. 영상 전송은 필연적으로 지연 시간이 존재할 수 밖에 없습니다. 여러분이 스크롤을 내리고, 클릭을 하는 등의 작은 인터렉션 하나가, 큰 지연 시간 뒤에 처리가 된다고 하면 유저는 답답하고 매끄럽지 않음을 느낄 것이고 이는 곧 이탈로 이어질 가능성이 있습니다. (구글은 비슷한 맥락에서 Core Web Vitals로써 INP를 설명하고 있습니다)
따라서 저는 영상을 보내는 나이브한 방법 이외의 유저의 브라우저에서 외부 웹 서비스를 표시할 좋은 방법을 찾아야 했고, 그것이 바로 프레임 내지는 iframe을 사용하는 방법 이었습니다. 이런 맥락에서 X-Frame-Options를 우회할 필요가 생긴 것 입니다.
어떻게 했나요?
중간자의 필요성

우리는 정상적인 방법으로는 제 3자 출처의 요청을 가로채어 응답 데이터 및 헤더를 조작할 수 없음을 잘 알고 있습니다. 여기서 필요한게 중간자 (Man in the Middle) 입니다. 누군가를 클라이언트 - 원격지 서버 사이에 두어, 서로에게 오가는 요청과 응답을 수정하는 작업을 수행하도록 하는 것 입니다. 그렇게 하면, 둘은 각자 수신한 요청과 응답이 모두 원본인지, 수정한 것인지 알 수 있는 방법은 거의 없을 것 입니다.[1]

이 중간자 역할을 하는 프록시 서버를 중간에 두어 요청을 모두 프록시 서버를 거치도록 하는 방법을 이용하는 것 입니다. 간단하게는 X-Frame-Options 응답 헤더의 제거가 있을 것 입니다. 중간자가 X-Frame-Options 헤더를 제거함으로 응답을 수신하는 클라이언트 브라우저의 iframe 요소는 큰 문제 없이 내용을 표시할 수 있게 됩니다.
여기서 끝이 아니다. URL을 조작하기
처음에는 그저 GET Query Parameter로 프록시 서버에게 어떤 원격 URL을 프록시 할 것인지 명시하도록 구현 했습니다. 예를 들면 다음과 같은 형식이 될 수 있겠습니다:
https://example.com/proxy?target=https://www.naver.com/...보통의 경우에는 별 문제 없이 동작 했습니다만, 재앙은 그다지 먼 곳에 있지 않았습니다. 만약 다음과 같은 코드가 원격지 웹 서비스 코드에 있다고 해봅시다. 아래 코드는 무신사 웹 페이지의 빌드된 소스코드 입니다:
import {E as k0} from "./vendor/react-error-boundary.js";
import {b as o0, d as Wt} from "./vendor/react-router.js";
import {d as F0} from "./vendor/dayjs.js";
import {L as Qt} from "./vendor/lottie.js";
import "./vendor/scheduler.js";
import "./vendor/prop-types.js";
import "./vendor/react-fast-compare.js";
import "./vendor/invariant.js";
import "./vendor/shallowequal.js";
import "./vendor/@remix-run.js";
import "./vendor/tslib.js";
import "./vendor/@emotion.js";
import "./vendor/stylis.js";
import "./vendor/framer-motion.js";
import "./vendor/motion-utils.js";
import "./vendor/motion-dom.js";
무신사는 내부적으로 ESM을 사용해서, import 구문을 통해 필요한 에셋을 불러오는 코드를 사용중에 있습니다. 문제는 여기서 발생합니다. import 의 대상이 되는 소스코드가 상대 경로를 따르게 되어 아래와 같은 결과를 초래하게 됩니다.
https://example.com/proxy?target=https://www.naver.com/...

위와 같은 URL을 표시하고 있는 `iframe` 요소에서,
`import "./vendor/framer-motion.js"` 구문을 만난다면..

https://example.com/proxy/vendor/framer-motion.js 를 요청하게 됨.
이를 해결하기 위해, 프록시 된 대상 URL에 대한 개념의 도입이 필요 했습니다. 상대 경로 진입에도 안정적으로 작동할 수 있는 새로운 방식의 접근이 필요 했습니다. 저는
- 상대 경로 접근에도 안전하며,
- 원본 URL의 구조를 그대로 남길 수 있는 구조
를 생각해 냈어야 했고, 그 결과는 이렇습니다. https://section.blog.naver.com/BlogHome.naver?directoryNo=0¤tPage=1&groupId=0 를 예시로 들면, 프록시화 (Proxified) 된 URL은 다음과 같은 것 입니다.
https://example.com/proxy/section/blog/naver/com/_/BlogHome.naver?...URL hostname의 . 구분자를 /로 치환하고, 이후의 모든 pathname, search 등은 모두 _ 구분자 뒤로 넘김으로서 URL의 원형을 유지할 수 있게 됩니다. 추가적으로 상대 경로 접근에도 안전한 URL을 만들 수 있습니다.
최종 보스가 남아있다. HTML API 후킹하기
우리는 상대 경로 문제를 해결하기 위해 URL을 프록시화 하는 방법을 사용했고, 이는 제대로 동작하는 듯 해보였습니다. 악몽은 React, Vue 등의 SPA 웹 앱을 프록시하여 표시하는 데에서 시작 되었습니다.
React, Vue 와 같은 프레임워크들은 History API 및 window.location 객체를 기반으로 한 Routing 기능을 제공하고 있습니다.[2] 이 말은, 결국엔 어떤 프레임워크가 되었든 저수준 빌트인 자바스크립트 API를 사용할 수 밖에 없다는 것을 의미 합니다. 그렇다면 직관적으로 생각 해봤을 때,
window(및globalThis) 객체의location속성의 값을 변경해주면 되지 않겠나?
라고 생각할 수 있습니다. 그러나 이는 불가능 합니다.

어떠한 이유 때문인지는 알 길이 없었지만, 자바스크립트는 그렇게 만만한 존재가 아니었습니다. 다른 좋은 방법을 찾아야 할 필요가 있었고, 결론에 도달하는 데에는 오랜 시간이 걸리지 않았습니다. 그것은 바로 원격지 웹 페이지에서 실행되는 모든 스크립트의 window.location 객체 접근을 감시하면 어떨지에 대한 아이디어 였습니다.
번들된 소스코드의 경우 대체적으로 다음과 같은 형식을 가지게 됩니다:
const l = window.location;
/* ... */ l.pathname /* ... */
여기서 우리는 변수 l이 window.location의 별칭인지 소스코드만 분석해서는 알기 매우 어렵습니다. 따라서, babel을 사용해서 소스코드를 AST로 분석하고, 모든 프로퍼티 접근을 특정 함수 호출로 변환하면, '특정 함수'에서 모든 것을 처리할 수 있으니 좋을 것 같다는 생각이 있었고, 실행에 옮겼습니다:
const l = window.location;
l.pathname;

// 위 코드는 아래와 같이 변환됨

const l = __internal_get__(window, 'location');
__internal_get__(l, 'pathname');
__internal_get__ 함수 내부에서 첫번째 인자가 window.location 과 동일한 인스턴스를 가지고 있는지 비교하거나, 두번째 인자인 프로퍼티 키를 비교해서 href 등의 값이라면, 원하는 값을 반환하도록 후킹 함수를 만들 수 있겠습니다.
function __internal_get__(owner, propertyKey) {
  if (owner === window.location) {
    return {
      get href() { /* proxified 된 url을 기반으로 Router를 속이는 URL을 반환하는 로직 */ }
    }
  }

  // ...
}
마치며
글에 열거한 내용 이외에도 정말 많은 기술이 사용 되었는데, 아주 재밌는 경험 이었습니다. 혹여나 이러한 비슷한 기능을 하는 기능을 개발할 일이 있으시다면, 도움이 됐으면 좋겠습니다.
여기서 거의 라는 표현을 사용한 이유는, 제 짧은 식견에서 보자면 비슷한 맥락에서 사용하는 기법으로
integrity속성이 있을 수 있겠습니다. ↩︎예를 들면,
location.pathname을 읽어 현재 Route가 어떤 Route인지 감지하는 등의 동작이 있겠음. ↩︎
Sending emails in Node.js, Deno, and Bun in 2026: a practical guide
洪 民憙 (Hong Minhee) @hongminhee@hackers.pub
So you need to send emails from your JavaScript application. Email remains one of the most essential features in web apps—welcome emails, password resets, notifications—but the ecosystem is fragmented. Nodemailer doesn't work on edge functions. Each provider has its own SDK. And if you're using Deno or Bun, good luck finding libraries that actually work.
This guide covers how to send emails across modern JavaScript runtimes using Upyo, a cross-runtime email library.
Disclosure
I'm the author of Upyo. This guide focuses on Upyo because I built it to solve problems I kept running into, but you should know that going in. If you're looking for alternatives: Nodemailer is the established choice for Node.js (though it doesn't work on Deno/Bun/edge), and most email providers offer their own official SDKs.
TL;DR for the impatient
If you just want working code, here's the quickest path to sending an email:
import { createMessage } from "@upyo/core";
import { SmtpTransport } from "@upyo/smtp";

const transport = new SmtpTransport({
  host: "smtp.gmail.com",
  port: 465,
  secure: true,
  auth: {
    user: "your-email@gmail.com",
    pass: "your-app-password", // Not your regular password!
  },
});

const message = createMessage({
  from: "your-email@gmail.com",
  to: "recipient@example.com",
  subject: "Hello from my app!",
  content: { text: "This is my first email." },
});

const receipt = await transport.send(message);
if (receipt.successful) {
  console.log("Sent:", receipt.messageId);
} else {
  console.log("Failed:", receipt.errorMessages);
}
Install with:
npm add @upyo/core @upyo/smtpThat's it. This exact code works on Node.js, Deno, and Bun. But if you want to understand what's happening and explore more powerful options, read on.
Why Upyo?
- Cross-runtime: Works on Node.js, Deno, Bun, and edge functions with the same API
- Zero dependencies: Keeps your bundle small
- Provider independence: Switch between SMTP, Mailgun, Resend, SendGrid, or Amazon SES without changing your application code
- Type-safe: Full TypeScript support with discriminated unions for error handling
- Built for testing: Includes a mock transport for unit tests
Part 1: Getting started with Gmail SMTP
Let's start with the most accessible option: Gmail's SMTP server. It's free, requires no additional accounts, and works great for development and low-volume production use.
Step 1: Generate a Gmail app password
Gmail doesn't allow you to use your regular password for SMTP. You need to create an app-specific password:
- Go to your Google Account
- Navigate to Security → 2-Step Verification (enable it if you haven't)
- At the bottom, click App passwords
- Select Mail and your device, then click Generate
- Copy the 16-character password
Step 2: Install dependencies
Choose your runtime and package manager:
Node.js
npm add @upyo/core @upyo/smtp
# or: pnpm add @upyo/core @upyo/smtp
# or: yarn add @upyo/core @upyo/smtp
Deno
deno add jsr:@upyo/core jsr:@upyo/smtpBun
bun add @upyo/core @upyo/smtpThe same code works across all three runtimes—that's the beauty of Upyo.
Step 3: Send your first email
import { createMessage } from "@upyo/core";
import { SmtpTransport } from "@upyo/smtp";

// Create the transport (reuse this for multiple emails)
const transport = new SmtpTransport({
  host: "smtp.gmail.com",
  port: 465,
  secure: true,
  auth: {
    user: "your-email@gmail.com",
    pass: "abcd efgh ijkl mnop", // Your app password
  },
});

// Create and send a message
const message = createMessage({
  from: "your-email@gmail.com",
  to: "recipient@example.com",
  subject: "Welcome to my app!",
  content: {
    text: "Thanks for signing up. We're excited to have you!",
    html: "<h1>Welcome!</h1><p>Thanks for signing up. We're excited to have you!</p>",
  },
});

const receipt = await transport.send(message);

if (receipt.successful) {
  console.log("Email sent successfully! Message ID:", receipt.messageId);
} else {
  console.error("Failed to send email:", receipt.errorMessages.join(", "));
}

// Don't forget to close connections when done
await transport.closeAllConnections();
Let me highlight a few important details:
secure: truewith port 465: This establishes a TLS-encrypted connection from the start. Gmail requires encryption, so this combination is essential.- Separate
textandhtmlcontent: Always provide both. Some email clients don't render HTML, and spam filters look more favorably on emails with plain text alternatives. - The
receiptpattern: Upyo uses discriminated unions for type-safe error handling. Whenreceipt.successfulistrue, you getmessageId. When it'sfalse, you geterrorMessages. This makes it impossible to forget error handling. - Closing connections: SMTP maintains persistent TCP connections. Always close them when you're done, or use
await using(shown next) to handle this automatically.
Pro tip: automatic resource cleanup with await using
Managing resources manually is error-prone—what if an exception occurs before closeAllConnections() is called? Modern JavaScript (ES2024) solves this with explicit resource management.
import { createMessage } from "@upyo/core";
import { SmtpTransport } from "@upyo/smtp";

// Transport is automatically disposed when it goes out of scope
await using transport = new SmtpTransport({
  host: "smtp.gmail.com",
  port: 465,
  secure: true,
  auth: {
    user: "your-email@gmail.com",
    pass: "your-app-password",
  },
});

const message = createMessage({
  from: "your-email@gmail.com",
  to: "recipient@example.com",
  subject: "Hello!",
  content: { text: "This email was sent with automatic cleanup!" },
});

await transport.send(message);
// No need to call `closeAllConnections()` - it happens automatically!
The await using keyword tells JavaScript to call the transport's cleanup method when execution leaves this scope—even if an error is thrown. This pattern is similar to Python's with statement or C#'s using block. It's supported in Node.js 22+, Deno, and Bun.
What if your environment doesn't support await using?
For older Node.js versions or environments without ES2024 support, use try/finally to ensure cleanup:
const transport = new SmtpTransport({
  host: "smtp.gmail.com",
  port: 465,
  secure: true,
  auth: { user: "your-email@gmail.com", pass: "your-app-password" },
});

try {
  await transport.send(message);
} finally {
  await transport.closeAllConnections();
}
This achieves the same result—cleanup happens whether the send succeeds or throws an error.
Part 2: Adding attachments and rich content
Real-world emails often need more than plain text.
HTML emails with inline images
Inline images appear directly in the email body rather than as downloadable attachments. The trick is to reference them using a Content-ID (CID) URL scheme.
import { createMessage } from "@upyo/core";
import { SmtpTransport } from "@upyo/smtp";
import { readFile } from "node:fs/promises";

await using transport = new SmtpTransport({
  host: "smtp.gmail.com",
  port: 465,
  secure: true,
  auth: { user: "your-email@gmail.com", pass: "your-app-password" },
});

// Read your logo file
const logoContent = await readFile("./assets/logo.png");

const message = createMessage({
  from: "your-email@gmail.com",
  to: "customer@example.com",
  subject: "Your order confirmation",
  content: {
    html: `
      <div style="font-family: sans-serif; max-width: 600px; margin: 0 auto;">
        <img src="cid:company-logo" alt="Company Logo" style="width: 150px;">
        <h1>Order Confirmed!</h1>
        <p>Thank you for your purchase. Your order #12345 has been confirmed.</p>
      </div>
    `,
    text: "Order Confirmed! Thank you for your purchase. Your order #12345 has been confirmed.",
  },
  attachments: [
    {
      filename: "logo.png",
      content: logoContent,
      contentType: "image/png",
      contentId: "company-logo", // Referenced as cid:company-logo in HTML
      inline: true,
    },
  ],
});

await transport.send(message);
Key points about inline images:
contentId: This is the identifier you use in the HTML'ssrc="cid:..."attribute. It can be any unique string.inline: true: This tells the email client to display the image within the message body, not as a separate attachment.- Always include
alttext: Some email clients block images by default, so the alt text ensures your message is still understandable.
File attachments
For regular attachments that recipients can download, use the standard File API. This approach works across all JavaScript runtimes.
import { createMessage } from "@upyo/core";
import { SmtpTransport } from "@upyo/smtp";
import { readFile } from "node:fs/promises";

await using transport = new SmtpTransport({
  host: "smtp.gmail.com",
  port: 465,
  secure: true,
  auth: { user: "your-email@gmail.com", pass: "your-app-password" },
});

// Read files to attach
const invoicePdf = await readFile("./invoices/invoice-2024-001.pdf");
const reportXlsx = await readFile("./reports/monthly-report.xlsx");

const message = createMessage({
  from: "billing@yourcompany.com",
  to: "client@example.com",
  cc: "accounting@yourcompany.com",
  subject: "Invoice #2024-001",
  content: {
    text: "Please find your invoice and monthly report attached.",
  },
  attachments: [
    new File([invoicePdf], "invoice-2024-001.pdf", { type: "application/pdf" }),
    new File([reportXlsx], "monthly-report.xlsx", {
      type: "application/vnd.openxmlformats-officedocument.spreadsheetml.sheet",
    }),
  ],
  priority: "high", // Sets email priority headers
});

await transport.send(message);
A few notes on attachments:
- MIME types matter: Setting the correct
typehelps email clients display the right icon and open the file with the appropriate application. priority: "high": This sets theX-Priorityheader, which some email clients use to highlight important messages. Use it sparingly—overuse can trigger spam filters.
Multiple recipients with different roles
Email supports several recipient types, each with different visibility rules:
import { createMessage } from "@upyo/core";

const message = createMessage({
  from: { name: "Support Team", address: "support@yourcompany.com" },
  to: [
    "primary-recipient@example.com",
    { name: "John Smith", address: "john@example.com" },
  ],
  cc: "manager@yourcompany.com",
  bcc: ["archive@yourcompany.com", "compliance@yourcompany.com"],
  replyTo: "no-reply@yourcompany.com",
  subject: "Your support ticket has been updated",
  content: { text: "We've responded to your ticket #5678." },
});
Understanding recipient types:
to: Primary recipients. Everyone can see who else is in this field.cc(Carbon Copy): Secondary recipients. Visible to all recipients—use for people who should be informed but aren't the primary audience.bcc(Blind Carbon Copy): Hidden recipients. No one can see BCC addresses—useful for archiving or compliance without revealing internal processes.replyTo: Where replies should go. Useful when sending from a no-reply address but wanting responses to reach a real inbox.
You can specify addresses as simple strings ("email@example.com") or as objects with name and address properties for display names.
Part 3: Moving to production with email service providers
Gmail SMTP is great for getting started, but for production applications, you'll want a dedicated email service provider. Here's why:
- Higher sending limits: Gmail caps you at ~500 emails/day for personal accounts
- Better deliverability: Dedicated services maintain sender reputation and handle bounces properly
- Analytics and tracking: See who opened your emails, clicked links, etc.
- Webhook notifications: Get real-time callbacks for delivery events
- No dependency on personal accounts: Production systems shouldn't rely on someone's Gmail
The best part? With Upyo, switching providers requires minimal code changes—just swap the transport.
Option A: Resend (modern and developer-friendly)
Resend is a newer email service with an excellent developer experience.
npm add @upyo/resendimport { createMessage } from "@upyo/core";
import { ResendTransport } from "@upyo/resend";
const transport = new ResendTransport({
apiKey: process.env.RESEND_API_KEY!,
});
const message = createMessage({
from: "hello@yourdomain.com", // Must be verified in Resend
to: "user@example.com",
subject: "Welcome aboard!",
content: {
text: "Thanks for joining us!",
html: "<h1>Welcome!</h1><p>Thanks for joining us!</p>",
},
tags: ["onboarding", "welcome"], // For analytics
});
const receipt = await transport.send(message);
if (receipt.successful) {
console.log("Sent via Resend:", receipt.messageId);
}Notice how similar this looks to the SMTP example? The only differences are the import and the transport configuration. Your message creation and sending logic stays exactly the same—that's Upyo's transport abstraction at work.
Option B: SendGrid (enterprise-grade)
SendGrid is a popular choice for high-volume senders, offering advanced analytics, template management, and a generous free tier.
SendGrid is a popular choice for high-volume senders.
npm add @upyo/sendgridimport { createMessage } from "@upyo/core";
import { SendGridTransport } from "@upyo/sendgrid";
const transport = new SendGridTransport({
apiKey: process.env.SENDGRID_API_KEY!,
clickTracking: true,
openTracking: true,
});
const message = createMessage({
from: "notifications@yourdomain.com",
to: "user@example.com",
subject: "Your weekly digest",
content: {
html: "<h1>This Week's Highlights</h1><p>Here's what you missed...</p>",
text: "This Week's Highlights\n\nHere's what you missed...",
},
tags: ["digest", "weekly"],
});
await transport.send(message);Option C: Mailgun (reliable workhorse)
Mailgun offers robust infrastructure with strong EU support—important if you need GDPR-compliant data residency.
npm add @upyo/mailgunimport { createMessage } from "@upyo/core";
import { MailgunTransport } from "@upyo/mailgun";
const transport = new MailgunTransport({
apiKey: process.env.MAILGUN_API_KEY!,
domain: "mg.yourdomain.com",
region: "eu", // or "us"
});
const message = createMessage({
from: "team@yourdomain.com",
to: "user@example.com",
subject: "Important update",
content: { text: "We have some news to share..." },
});
await transport.send(message);Option D: Amazon SES (cost-effective at scale)
Amazon SES is incredibly affordable—about $0.10 per 1,000 emails. If you're already in the AWS ecosystem, it integrates seamlessly with IAM, CloudWatch, and other services.
npm add @upyo/sesimport { createMessage } from "@upyo/core";
import { SesTransport } from "@upyo/ses";
const transport = new SesTransport({
authentication: {
type: "credentials",
accessKeyId: process.env.AWS_ACCESS_KEY_ID!,
secretAccessKey: process.env.AWS_SECRET_ACCESS_KEY!,
},
region: "us-east-1",
configurationSetName: "my-config-set", // Optional: for tracking
});
const message = createMessage({
from: "alerts@yourdomain.com",
to: "admin@example.com",
subject: "System alert",
content: { text: "CPU usage exceeded 90%" },
priority: "high",
});
await transport.send(message);Part 4: Sending emails from edge functions
Here's where many email solutions fall short. Edge functions (Cloudflare Workers, Vercel Edge, Deno Deploy) run in a restricted environment—they can't open raw TCP connections, which means SMTP is not an option.
You must use an HTTP-based transport like Resend, SendGrid, Mailgun, or Amazon SES. The good news? Your code barely changes.
Cloudflare Workers example
// src/index.ts
import { createMessage } from "@upyo/core";
import { ResendTransport } from "@upyo/resend";

export default {
  async fetch(request: Request, env: Env): Promise<Response> {
    const transport = new ResendTransport({
      apiKey: env.RESEND_API_KEY,
    });

    const message = createMessage({
      from: "noreply@yourdomain.com",
      to: "user@example.com",
      subject: "Request received",
      content: { text: "We got your request and are processing it." },
    });

    const receipt = await transport.send(message);

    if (receipt.successful) {
      return new Response(`Email sent: ${receipt.messageId}`);
    } else {
      return new Response(`Failed: ${receipt.errorMessages.join(", ")}`, {
        status: 500,
      });
    }
  },
};

interface Env {
  RESEND_API_KEY: string;
}
Vercel Edge Functions example
// app/api/send-email/route.ts
import { createMessage } from "@upyo/core";
import { SendGridTransport } from "@upyo/sendgrid";

export const runtime = "edge";

export async function POST(request: Request) {
  const { to, subject, body } = await request.json();

  const transport = new SendGridTransport({
    apiKey: process.env.SENDGRID_API_KEY!,
  });

  const message = createMessage({
    from: "app@yourdomain.com",
    to,
    subject,
    content: { text: body },
  });

  const receipt = await transport.send(message);

  if (receipt.successful) {
    return Response.json({ success: true, messageId: receipt.messageId });
  } else {
    return Response.json(
      { success: false, errors: receipt.errorMessages },
      { status: 500 }
    );
  }
}
Deno Deploy example
// main.ts
import { createMessage } from "jsr:@upyo/core";
import { MailgunTransport } from "jsr:@upyo/mailgun";

Deno.serve(async (request: Request) => {
  if (request.method !== "POST") {
    return new Response("Method not allowed", { status: 405 });
  }

  const { to, subject, body } = await request.json();

  const transport = new MailgunTransport({
    apiKey: Deno.env.get("MAILGUN_API_KEY")!,
    domain: Deno.env.get("MAILGUN_DOMAIN")!,
    region: "us",
  });

  const message = createMessage({
    from: "noreply@yourdomain.com",
    to,
    subject,
    content: { text: body },
  });

  const receipt = await transport.send(message);

  if (receipt.successful) {
    return Response.json({ success: true, messageId: receipt.messageId });
  } else {
    return Response.json(
      { success: false, errors: receipt.errorMessages },
      { status: 500 }
    );
  }
});
Part 5: Improving deliverability with DKIM
Ever wonder why some emails land in spam while others don't? Email authentication plays a huge role. DKIM (DomainKeys Identified Mail) is one of the key mechanisms—it lets you digitally sign your emails so recipients can verify they actually came from your domain and weren't tampered with in transit.
Without DKIM:
- Your emails are more likely to be flagged as spam
- Recipients have no way to verify you're really who you claim to be
- Sophisticated phishing attacks can impersonate your domain
Setting up DKIM with Upyo
First, generate a DKIM key pair. You can use OpenSSL:
# Generate a 2048-bit RSA private key
openssl genrsa -out dkim-private.pem 2048

# Extract the public key
openssl rsa -in dkim-private.pem -pubout -out dkim-public.pem
Then configure your SMTP transport:
import { createMessage } from "@upyo/core";
import { SmtpTransport } from "@upyo/smtp";
import { readFileSync } from "node:fs";

const transport = new SmtpTransport({
  host: "smtp.example.com",
  port: 587,
  secure: false,
  auth: {
    user: "user@yourdomain.com",
    pass: "password",
  },
  dkim: {
    signatures: [
      {
        signingDomain: "yourdomain.com",
        selector: "mail", // Creates DNS record at mail._domainkey.yourdomain.com
        privateKey: readFileSync("./dkim-private.pem", "utf8"),
        algorithm: "rsa-sha256", // or "ed25519-sha256" for shorter keys
      },
    ],
  },
});
The key configuration options:
signingDomain: Must match your email's "From" domainselector: An arbitrary name that becomes part of your DNS record (e.g.,mailcreates a record atmail._domainkey.yourdomain.com)algorithm: RSA-SHA256 is widely supported; Ed25519-SHA256 offers shorter keys (see below)
Adding the DNS record
Add a TXT record to your domain's DNS:
- Name:
mail._domainkey(ormail._domainkey.yourdomain.comdepending on your DNS provider) - Value:
v=DKIM1; k=rsa; p=YOUR_PUBLIC_KEY_HERE
Extract the public key value (remove headers, footers, and newlines from the .pem file):
cat dkim-public.pem | grep -v "^-" | tr -d '\n'Using Ed25519 for shorter keys
RSA-2048 keys are long—about 400 characters for the public key. This can be problematic because DNS TXT records have size limits, and some DNS providers struggle with long records.
Ed25519 provides equivalent security with much shorter keys (around 44 characters). If your email infrastructure supports it, Ed25519 is the modern choice.
# Generate Ed25519 key pair
openssl genpkey -algorithm ed25519 -out dkim-ed25519-private.pem
openssl pkey -in dkim-ed25519-private.pem -pubout -out dkim-ed25519-public.pem
const transport = new SmtpTransport({
// ... other config
dkim: {
signatures: [
{
signingDomain: "yourdomain.com",
selector: "mail2025",
privateKey: readFileSync("./dkim-ed25519-private.pem", "utf8"),
algorithm: "ed25519-sha256",
},
],
},
});Part 6: Bulk email sending
When you need to send emails to many recipients—newsletters, notifications, marketing campaigns—you have two approaches:
The wrong way: looping with send()
// ❌ Don't do this for bulk sending
for (const subscriber of subscribers) {
  await transport.send(createMessage({
    from: "newsletter@example.com",
    to: subscriber.email,
    subject: "Weekly update",
    content: { text: "..." },
  }));
}
This works, but it's inefficient:
- Each
send()call waits for the previous one to complete - No automatic batching or optimization
- Harder to track overall progress
The right way: using sendMany()
The sendMany() method is designed for bulk operations:
import { createMessage } from "@upyo/core";
import { ResendTransport } from "@upyo/resend";

const transport = new ResendTransport({
  apiKey: process.env.RESEND_API_KEY!,
});

const subscribers = [
  { email: "alice@example.com", name: "Alice" },
  { email: "bob@example.com", name: "Bob" },
  { email: "charlie@example.com", name: "Charlie" },
  // ... potentially thousands more
];

// Create personalized messages
const messages = subscribers.map((subscriber) =>
  createMessage({
    from: "newsletter@yourdomain.com",
    to: subscriber.email,
    subject: "Your weekly digest",
    content: {
      html: `<h1>Hi ${subscriber.name}!</h1><p>Here's what's new this week...</p>`,
      text: `Hi ${subscriber.name}!\n\nHere's what's new this week...`,
    },
    tags: ["newsletter", "weekly"],
  })
);

// Send all messages efficiently
let successCount = 0;
let failureCount = 0;

for await (const receipt of transport.sendMany(messages)) {
  if (receipt.successful) {
    successCount++;
  } else {
    failureCount++;
    console.error("Failed:", receipt.errorMessages.join(", "));
  }
}

console.log(`Sent: ${successCount}, Failed: ${failureCount}`);
Why sendMany() is better:
- Automatic batching: Some transports (like Resend) combine multiple messages into a single API call
- Connection reuse: SMTP transport reuses connections from the pool
- Streaming results: You get receipts as they complete, not all at once
- Resilient: One failure doesn't stop the rest
Progress tracking for large batches
const totalMessages = messages.length;
let processed = 0;

for await (const receipt of transport.sendMany(messages)) {
  processed++;

  if (processed % 100 === 0) {
    console.log(`Progress: ${processed}/${totalMessages} (${Math.round((processed / totalMessages) * 100)}%)`);
  }

  if (!receipt.successful) {
    console.error(`Message ${processed} failed:`, receipt.errorMessages);
  }
}

console.log("Batch complete!");
When to use send() vs sendMany()
| Scenario | Use |
|---|---|
| Single transactional email (welcome, password reset) | send() |
| A few emails (under 10) | send() in a loop is fine |
| Newsletters, bulk notifications | sendMany() |
| Batch processing from a queue | sendMany() |
Part 7: Testing without sending real emails
Upyo includes a MockTransport for testing:
- No external dependencies: Tests run offline, in CI, anywhere
- Deterministic: No flaky tests due to network issues
- Fast: No HTTP requests or SMTP handshakes
- Inspectable: You can verify exactly what would have been sent
Basic testing setup
import { createMessage } from "@upyo/core";
import { MockTransport } from "@upyo/mock";
import assert from "node:assert";
import { describe, it, beforeEach } from "node:test";

describe("Email functionality", () => {
  let transport: MockTransport;

  beforeEach(() => {
    transport = new MockTransport();
  });

  it("should send welcome email after registration", async () => {
    // Your application code would call this
    const message = createMessage({
      from: "welcome@yourapp.com",
      to: "newuser@example.com",
      subject: "Welcome to our app!",
      content: { text: "Thanks for signing up!" },
    });

    const receipt = await transport.send(message);

    // Assertions
    assert.strictEqual(receipt.successful, true);
    assert.strictEqual(transport.getSentMessagesCount(), 1);

    const sentMessage = transport.getLastSentMessage();
    assert.strictEqual(sentMessage?.subject, "Welcome to our app!");
    assert.strictEqual(sentMessage?.recipients[0].address, "newuser@example.com");
  });

  it("should handle email failures gracefully", async () => {
    // Simulate a failure
    transport.setNextResponse({
      successful: false,
      errorMessages: ["Invalid recipient address"],
    });

    const message = createMessage({
      from: "test@yourapp.com",
      to: "invalid-email",
      subject: "Test",
      content: { text: "Test" },
    });

    const receipt = await transport.send(message);

    assert.strictEqual(receipt.successful, false);
    assert.ok(receipt.errorMessages.includes("Invalid recipient address"));
  });
});
The key testing methods:
getSentMessagesCount(): How many emails were “sent”getLastSentMessage(): The most recent messagegetSentMessages(): All messages as an arraysetNextResponse(): Force the next send to succeed or fail with specific errors
Simulating real-world conditions
import { MockTransport } from "@upyo/mock";

// Simulate network delays
const slowTransport = new MockTransport({
  delay: 500, // 500ms delay per email
});

// Simulate random failures (10% failure rate)
const unreliableTransport = new MockTransport({
  failureRate: 0.1,
});

// Simulate variable latency
const realisticTransport = new MockTransport({
  randomDelayRange: { min: 100, max: 500 },
});
Testing async email workflows
import { MockTransport } from "@upyo/mock";

const transport = new MockTransport();

// Start your async operation that sends emails
startUserRegistration("newuser@example.com");

// Wait for the expected emails to be sent
await transport.waitForMessageCount(2, 5000); // Wait for 2 emails, 5s timeout

// Or wait for a specific email
const welcomeEmail = await transport.waitForMessage(
  (msg) => msg.subject.includes("Welcome"),
  3000
);

console.log("Welcome email was sent:", welcomeEmail.subject);
Part 8: Provider failover with PoolTransport
What happens if your email provider goes down? For mission-critical applications, you need redundancy. PoolTransport combines multiple providers with automatic failover—if one fails, it tries the next.
import { PoolTransport } from "@upyo/pool";
import { ResendTransport } from "@upyo/resend";
import { SendGridTransport } from "@upyo/sendgrid";
import { MailgunTransport } from "@upyo/mailgun";
import { createMessage } from "@upyo/core";

// Create multiple transports
const resend = new ResendTransport({ apiKey: process.env.RESEND_API_KEY! });
const sendgrid = new SendGridTransport({ apiKey: process.env.SENDGRID_API_KEY! });
const mailgun = new MailgunTransport({
  apiKey: process.env.MAILGUN_API_KEY!,
  domain: "mg.yourdomain.com",
});

// Combine them with priority-based failover
const transport = new PoolTransport({
  strategy: "priority",
  transports: [
    { transport: resend, priority: 100 },    // Try first
    { transport: sendgrid, priority: 50 },   // Fallback
    { transport: mailgun, priority: 10 },    // Last resort
  ],
  maxRetries: 3,
});

const message = createMessage({
  from: "critical@yourdomain.com",
  to: "admin@example.com",
  subject: "Critical alert",
  content: { text: "This email will try multiple providers if needed." },
});

const receipt = await transport.send(message);
// Automatically tries Resend first, then SendGrid, then Mailgun if others fail
The priority values determine the order—higher numbers are tried first. If Resend fails (network error, rate limit, etc.), the pool automatically retries with SendGrid, then Mailgun.
For more advanced routing strategies (weighted distribution, content-based routing), see the pool transport documentation.
Part 9: Observability with OpenTelemetry
In production, you'll want to track email metrics: send rates, failure rates, latency. Upyo integrates with OpenTelemetry:
import { createOpenTelemetryTransport } from "@upyo/opentelemetry";
import { SmtpTransport } from "@upyo/smtp";

const baseTransport = new SmtpTransport({
  host: "smtp.example.com",
  port: 587,
  auth: { user: "user", pass: "password" },
});

const transport = createOpenTelemetryTransport(baseTransport, {
  serviceName: "email-service",
  tracing: { enabled: true },
  metrics: { enabled: true },
});

// Now all email operations generate traces and metrics automatically
await transport.send(message);
This gives you:
- Delivery success/failure rates
- Send operation latency histograms
- Error classification by type
- Distributed tracing for debugging
See the OpenTelemetry documentation for details.
Quick reference: choosing the right transport
| Scenario | Recommended Transport |
|---|---|
| Development/testing | Gmail SMTP or MockTransport |
| Small production app | Resend or SendGrid |
| High volume (100k+/month) | Amazon SES |
| Edge functions | Resend, SendGrid, or Mailgun |
| Self-hosted infrastructure | SMTP with DKIM |
| Mission-critical | PoolTransport with failover |
| EU data residency | Mailgun (EU region) or self-hosted |
Wrapping up
This guide covered the most popular transports, but Upyo also supports:
- JMAP: Modern email protocol (RFC 8620/8621) for JMAP-compatible servers like Fastmail and Stalwart
- Plunk: Developer-friendly email service with self-hosting option
And you can always create a custom transport for any email service not yet supported.
Resources
- 📚 Documentation
- 📦 npm packages
- 📦 JSR packages
- 🐙 GitHub repository
Have questions or feedback? Feel free to open an issue.
What's been your biggest pain point when sending emails from JavaScript? Let me know in the comments—I'm curious what challenges others have run into.
Upyo (pronounced /oo-pyo/) comes from the Korean word 郵票, meaning “postage stamp.”
![]() 洪 民憙 (Hong Minhee) shared the below article:
洪 民憙 (Hong Minhee) shared the below article:
2025 Q4 Review
Jaeyeol Lee @kodingwarrior@hackers.pub
이번 분기는 그렇게 기대는 많이 하지는 않았는데, 이것저것 벌려놓은 일들은 있었어서 이거라도 수습은 해야겠다라는 마음가짐은 했던 것 같다. 벌려놓은 일이 많았던 만큼 역시나 업보를 청산하느라 정신이 없는 나날의 연속이었고, 그러면서도 나름 만족스러운 하루를 보내고 있었다. 그러면서도 여러가지 좋은 소식도 생겼다. 기대했던 것들을 상회하는 좋은 기회를 누리고 있어서 요즘은 매일마다 도파민이 넘치고 있는 삶을 살고 있다. 자세한 얘기는...... 후술하도록 하겠다.
Timeline
이번에도 업보청산하느라 정신없는 나날을 보내고 있었고, 그러면서도 중요한 이벤트도 몇 가지 일어났다.
- 2025-10-06 (일본 IT 회사와의 첫 캐주얼 면담) : 지난 분기 마지막 쯤에 PyCon JP에서 알게된 좋은 인연을 통해서, 일본 소재의 IT 회사에서 원격으로 캐주얼 면담할 기회를 가질 수 있었다. 듀오링고로 겨우 체득한 어설픈 일본어 구사 실력, 읽고 쓰는 쪽으로는 문제가 없지만 듣고 말하는 쪽으로는 부족한 영어 실력이었기 때문에 여러모로 걱정은 되었는데 한국인 직원 분이 중간에 통역을 해주신 덕분에 나에 대해서 어필할 수도 있고, 일본의 IT 회사는 어떤 분위기인지 알아가는 유익한 시간을 보낼 수 있었다.
- 이 시점까지만 해도..... 일본으로 꼭 가고 싶은 생각이 들었던 것 같다. 한 6개월 정도는 길게 보고 준비해야겠다는 생각을 했을 정도니까.
- 2025-10-15 (구직 시작) : OSSCA 프로그램도 슬슬 끝나가고 있었던 시점이어서, 이력서도 완성하고 구직을 시동걸기 시작했다. 이력서는 평소에 했던 것처럼 typst로 깎았는데, 2 column 구조로 어떻게든 공백을 채웠던 것 같다. 이 때 당시까지만 해도, Fedify 프로젝트 기여할 때 NestJS 미들웨어를 개발했던 경험을 살려서 NodeJS 백엔드 개발자 혹은 풀스택 개발자 지원해야겠다는 마음가짐을 가지고 있었던 것 같다. 경력은 사실상 망하긴 했지만 외부활동을 나름? 열심히 했던 덕분인지 생각했던 것보다 채워넣을 수 있는 내용들이 많았다. 한 10명 정도 되는 분들한테 이력서 피드백을 요청했었는데, 전부 긍정적인 평가를 받았다. 이력서는 여기서 볼 수 있다.
- 2025-10-25 (브라우저 스터디 시작) : Fedify 팀에서의 인연 (그리고, 누군가의 팬클럽 디스코드)으로 알게된 사람들과 밑바닥에서부터 만드는 웹 브라우저 라는 책으로 스터디를 시작했다. 다들 프로그래밍에 어느 정도는 자신있는 사람들이었어서, 매 챕터마다 연습문제를 모두 풀어오는 하드코어한 스터디였다. 풀스택 엔지니어로서의 근무를 희망하는 사람으로서 브라우저의 동작 원리를 제대로 이해하지 않으면 안되겠다는 생각이 들었기 때문에, 구직을 성공하기 전까지는 누구보다 진도를 앞서서 진행하고 매주마다 연습문제를 전부 다 풀고 Hackers Pub에도 풀이글을 꾸준히 게시했던 것 같다. 구직을 성공하기 전까지는.....
- 어떻게든 16챕터까지 전부 풀어서 이걸로 나만의 스토리를 만들고 싶었던 욕심은 있지만, 2025년 12월 31일 기준, 챕터 5까지만 진도를 끝내고 멈춘 상태인 지금 당장의 나로서는 지금 내가 하고 있는 일에 충실해야겠다는 판단이 들어서 당분간은 미루고 있다.
- 책 자체는 웹 개발을 공부한다기보다는 브라우저를 진짜로 밑바닥에서부터 만들면서 이해하는 교재이다보니 프론트엔드 개발 비슷한걸 기대한 사람들에게는 약간 당혹감을 느낄 수도 있다. 첫장부터 **"소켓프로그래밍"**으로 직접 HTTP 프로토콜로 요청을 쏘고 HTML 응답을 읽어들여서 화면에 GUI 툴킷으로 어떻게든 뿌리는 **"데스크톱 어플리케이션"**을 만드는 것이기 때문이다. 같이 스터디했던 분의 표현을 빌리자면, 사실상 게임엔진을 만드는 것이랑 유사하다.
- 코드를 직접 따라치는 것 만으로도 벅차다고 느낄 수도 있긴 한데, 연습문제를 푸는 것도 굉장히 해볼만한 도전과제라고 생각하고 있다. "여기 있는 연습문제를 모두 풀 수 있는 사람이라면 어딜 가도 먹히지 않을까?" 라는 생각도 들곤 하는데, 나 말고도 연습문제를 푸는 스터디를 했던 사람이라면 모두 공감할 것이다.
- 2025-11-01 (OSSCA 성과 발표회) : 길다면 길었고, 짧다면 짧았던 OSSCA 일정이 끝이 났다. Fedify 팀을 대표해서 OSSCA 기간 동안 어떤 기여를 했는지 발표하는 시간을 가졌다. 여기저기 UbuCon Korea/PyCon Korea/NeovimConf.live 등등에서 발표해본 경험은 있었기 때문에, 내가 발표하는게 맞겠다는 생각이 들어서 자진해서 지원했다. 다만..... OSSCA 성과 발표회에서는 대본만 열심히 준비했고, 대본을 안 보고 발표를 할 수도 있다는 가능성을 생각하지 못해서 만족스러운 수준으로 발표하지는 못했다. OSSCA를 중심으로 오픈소스 기여하는 사람들을 어셈블해서 Hackers Pub을 부흥시키겠다는 원대한 계획이 실현되지는 못해서 아쉬운 감은 없지 않다.
- 2025-11-04 (미국 스타트업에서의 Work trial 시작) : OSSCA 성과발표회가 있고 얼마 지나지 않아서, 어느날 갑자기 미국의 어떤 스타트업 CTO분한테서 커피챗 관련으로 연락이 왔다. 당장 미국으로 갈 계획까지는 없었지만, 어떻게든 진짜 구직을 해야겠다고 생각하고 있던 입장이었어서 가벼운 마음으로 커피챗을 했던 것 같다. 그리고, 그 다음날 CEO도 같이 껴서 역시 가볍게 커피챗을 진행했는데 커피챗이 끝나자마자? 바로 Work Trial을 시작했다. 매일마다 도파민에 찌든 삶을 살게 된 것은 이때부터가 시작이었다...
- ⭐️ 2025-11-15 (Work trial 수습 통과) : 2주도 안되는 Work Trial이 진행되는 동안, 정말 많은 일들이 있었던 것 같다. 뭔가 좀 부족하다 싶은 것들을 발견할때마다 PR을 올리긴 했었는데, 진행하게 된 지 거의 3~5일 만에 PR을 많이 올렸다면서 샤라웃을 받기도 했었고, 수습 7일차되는 시점에 외부 시스템을 연동하는 등의 큰 기능을 맡게 되기도 했다. 그리고 12일차에 Work trial 수습 통과했고 정식적인 멤버로 같이 할 수 있게 되었다. 당장은 미국으로 건너갈 조건이 되지 않아서 파트타임으로 일하고 있긴 하지만, 지금까지 받아왔던 대우, 지금까지 근무했던 것보다 훨씬 더 좋은 조건으로 일하고 있어서 너무 만족스럽게 살고 있다. 구직을 본격적으로 시작한지 한 달 만에 자리 잡았다는 것 자체도 사실은 안 믿긴다.
- 회사에 대해서 자랑을 좀 하자면.......
- 최고의 복지는 동료라고 했던가? 누구보다 제품개발에 진심이고 배울 점이 많은 사람들과 함께 하고 있다. 소수 정예로 돌아가는 팀이긴 하지만, 소규모 팀에서만 일한 경험만 남는 것에 대한 불안이 오히려 줄어들었다.
- 어떻게 보면 당연하지만, 풀재택이 가능한, 근무조건이 굉장히 자유로운 회사이다. 명목상으로는 근무시간을 11:00 ~ 20:00 정도로 두고 주 40시간 기준으로 계약을 하긴 했지만, 프로젝트 일정에 지장이 생기지만 않는다면 자율적으로 일할 수 있는 회사이다. (물론, 나는 자발적으로 50시간 이상은 채워서 일하고 있다.)
- 근무조건이 굉장히 자유로워서 두 달 혹은 세 달에 한번 정도는 일본에서 길게 워케이션하는 것도 한번 상상해볼 수 있는 처지가 되었다. 실제로, 11월 21일 ~ 24일에는 Fedify 팀과 같이 후쿠오카 여행을 하다가도 중간에 비는 시간에 회사 업무를 보기도 했었다.
- 회사 자체의 비즈니스가 마음에 든다. 교육이라는 분야에 꾸준히 관심은 있었고, 관련 도메인에서 일해본 적이 두-세차례 정도 있었다. 내가 좋아하는 도메인에서, 비전이 있는 사업을 하고 있기 때문에 더욱 몰입해서 일하게 되는 것 같다.
- 포괄이라는 개념이 없다. 페이는 시급 단위로 계산하기 때문에, 일을 한 만큼 더 받아갈 수 있다. 그래서, 무리하지 않는 선에서 최대한 땡겼더니 전 직장 대비 60%-75% 까지 더 끌어당겨서 받고 있다.
- AI 도구를 굉장히 적극적으로 쓰고 있는 회사이다. 교육 분야를 AI로 개척하는 사업을 하고 있기도 하지만, 그 과정에서 AI를 어떻게 활용할 수 있는지 어깨너머로 배워갈 수 있다. 개발생산성을 높이기 위한 AI 도구 도입도 굉장히 열려있는 편이고, 워크플로우 개선에 대해서도 진지하게 고민을 많이 하고 있는 동료들과 함께하고 있다보니 AI 도구를 더욱 잘 쓰게 되는 것 같다. AI 도구 활용에 있어서 시너지 효과를 낼 수 있는 환경에서 일하고 있다.
- 사실 기술 스택에 대해서 별로 호불호 의견이 있는 편도 아니기도 하고 내가 밥벌이 할 수 있으면 그걸로 그만이라는 인식이 없지는 않지만, 내가 원하는 기술 스택으로 일하고 있다. 크게 보면 Python(FastAPI) + React 조합으로 일하고 있는데, 최근에 여러가지 기술적인 도전을 하고 있어서, 필수불가결하게 새로운 스택도 점진적으로 도입하고 있다. 궁금하면? 커피챗으로 문의 😘
- 어떻게 보면, 나는 운이 좋아서 좋은 조건의 회사에서 일할 수 있게 되었긴 하지만.... 2025년 12월 기준으로 국내에 좋은 일자리가 열려있지 않은 현재 기준으로는, 해외로 눈을 돌리는 것도 나쁘지 않은 선택지인 것 같다.
- 회사에 대해서 자랑을 좀 하자면.......
- ⭐️ 2025-11-30 (VIMRC 2025 진행) : 2025년 7월 6일부터 시작했던 VIMRC 2025 진행을 무사히 끝냈다. 이번 VIMRC 2025 행사에서 라이트닝토크 발표를 지원해주셨던 오정민님/위성훈님/황정현님/이광효님/이승록님/이효승님께 정말 감사함을 느끼고 있다. 스티커 굿즈를 만들어 주신 어떤 프리랜서 분에게도 감사함을 느끼고 있다. 그리고, 네트워킹 세션을 같이 진행해 주셨던 김대현님한테도 신세를 많이 졌다. 재치있는 굿즈 스티커 디자인을 맡아주신 백송민님도, VIMRC 2025까지 같이 달려주신 다른 vim.kr 모더레이터 분들도 감사...
- VIMRC 2025 행사는 라이트닝토크도 재밌는 컨텐츠가 많았지만, 네트워킹 시간도 굉장히 알찼다. 일단 내가 있었던 테이블 기준으로는 스플릿 키보드를 직접 커스터마이징해서 시연하는 분이 계셨는데, 현장에 있는 분들이 물개박수를 칠 정도. 김대현님이 있었던 테이블은 Neovim 플러그인 개발자 뿐만이 아니라 Neovim 코어에도 기여했던 분들이 계셨어서 그 쪽도 그 쪽 나름대로 재밌는 컨텐츠가 있었을 것으로 생각된다.
- VIMRC 2025 공식 일정이 끝나고 난 다음에는 뒷풀이를 2차/3차까지 달렸는데, 9시 30분 카페가 문 닫는 시간까지 서로 인생 살아가는 얘기하다가 Vim 관련 얘기로 컨텐츠가 가득한 알찬 하루를 보낼 수 있었다. 내가 이런 모임을 주최할 수 있었다는 것 자체도 믿기지가 않는다.
- 한편 아쉬운 부분도 많았다. 단체사진 찍어놓을걸...... 라이트닝토크 발표 현장 녹화도 떠놓을걸..... 행사 현장의 사진을 좀 더 많이 찍어놓을 걸......
크게 보자면 뭔가 좀 적은 것 같긴 한데, 좋은 일들이 가득한 나날이었다. 지금 당장은 회사 쪽 일에 전념하고 싶기도 하고, 향후에 근황 공유를 하더라도 좀 심심할 수 있겠다는 생각은 들고 있다. 한 4년 전 쯤, 리걸테크 분야 회사에서 일했던 것과 비슷한 심정을 느끼고 있는데, 지금 회사에 있는 매 순간순간이 성장하고 있다는 느낌이 들고 있고, 긍정적인 의미로 한계에 도전하게 되는 일들이 많다. 회사의 성장이 곧 나의 성장이라는 확신이 들게 하는 환경이고, 회사 일 자체가 정말 재밌기도 해서 스스로가 워커홀릭이 되어가는게 느껴진다.
참...... 인생 살다가도 모르는 일이다. 3년 내내 어디에다가 말하기도 어려운 힘든 나날을 보내기만 했는데, 문득 좋은 기회가 찾아와서 이렇게 행복하게 살아도 되는건가 싶은 생각을 늘상 하고 있다. 뭐, 지금은 즐겨야지 싶다.
지금 상태를 요약하자면....
- 지금까지 받아왔던 대우보다 훨씬 상회하는 조건의 좋은 회사에서 근무할 수 있게 되었다.
- 그 이후로 삶이 더더욱 윤택하게 되었고, 매일마다 행복하다는 생각을 요즘 들어서 하게 되었다.
- 매사를 조금이나마 긍정적으로 생각할 수 있게 되었다.
그리고, 어쩌다보니 좋은 기회가 생겨서 책을 쓰게 되었는데 조만간 소식을 공유할 수 있으면 좋겠다.
다음엔 뭘 해볼까?
말 그대로 오늘내일하는 삶을 살아왔기 때문에, 회고라는 것도 딱히 생각도 없었고, (있는 그대로 말하면 어지간하면 경악할만한) 열악한 환경에서 살아왔기 때문에 더 나은 미래를 가정한다는 것 자체가 성립이 되지 않았는데, "이제는 진짜 바뀔 수 있다" 라는 확신이 들고 있다. 거의 3-4년을 무기력하고 우울한 삶, 악순환의 고리 속에서 살아왔는데 이제는 좀 달라졌다.
해외 컨퍼런스에 좀 더 적극적으로 참여해보자
올해에 PyCon JP에 참여한 이후로, 해외 컨퍼런스에 좀 더 많이 참여해보고 싶은 생각이 들었다. PyCon JP에서도 좋은 인연들을 알아갈 수 있었고, 좋은 기회를 얻을뻔도 했었다. 심지어, FastAPI 메인테이너인 tiangolo님과도 같이 사진을 찍을 수 있었다. 이런 맛으로 해외 컨퍼런스에 참여하는 것일까? 올해에 참여한 해외 컨퍼런스는 PyCon JP 밖에 없었지만, 내년에는 홍콩에도 가보고 필리핀에도 가보고 PyCon JP는 당연히 참여를 하는거고, 특히 일본에서 열리는 VimConf는 이번에는 반드시 참가하고 말 것이라는 확고한 의지가 있다.
내년에는 그래도, 내가 생각하는 것을 자유롭게 표현할 수 있는 수준으로는 능숙해질 필요는 있어야겠어서 전화영어는 알아보고 있다. 지금 일하고 있는 회사가 현지 직원을 채용하고 있기도 해서, 이제는 영어로 회화하는건 피할 수가 없는 현실이 되었다. 그리고.... 돈 모아서 PyCon US 갈 생각도 이미 하고 있다.
좀 더 좋은 영향력을 행사할 수 있도록 하자
Python 생태계에 언젠가는 기여를 해야겠다고 생각만 해왔던 것 같다. 내가 애정을 가져왔고 지금도 애정을 가지는 언어 생태계에서 밥벌이를 시작한 만큼, 이제는 좀 기여할 수 있는 여지도 명분도 충분히 생겼다. 여러 생태계를 관찰하면서 느낀 점이 있는데, 개발 커뮤니티 생태계가 성숙해지려면 여러가지 요소가 필요하다. 그나마 직관적으로 와닿는 예시를 들자면.. (1) 좋은 일자리, (2) 보고 배울 수 있는 멘토, (3) 질적인 네트워킹, (4) 포용적인 분위기, (5) 상호간 영감을 주면서 시너지를 낼 수 있는 환경 정도 되겠다. 그렇지 않은 환경을 수차례 관찰을 해온 적이 있기 때문에 더욱 실감하고 있는 부분이기도 하다.
커뮤니티를 직접 빌드하는건 이미 벌려놓은게 있으니 지금 하는거라도 잘해야겠다 치더라도, 이미 이렇게 자리를 잡게 된 이상 (내가 하고 있는 일을 더욱 잘해서) Python 생태계의 양질의 일자리를 더 확보하는데 기여를 해야겠고, 어딜 내놔도 부끄러운 사람이 되지 않기 위해 더욱 분발해서 Python 생태계의 보고 배울 수 있는 멘토가 되고 싶고, 필요하다면 여기저기 발표도 해보고 싶다. 2026년 목표는 해외 Python 관련 행사에서 영어로 발표해본다? 정도 될 것 같다.
비즈니스적으로 기여할 수 있는 사람이 되도록 하자
개발자로서 기술만 잘한다고 해서 좋은 결과를 만들 수 있는 건 아니다. 주변 지인분들의 표현을 빌리자면, 개발자도 어떻게 보면 회사의 일원이다. 스스로는 회사의 일원으로서, 특히 어느 정도 연차가 있는 사람으로서, 회사의 비즈니스적인 성장에 기여할 의무는 어느 정도 있다고 생각하는 편이다.
현재 회사에서 일하면서 AI 도구를 활용하거나 워크플로우를 개선하는 과정을 통해, 기술이 어떻게 비즈니스 임팩트를 만드는지 배워가고 있다. 앞으로는 "이 기능이 사용자에게 어떤 가치를 줄까" "이 기술 선택이 비용과 시간 면에서 타당할까"라는 질문을 더 자주 던질 수 있는 엔지니어가 되고 싶다. 좋은 제품은 좋은 코드와 좋은 비즈니스 센스의 조화에서 나온다.
내실을 좀 더 다듬도록 하자
서른이 넘은지 시간이 어느 정도는 지난 지금 생각해보면, 스스로를 돌아볼 기회가 없었다. 그냥 말 그대로 미래라는게 없었다고 생각되었기 때문이다. 좋은 동료와 일하는 경험의 부재, 진지하게 제품 개발에 임할 수 있는 기회의 부재, 대외활동은 적극적으로 해오긴 했지만 결과적으로는 본업의 불만족으로 인한 우울감 때문에 일상을 제대로 유지하기도 어려웠다. 인생이 이따위인데 뭔 회고인가? 라는 꼬인 생각도 했었던 것 같다. 이제는 좀 확실하게 달라졌다.
진심박치기 모드일 때는 다르다고 확신은 하고 있었고, 이젠 진심박치기 모드일 수 있는 기회가 왔다. 해볼 수 있는 것들은 다 해보고 싶고, 본업에 충실한 나로서 제대로 인정받고 싶다. 본업으로 같이 일하고 싶은 동료로서, 사람 대 사람으로서 안심할 수 있는 사람으로서. 내가 인정하는 내가 인정받고 싶은 사람들과 함께 하는 시간이 많아지다보니, 사고의 흐름이 자연스럽게 변하게 된 것 같다.
이번엔 진짜 최선을 다해서 살아볼까싶다.
strcpy도 사용 금지
------------------------------
- cURL 프로젝트가 기존에 strncpy()를 제거한 데 이어, 이제 *strcpy()도 코드베이스에서 완전히 금지* 함
- strcpy()는 API가 단순하지만 *버퍼 크기 검증이 분리될 위험* 이 있어, 장기 유지보수 시 안전하지 않음
- 이를 대신해 *curlx_strcopy()* 라는 새 함수가 도입되어, 대상 버퍼 크기와 문자열 …
------------------------------
https://news.hada.io/topic?id=25474&utm_source=googlechat&utm_medium=bot&utm_campaign=1834
2026년 병오년 새해를 맞아 식탁보 1.16.0 버전을 출시했습니다. 이번 버전에서는 폴더 마운트 기능, 그리고 백그라운드 비동기 다운로드를 구현하여 이전보다 최대 30~40% 이상 빨라진 환경 구축 속도를 달성했습니다.
코딩 AI 어시스턴트의 도움을 받아 계속해서 빠른 출시와 적극적인 기능 반영을 이어 나가도록 하겠습니다. 많은 공유와 후원을 계속 부탁드리겠습니다!
#식탁보 #인터넷뱅킹 #NPKI #보안 #플러그인 #공동인증서
https://github.com/yourtablecloth/TableCloth/releases/tag/v1.16.0
2026年에도 새해 福 많이 받으세요!
연말을 맞이하여 주요 저장소들의 AGENTS.md/CLAUDE.md 문서 업데이트 중…
VCS와 패키지 매니저가 통합되어야 한단 얘기를 했었는데, shadcn의 인기가 그런 방향에 대한 지지를 간접적으로 보여주고 있다. shadcn은 UI 라이브러리를 만들어봤자 어차피 고쳐쓰는 경우가 많아서 나왔다. 문제는 기존의 npm 패키지 같은 것들은 받는건 쉬운데 그다음에 고치는게 열불터지는 것이다.
- 조건에 맞는 소스 코드를 받는 것 2. 그걸 고치는 것, 에서 패키지 매니저는 1은 잘하는데 2를 불편하게 만든다. VCS는 1을 할수있는데, 약간 번거롭게 되어있고(git submodule을 생각해보라), 2는 당연히 쉽다. VCS에서 1을 개선해야한다.
오늘은 고등학교 때 만들다 말았던 라이브러리를 얼추 마무리 지었다. Claude랑 같이 스펙 문서 만들고, 이를 바탕으로 작업하도록 했다. 당시에 하라는 FAT 덤프 파싱은 안 하고 Python에서 편하게 파싱하고 싶어서 만들기 시작했던 라이브러리고 취업하게 되서 이후로 안 봤었는데, Claude Code 덕분에 이제는 보내줄(?) 수 있을 것 같다.
근데 당시에 파서 콤비네이터를 몰랐어서 그랬고 지금은 파서 콤비네이터를 쓸 것 같다. 그리고 오늘 작업하면서 보게 된 건데 비슷한(?) 느낌으로 construct[1] 라는 라이브러리의 존재도 알게 되었다.
이제 Python을 잘 안 쓰고, 원래 시작점이었던 포렌식도 안 하니까 쓸 일은 없겠지만 그래도 당시 2019년 Hacktoberfest 시기에 필드 추가 기여도 받아보고 좋은 기억의 라이브러리였다.
https://github.com/moreal/pystructs/
![]() @hongminhee洪 民憙 (Hong Minhee) OpenCode 는 어떤점이 좋으셨어요?
@hongminhee洪 民憙 (Hong Minhee) OpenCode 는 어떤점이 좋으셨어요?
![]() @jLEE Jaeyoung OpenCode가 특별히 Claude Code보다 좋은 점은 아직 크게 못 느낀 것 같아요. 아, LSP를 지원하다는 것 정도…? 근데 Claude Code도 최근에 LSP 지원이 들어왔다고 듣긴 해서 (LSP를 쓴다는 느낌을 받은 적은 없지만요), 이 부분은 좀 애매하네요. 다만 OpenCode가 오픈 소스인데다 확장성이 좋아서 그 부분을 기대하고 있어요. 아, 그리고 세션 중간에 모델(아예 다른 업체의 모델로도)을 바꿀 수 있는 것도 좋은 것 같습니다.
@jLEE Jaeyoung OpenCode가 특별히 Claude Code보다 좋은 점은 아직 크게 못 느낀 것 같아요. 아, LSP를 지원하다는 것 정도…? 근데 Claude Code도 최근에 LSP 지원이 들어왔다고 듣긴 해서 (LSP를 쓴다는 느낌을 받은 적은 없지만요), 이 부분은 좀 애매하네요. 다만 OpenCode가 오픈 소스인데다 확장성이 좋아서 그 부분을 기대하고 있어요. 아, 그리고 세션 중간에 모델(아예 다른 업체의 모델로도)을 바꿀 수 있는 것도 좋은 것 같습니다.
Released Vertana 0.1.0—agentic #translation for #TypeScript/#JavaScript.
Instead of just passing text to an #LLM, it autonomously gathers context from linked pages and references to produce translations that actually understand what they're #translating.
- Docs: https://vertana.org/
- GitHub: https://github.com/dahlia/vertana

알고리즘을 각 잡고 공부해 본 적이 없습니다. 기본부터 천천히 다져가며 공부하고 싶은데, 좋은 책, 강의 등이 있을까요?
![]() @hongminhee洪 民憙 (Hong Minhee) openrouter(AI 모델 여러개 쓸 수 있는 인터페이스 제공하는 곳)랑 연결해서, AI 모델 여러개로 에이전트 여러개 만들어서 각자 역할분담하게 하는 전략도 있더라고요.
@hongminhee洪 民憙 (Hong Minhee) openrouter(AI 모델 여러개 쓸 수 있는 인터페이스 제공하는 곳)랑 연결해서, AI 모델 여러개로 에이전트 여러개 만들어서 각자 역할분담하게 하는 전략도 있더라고요.
저도 돈 많으면 시도해보고 싶습니다...
![]() @akastoot악하 그런 게 OpenCode만 가지고도 되는 것 같더라고요!
@akastoot악하 그런 게 OpenCode만 가지고도 되는 것 같더라고요!
평소에는 거의 Claude Code만 쓰는데, 오늘은 일부러 OpenCode를 써봤다. OpenCode에서 Claude 4.5 Opus도 써 보고, Gemini 3 Pro도 써 보고, GPT-5.2도 써 봤다. 일단 “말귀”를 잘 알아 듣는다는 점에서는 Claude 4.5 Opus와 GPT-5.2가 괜찮았던 것 같고, Gemini 3 Pro는 여러 측면에서 내 기대와는 좀 다르게 돌아갔던 것 같다. 그리고 문서 작업을 시켜보면 알 수 있는데, Gemini 3 Pro는 글을 상대적으로 못 쓴다. 이래저래 Gemini 3 Pro는 앞으로도 안 쓰게 될 듯.
OpenCode 자체는 잘 만들었다고 느꼈다. Claude Max 플랜을 그대로 쓸 수 있어서, 당분간 Claude Code 대신 메인 에이전트로 사용해 볼 예정.
今年の10月から地域の市民向けシビックテック講座に参加してるのですが、そこでたまたま挙がったテーマが個人的にとても良く、だんだん魅了されています。
ちなみにテーマはを消滅危機言語である沖縄語(沖縄方言)を残したい」で、中学生の頃になりたかった言語学者の夢を大変久々に思い出したのでした。
講座修了後も継続して取り組みたいなと思い始めたので、その気持ちに従って図書館通いの日々が始まりました。
言語を扱うので、LLMを調べたり弄ったりする機会もできて、なんだか毎日楽しいよ。
#코스모슬라이드 업로드 페이지 그냥 수제 프론트 디자인 해야 하나... 이래서 풀 스택이 어렵구나.